Installation of a warm electric floor: types and rules of laying
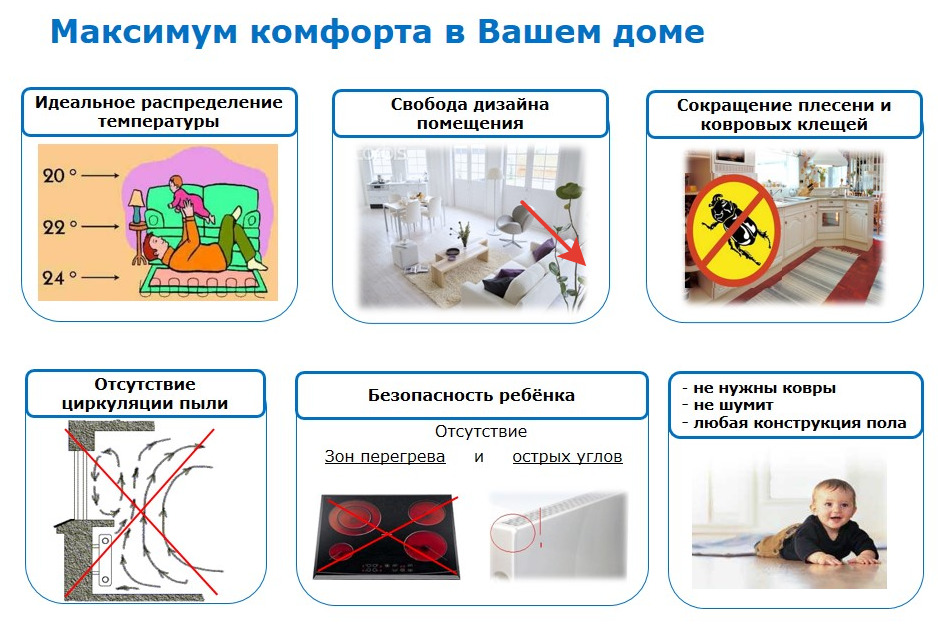
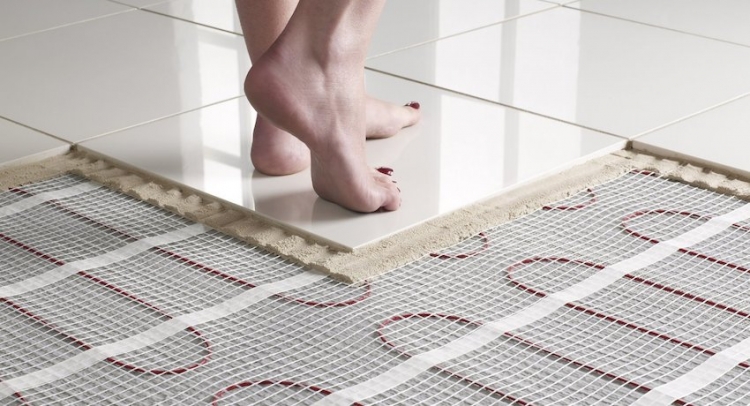
The "warm floor" system is actively used by tenants of apartments and private houses. This innovation allows you to equip a home with a comfortable microclimate and make your stay at home even more enjoyable. For this reason, many people learn the installation of a warm electric floor, the types and rules of laying their own hands.
Special features
When choosing such floors, consider the features of this product:
- Electric floor heating can only work on the basis of electricity. Therefore, this method belongs to the category of expensive, because there is no alternative in choosing a power source;
- Installation implies the exact distribution of areas on which the furniture or plumbing will be located. When installing the system will need to bypass these areas;
- Experts advise against moving furniture after the floors have been installed;
- The wire is able to work only at a temperature that does not exceed 100 degrees. Otherwise, you run the risk of overheating, due to which the cable will burn out and begin to release toxic substances;
- If mechanical damage to the floor occurs, you may receive an electric shock;
- When carrying out repairs, it is necessary to detect the affected place and put a clutch on it. If you find the source of the problem does not work, you will have to change the entire area that does not work;
- When heated, the ETP forms electromagnetic radiation, which has an adverse effect on people and pets living in the house (only applies to cable type).
Species
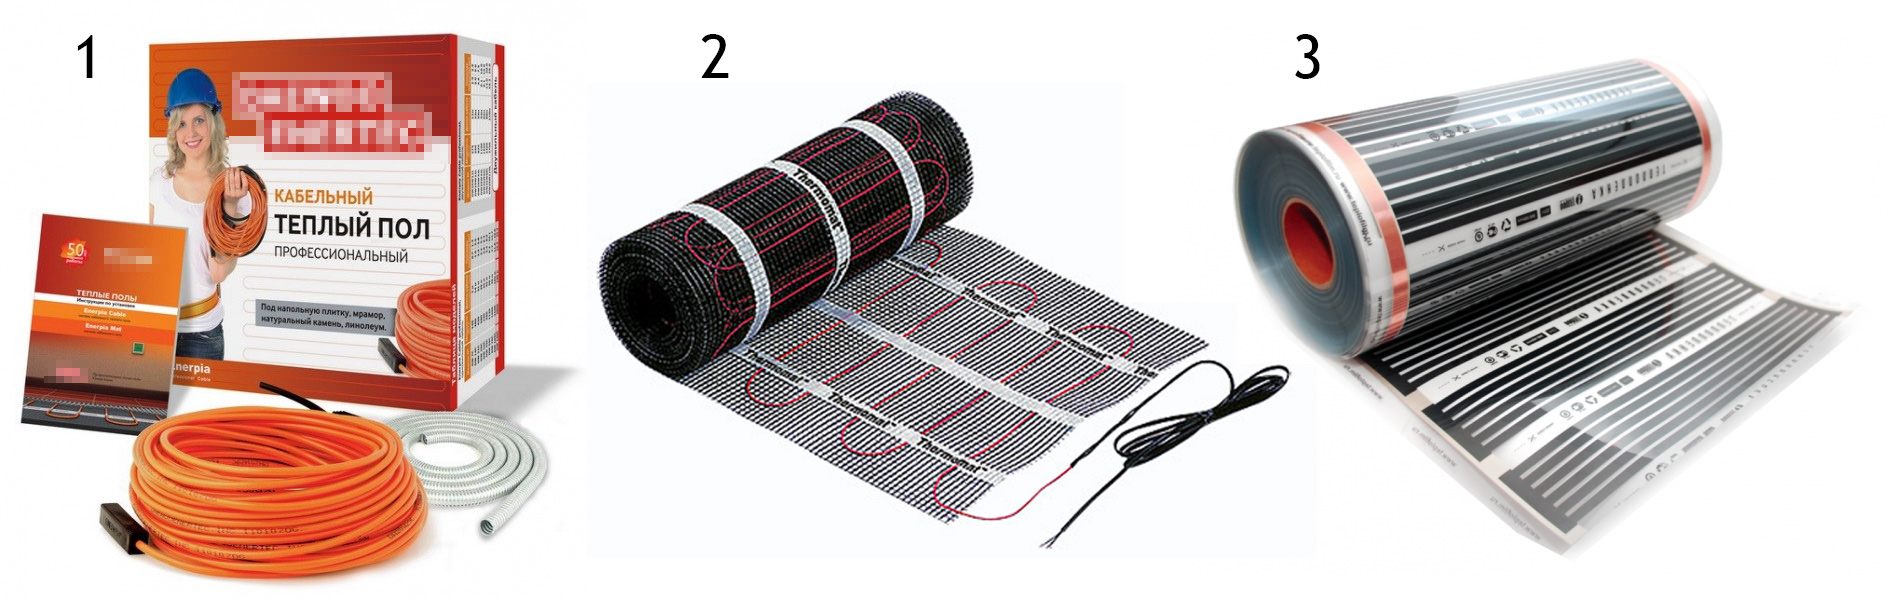
Electric floor heating can be divided into three types, which imply different ways of installation:
- Equipment with the use of heating wire. In this type there is a thermostat, a temperature sensor along with a long wire, which is provided with a double layer of insulation. This wire is used to heat the system.This ETP is considered the cheapest as well as the most difficult to install;
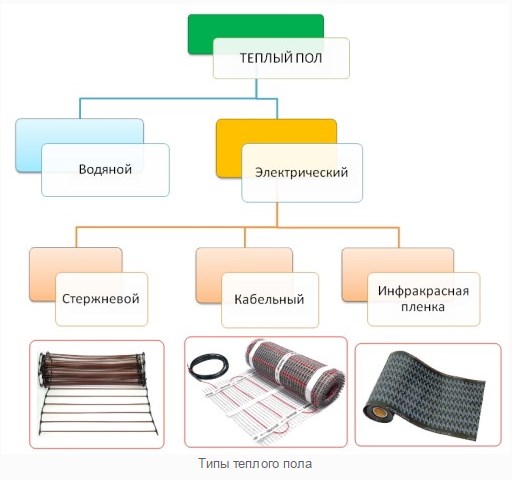
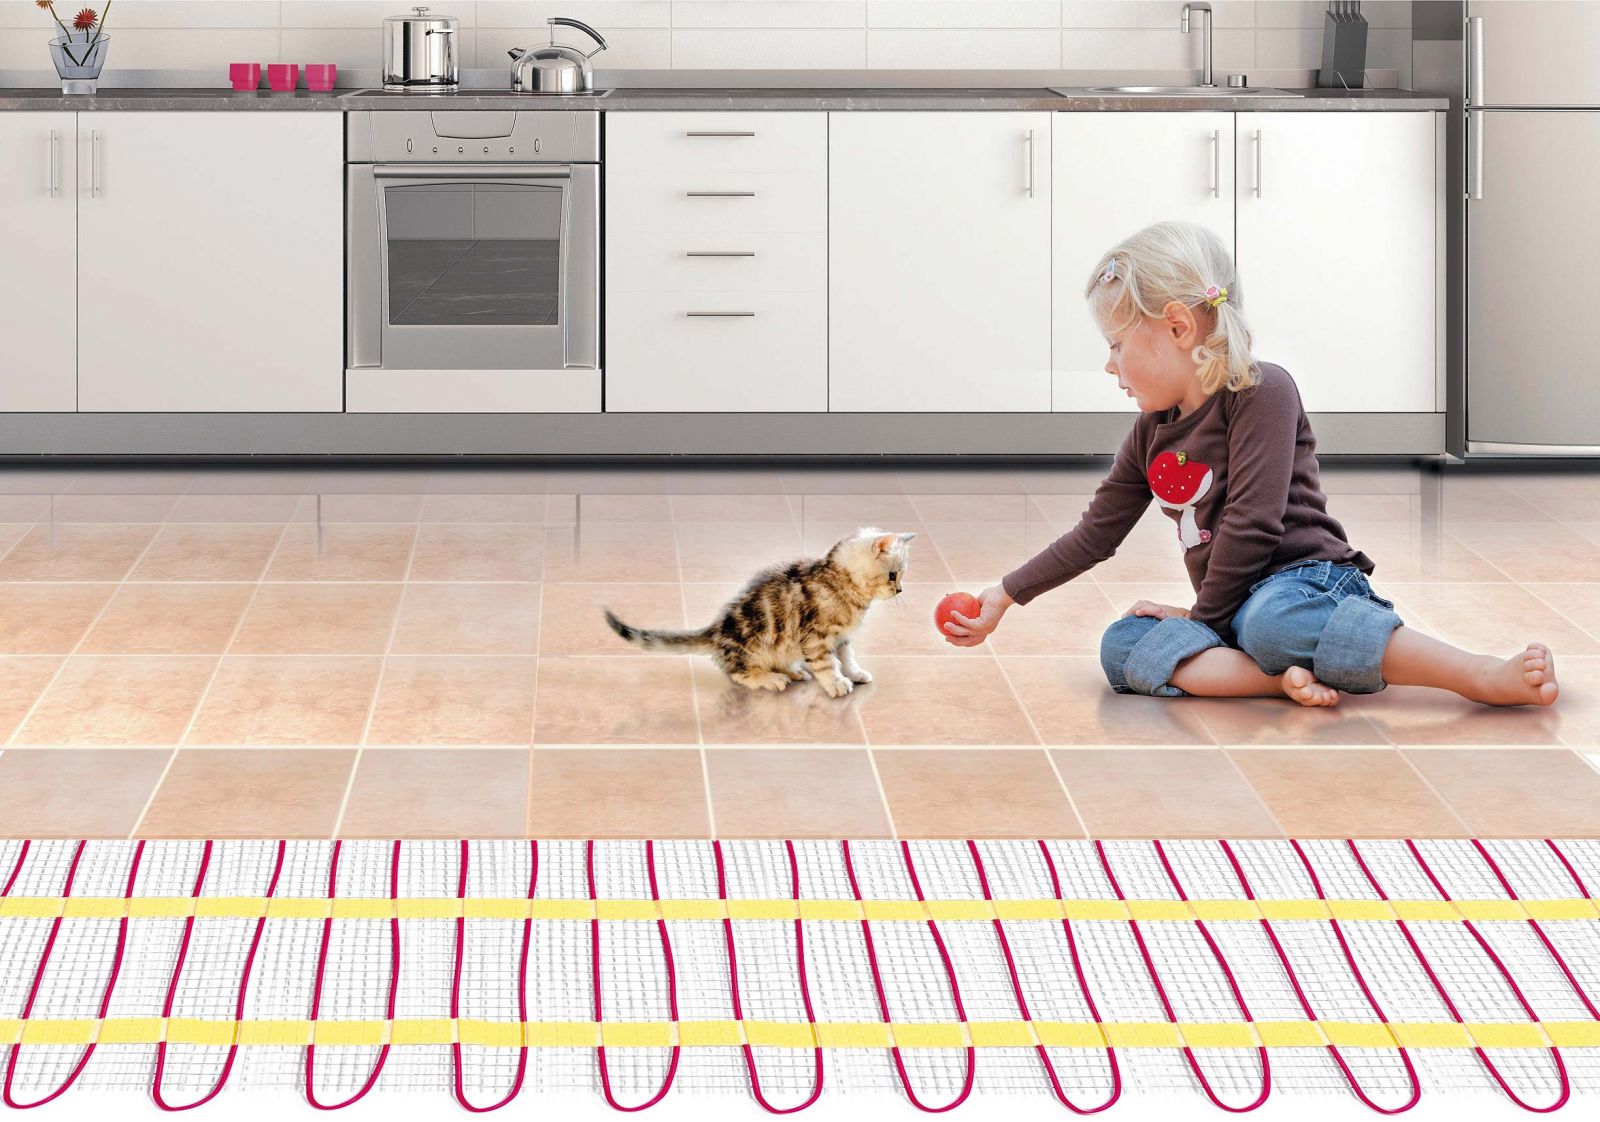
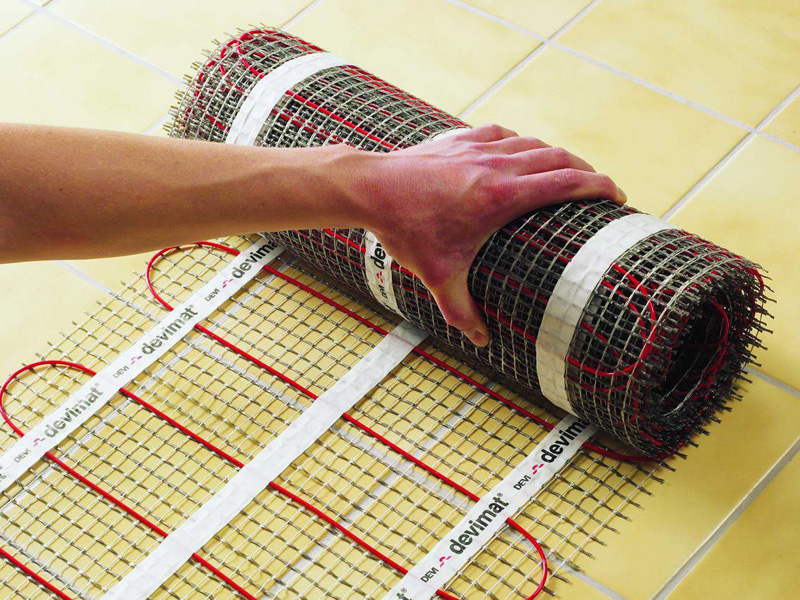
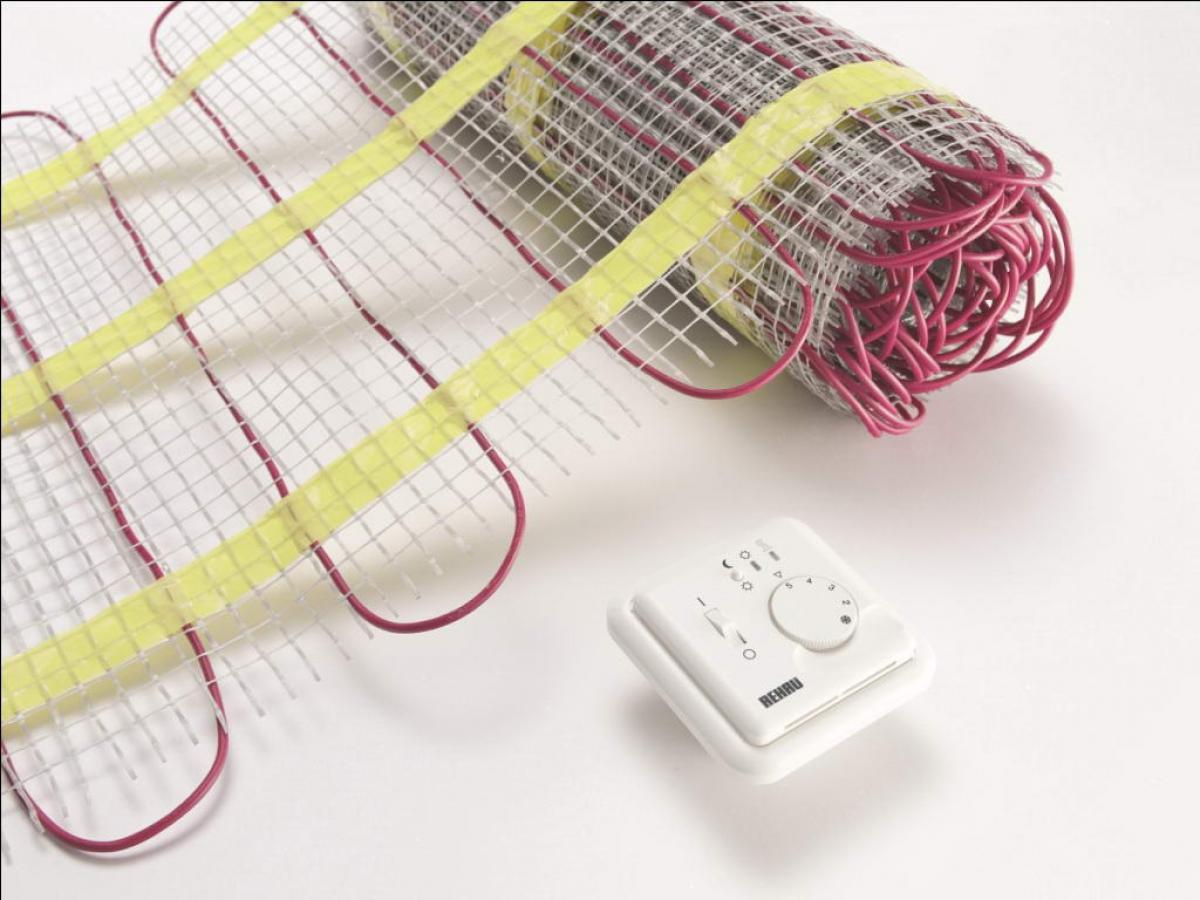
- Cable warm floor. In this system, there are heating resistive cables, which are based on heating mats. This type is distinguished by convenient installation, saving in time along with reduction of possible errors during installation;
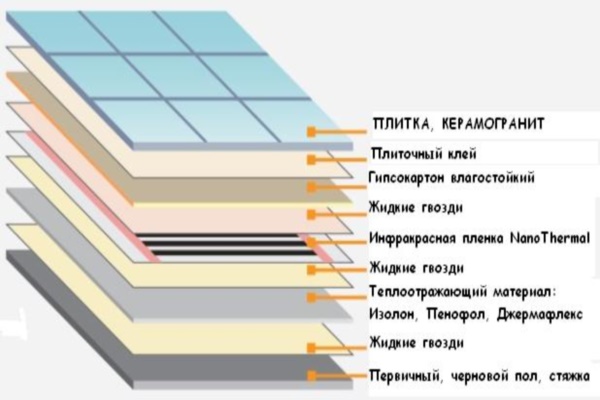
- ETP technologyThe basis of which is infrared film. Such a system is very different from other options, because here the heating is carried out by infrared radiation, which creates a carbon raw material deposited on the film. Such a floor does not require a screed, and you can put the topcoat directly on the film.

Constructions
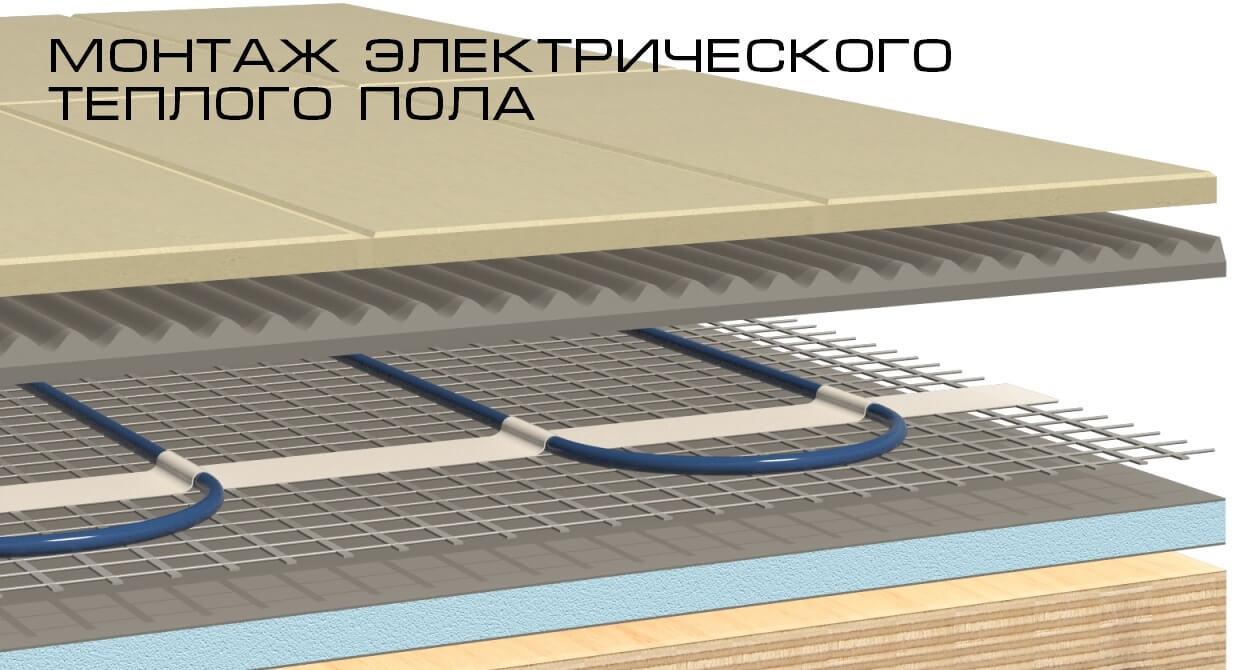
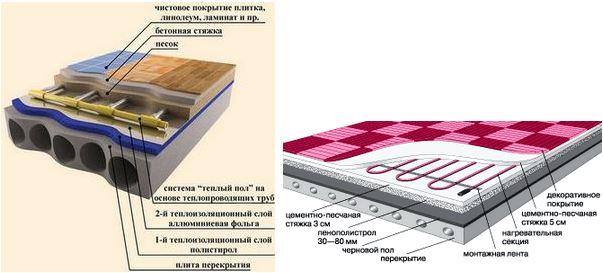
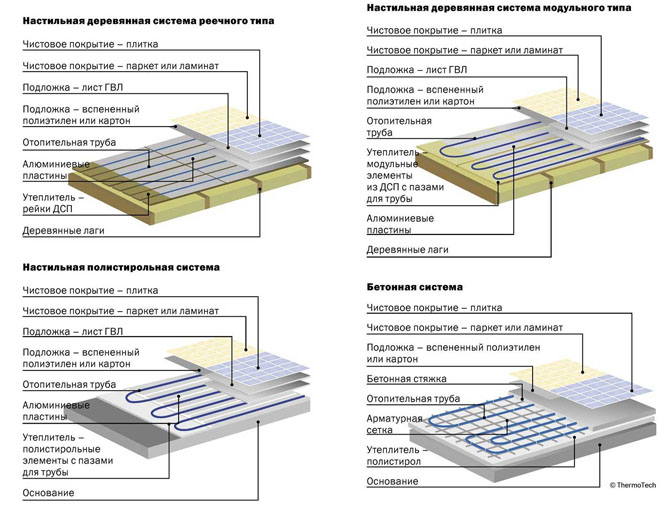
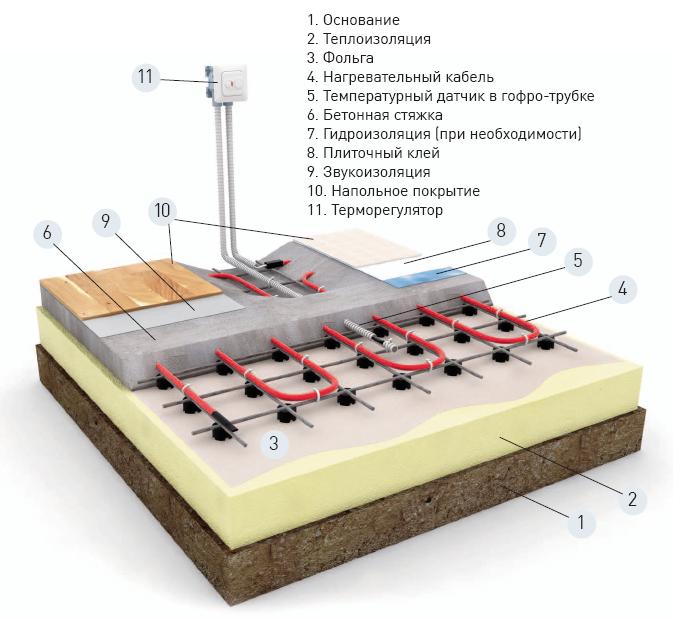
The room in which you plan to install a heated floor should be reliably protected from the formation of drafts and other heat loss options. Therefore, all heating components should be installed exclusively on the heat-insulating layer, which does not allow energy to be spent on heating the floor slabs, along with the loss of heat into the atmosphere.
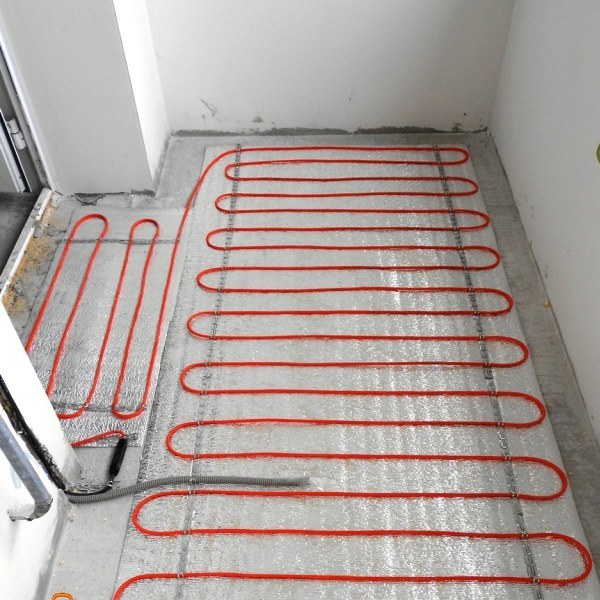
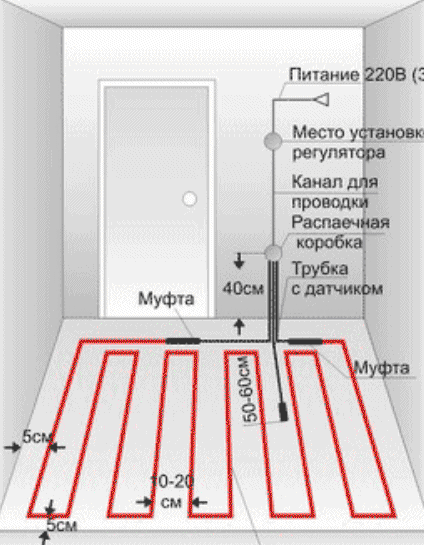
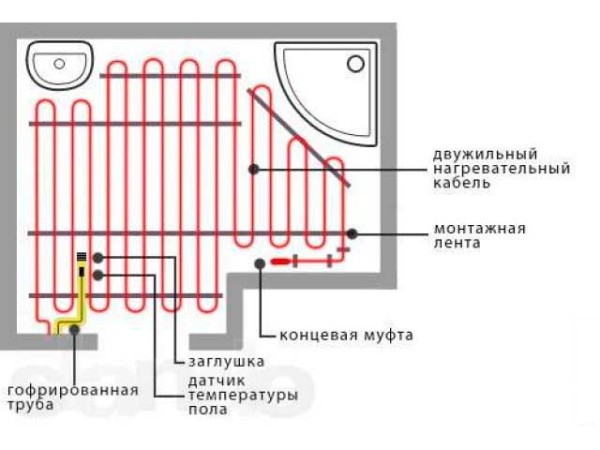
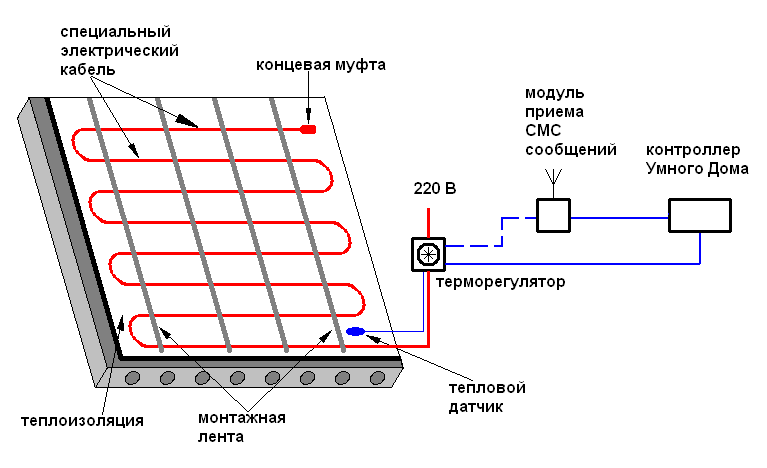
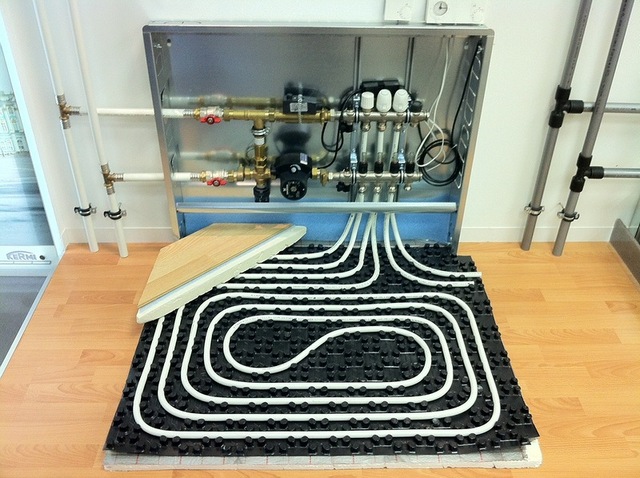
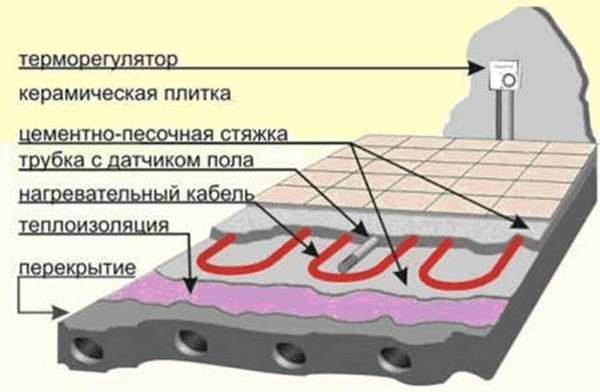
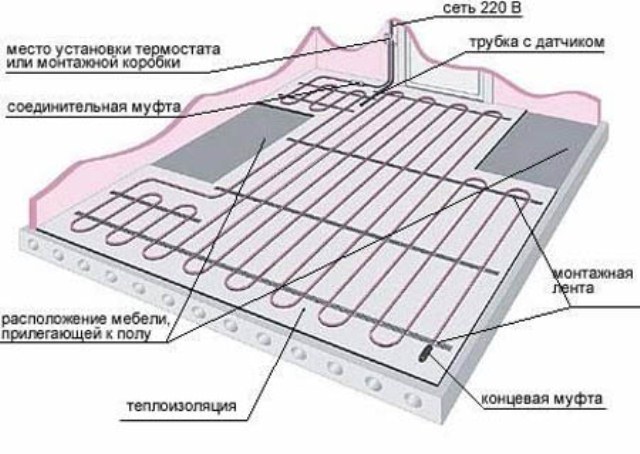
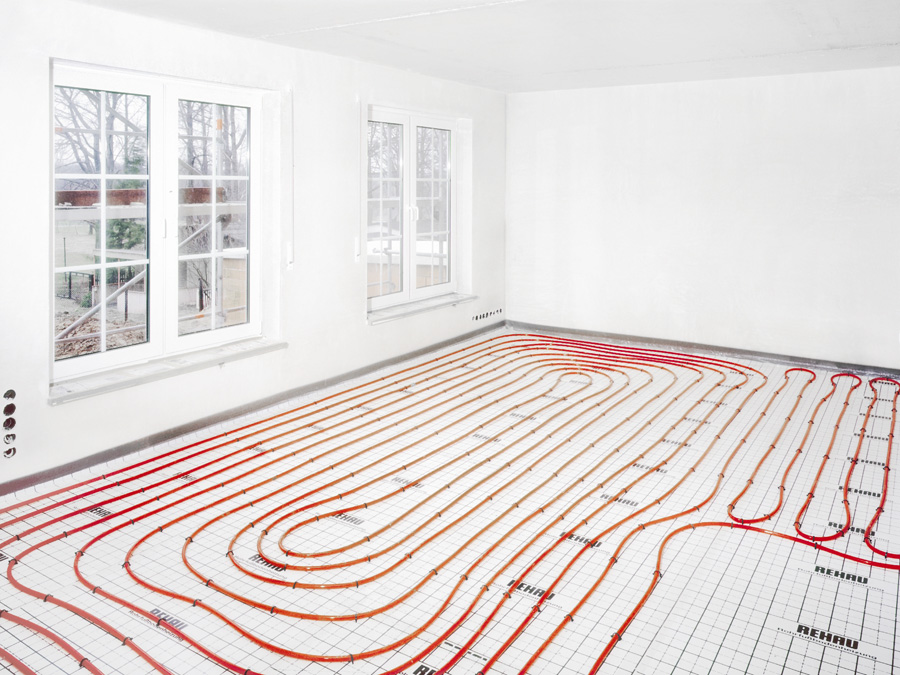
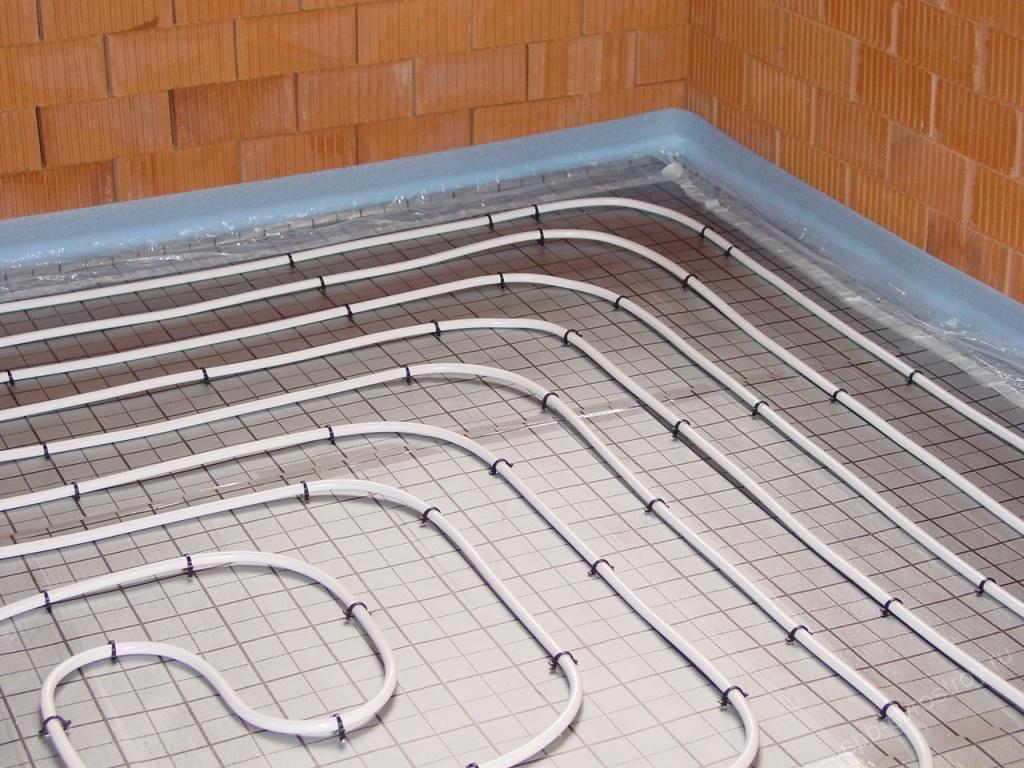
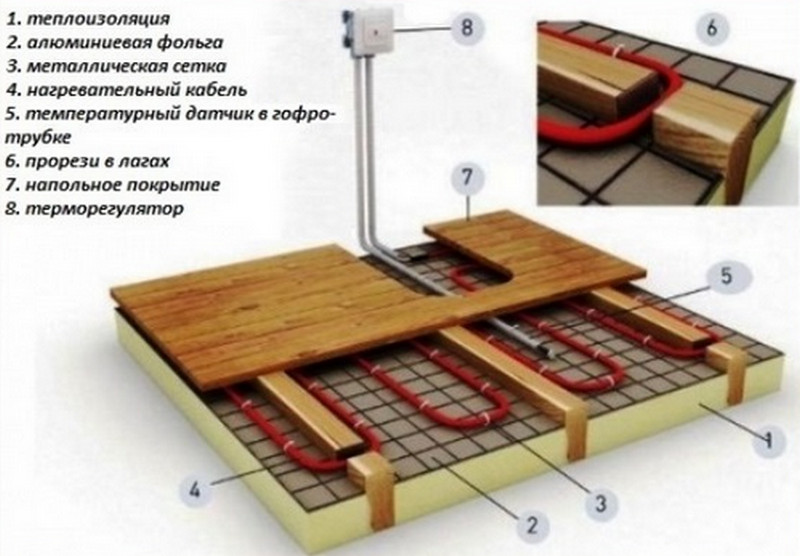
If we talk about the design of the heated floor, the heating cable must be placed on the insulating layer and secured with a mounting tape.Inside the cable there is a snake, in which at the same distance between the coils a pipe of corrugations is lined. A temperature sensor is placed in this pipe, which is responsible for the heating level of the entire system in the house.
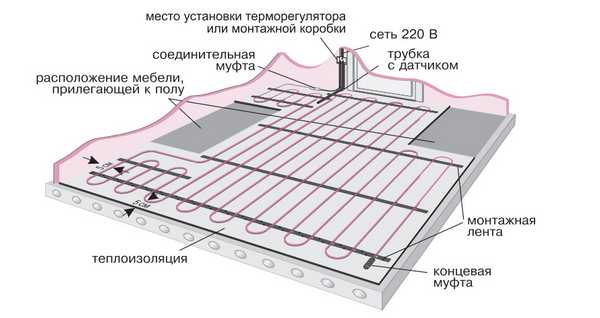
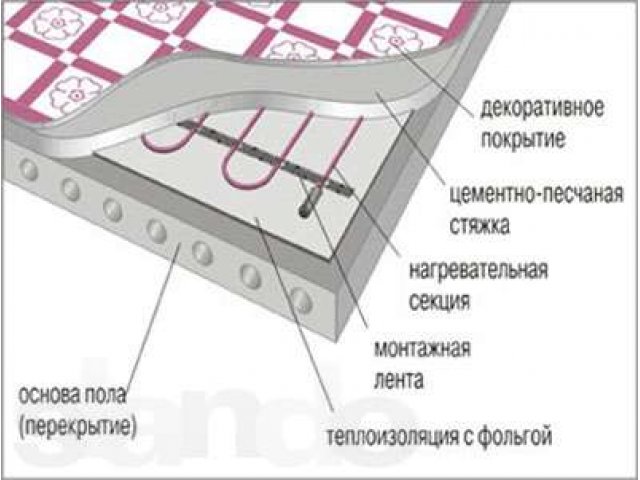
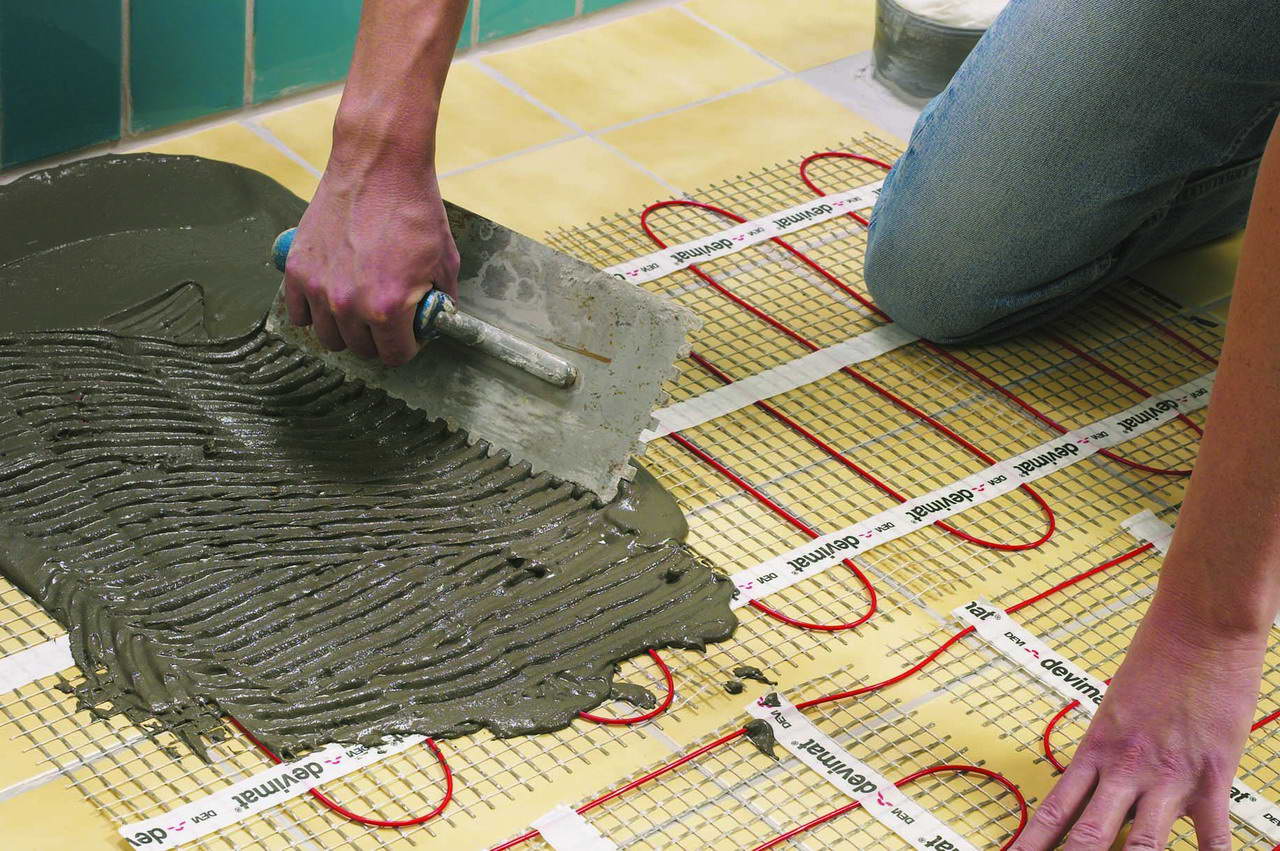
When all heating components are laid, a coupler can be poured over it. The thickness of the layer is determined based on the structure of the cable. It is important that the layer has a smooth surface without voids. A tile or other floor covering is laid over the screed.
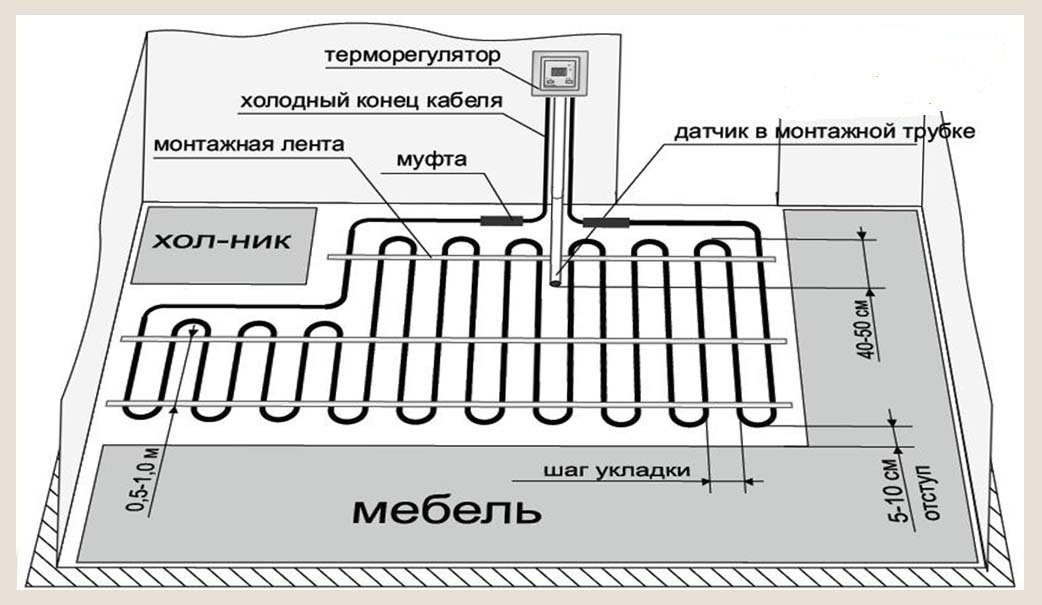
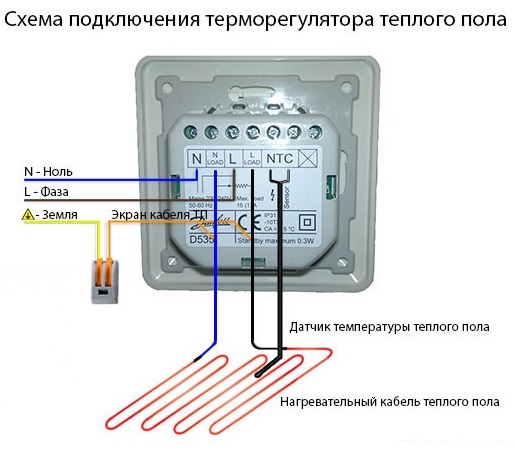
The thermostat is on the wall. The place should be chosen taking into account its comfortable work. The automated work of an electrically heated floor depends on it.
To protect the electrical circuit from leakage, you need to connect to the circuit breaker RCD.
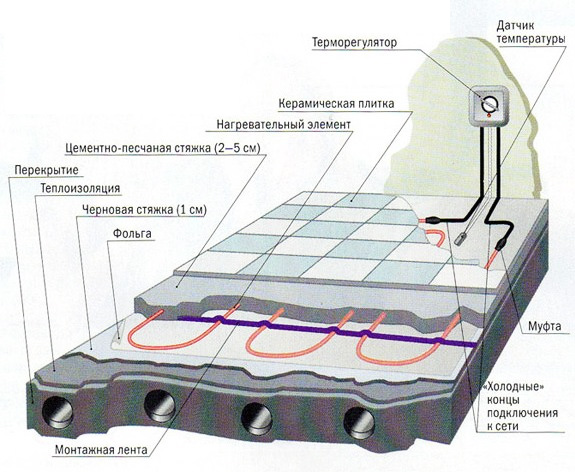
The temperature sensor is connected to the thermostat by means of a cable, which is connected to the power supply circuit using the RCD. This component also controls the contactor with a separate cable. Output circuits should be connected to the heating components through the junction box.
Where is it used?
Electric floor heating you can install in apartment buildings and country cottages.Such a system is universal, therefore it is used in any premises. Most people install ETP in the bathroom, on the balcony and in the kitchen. Such a method can act as the only source of heating, if you are ready for high energy costs.
Power calculation
Before you lay a warm floor, you need to calculate the required power. For this purpose, it is necessary to immediately determine whether the ETP will act as the main heating circuit or be only an aid. The technical documentation of each ETP specifies the requirements for each case.
If you choose a system based on heating mats or a cable, choose an indicator of 120-140 watts per square meter. Under the condition of heating only with the help of this system should choose the power of 160-180 watts. For an ETP based on an infrared film, a value of 150 Watts per square meter should be set, or for heating only using an ETP 220 Watts.
If you choose a heating mat or infrared film, the power level will be known immediately. and you only need to make a choice of the desired option.If you choose a heating cable, the power level indicator will depend on the distance that is present between the turns. You will be required to clarify information about the site and the shape of the surface to be heated and further comparison with the parameters set forth in the attached instructions. As a rule, the segment will be about 10-30 cm based on the power level of the cable itself.
The calculations should take into account the maximum load on the electrical network of your home and use switches that are calculated on the required load current.
Distribution options for thermal sections
When developing the project of your future electric floor, pay attention to the fact that there are several options for installing the system, which differ in the method of laying the wires:
- mount to the tie itself;
- you can put the wires on the screed under the floor covering;
- installation over the screed under the finishing surface. To it can be attributed film or infrared floor heating.
Once you have chosen a convenient stacking method for you, the next step will be to develop a plan:
- ETP calculations;
- designation of a place for the heating controller and power supply;
- designation of the place where the heating cable will be installed.
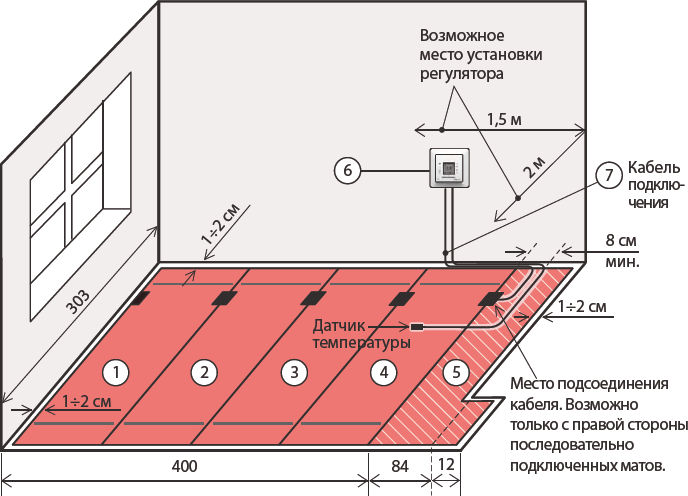
When developing a plan, keep in mind that the wire should not be placed on areas where there will be large-sized furniture and other items.
Also, it is not recommended to mount it in the part of the room where heat sources are already present.
Preparation of the basis for work
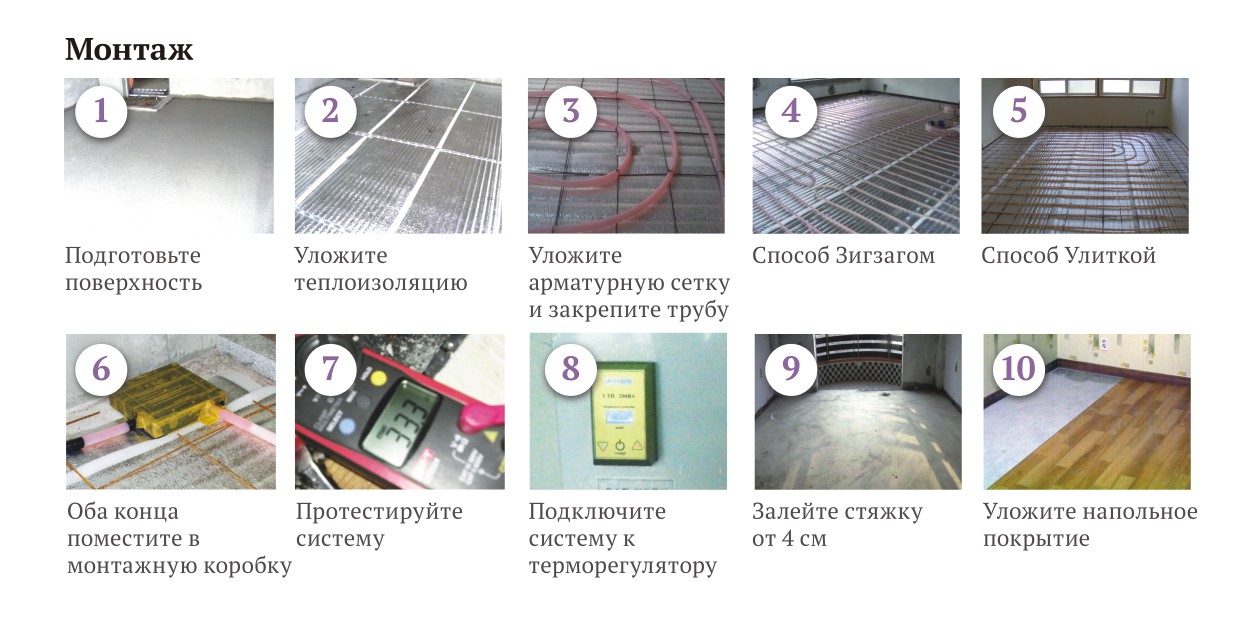
Before you do the main work, you need to remove the old floors, if they exist. Remove all furniture from the premises, as well as garbage. To prepare the base, it is sufficient to make the surface level and remove any contamination from it. If you notice that there are dimples or cracks on the floor, seal them.
If the base has significant damage, you will need to fill the tie. If you wish to shorten the repair period, in this situation, pouring a special quick-drying mixture will help.
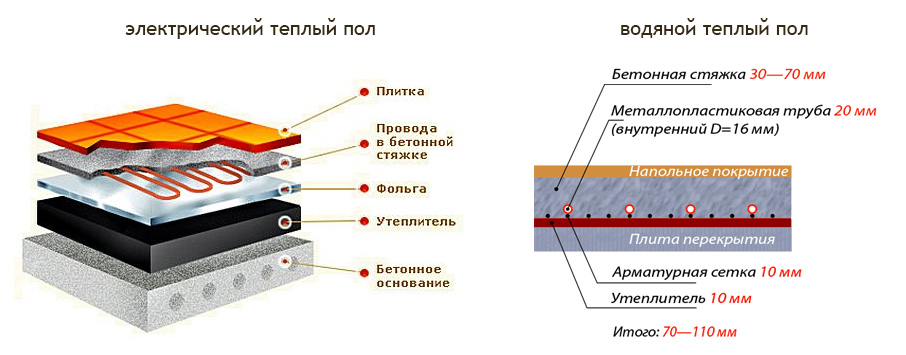
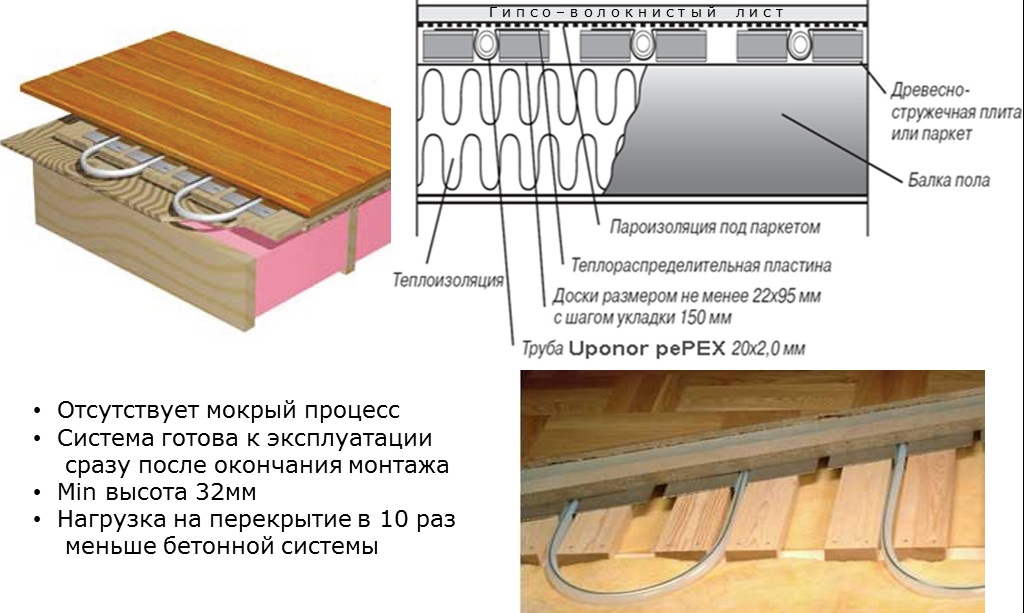
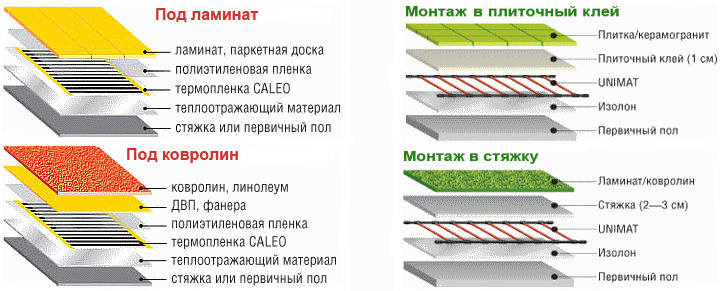
You can work on concrete, and also use ceramic granite as a base. In case the ETP will be installed on a wooden floor, do not forget about the layer of aluminum foil for safety reasons.In the role of thermal insulation, you can purchase penoplex.
Surface insulation
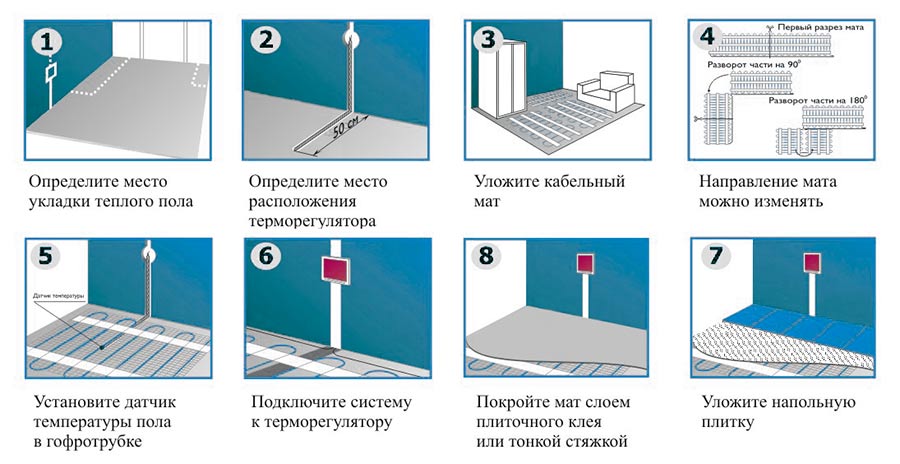
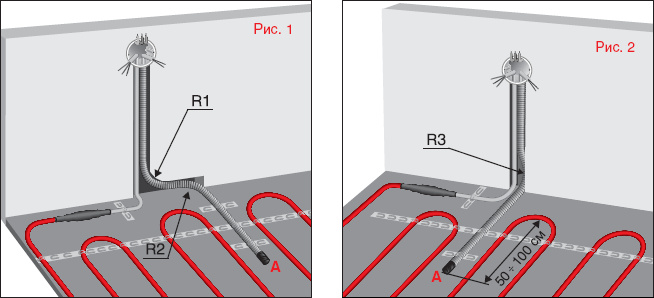
It is recommended to mark the floor before installation. Determine the surface areas that should not be heated. Remember that between the wall and large-sized pieces of furniture should observe a minimum distance of 0.5 m. The segment to the heating devices should not be less than 0.3 m.
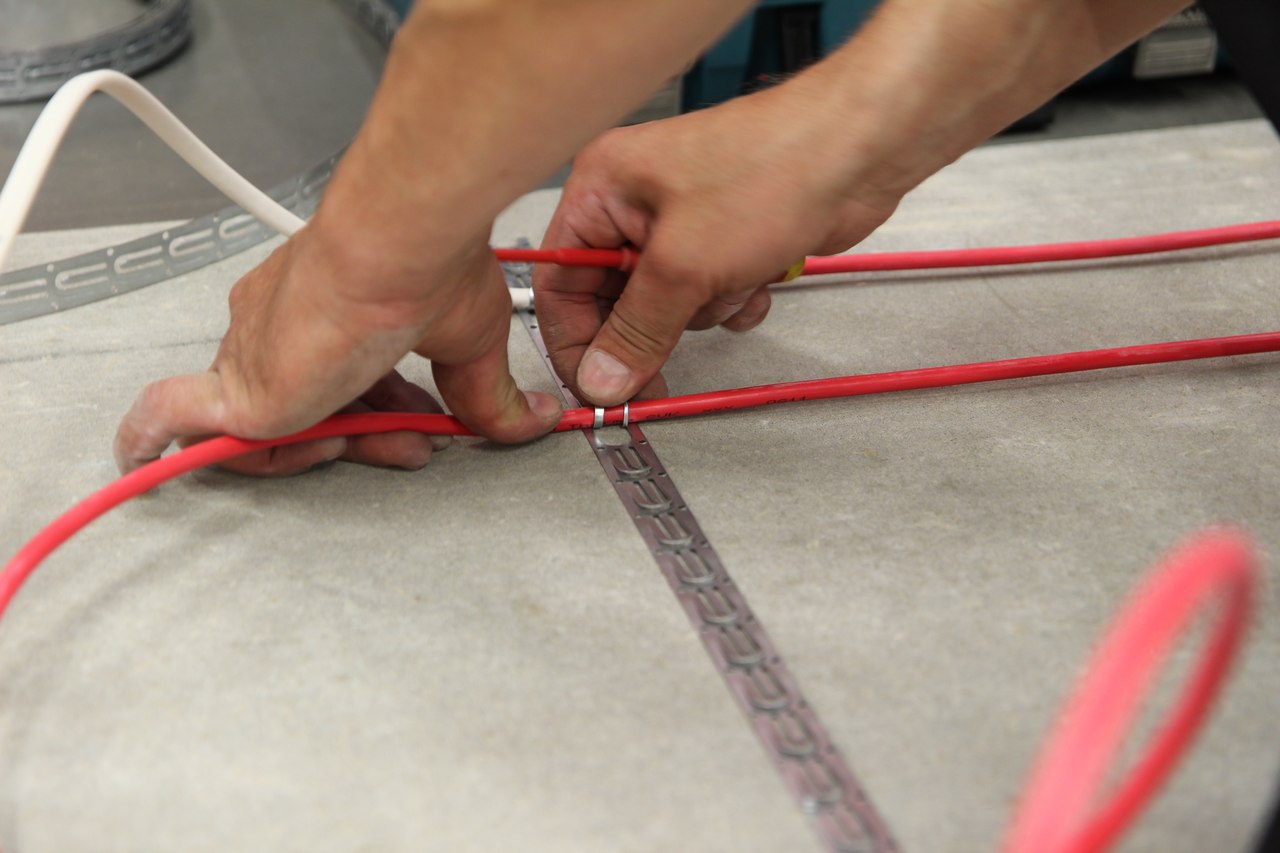
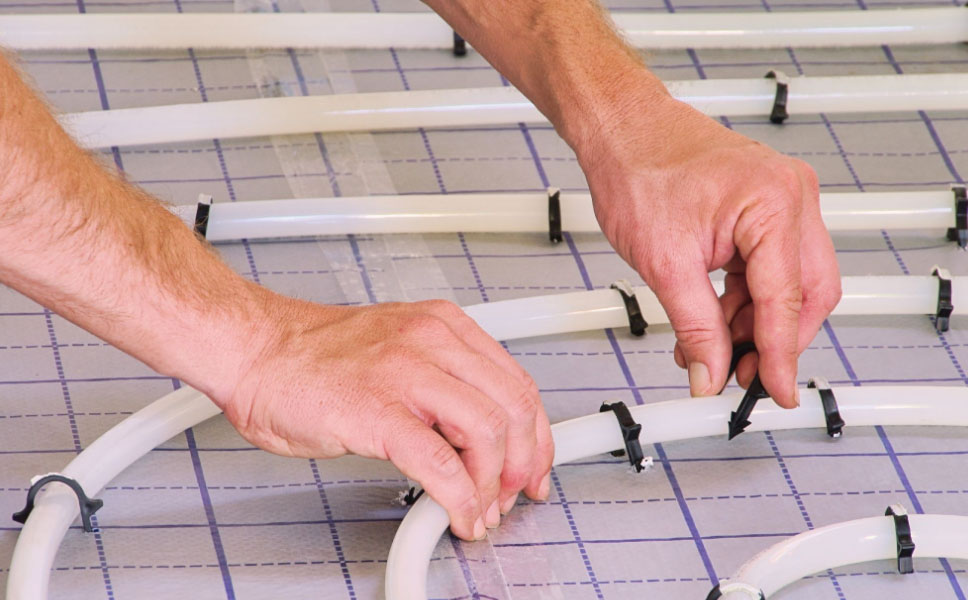
If you install an ETP, where the heating wire is used as the basis, initially it is better to put a mounting tape. It will be responsible for fixing the turns of the wires, which will not allow them to move further. Under the tape, which is fastened with dowels, heat insulation should be located.
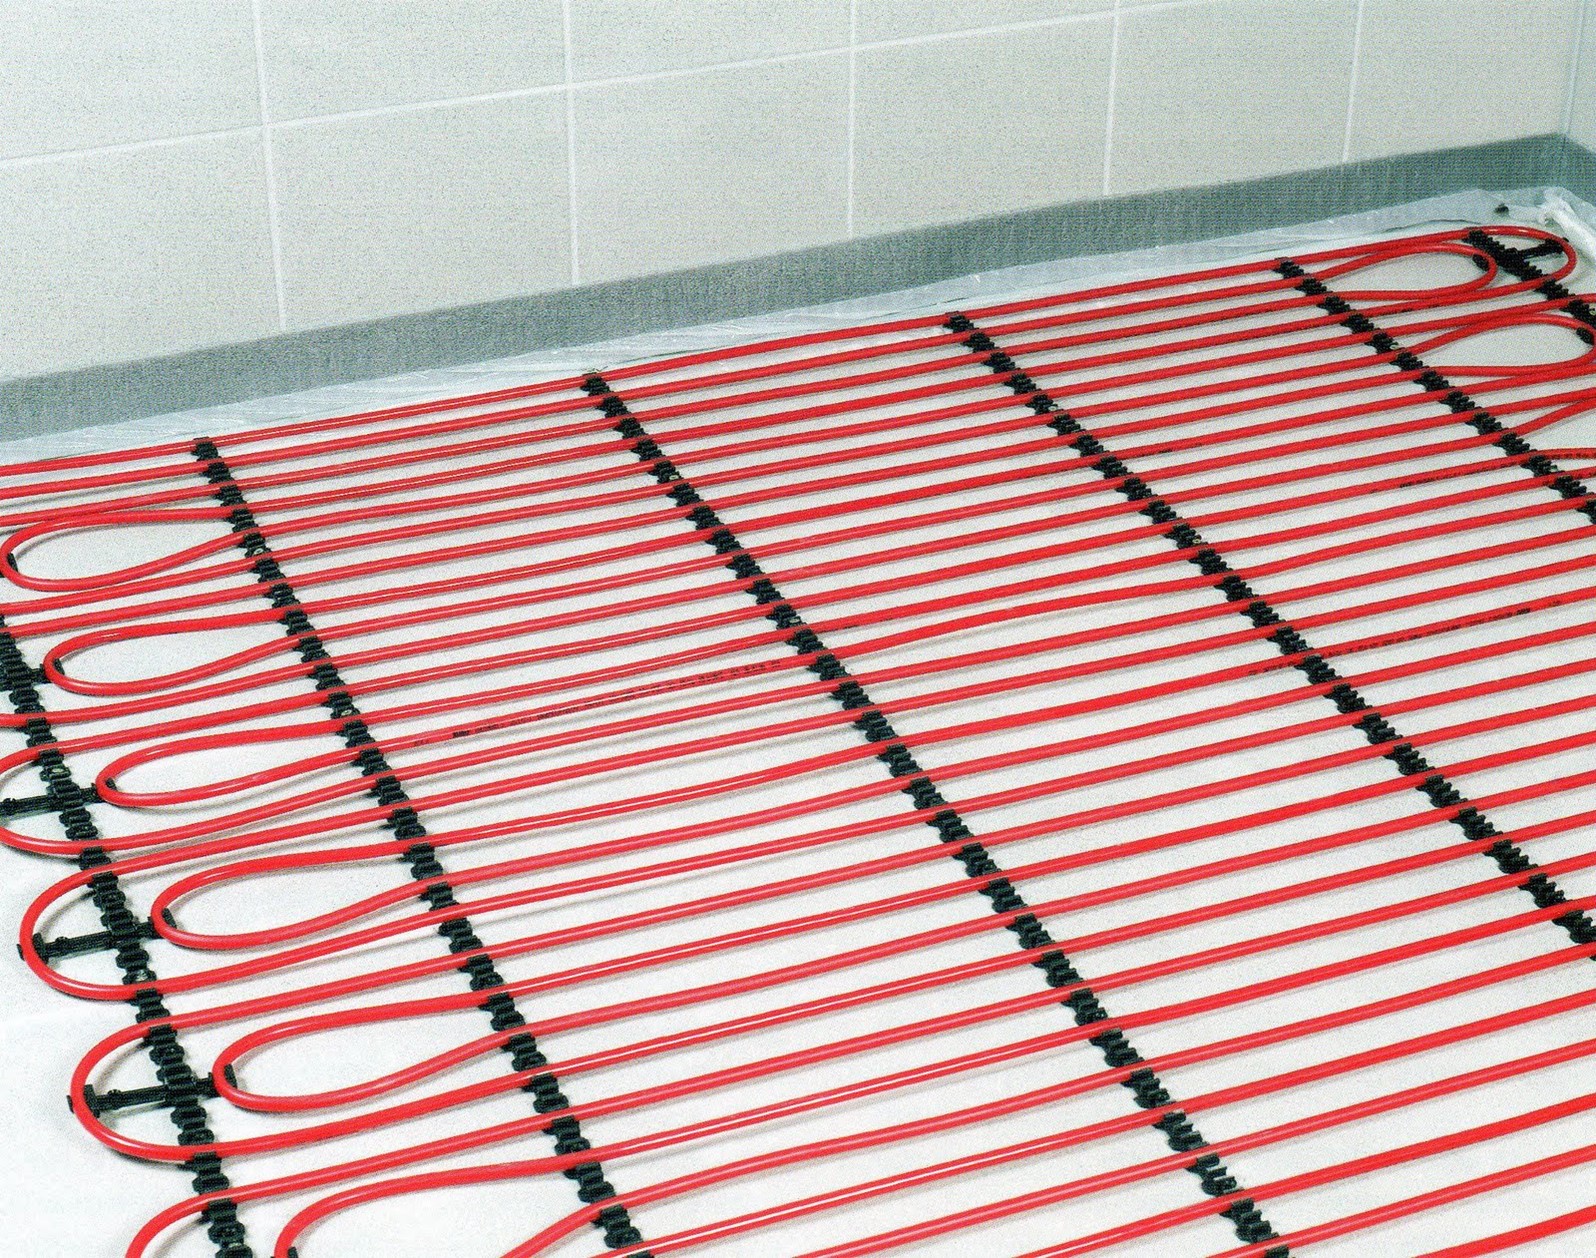
Gently unwind the heating cable and lay it on top of the thermal insulation layer and mounting tape. It is necessary to observe the rule that all coils and gaps should be parallel. Each of the coils should be fixed with special antennae directly on the mounting tape without overlaps. After you have completed the installation, measure the insulation resistance. Its value should not exceed the standard value by more than 10%.
If you work with heating mats, it is better to lay them all over the floor, which must be heated. The connection of mats is made using the scheme, which is present in the technical data sheet of the device. After laying, check the insulation resistance.
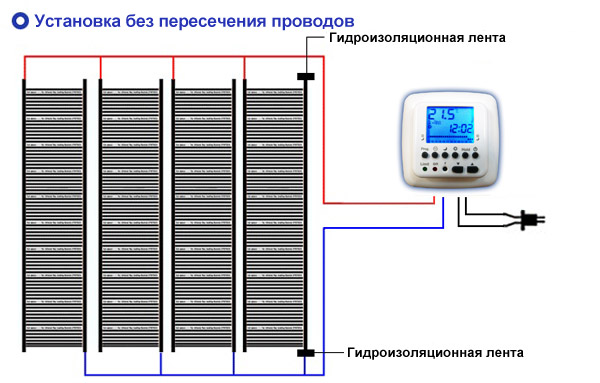
When working with infrared film should be carefully unwinding the base. The film should be connected in parallel.
How to set your own hands?
You can also install the electric floor yourself. To do this, follow certain rules.
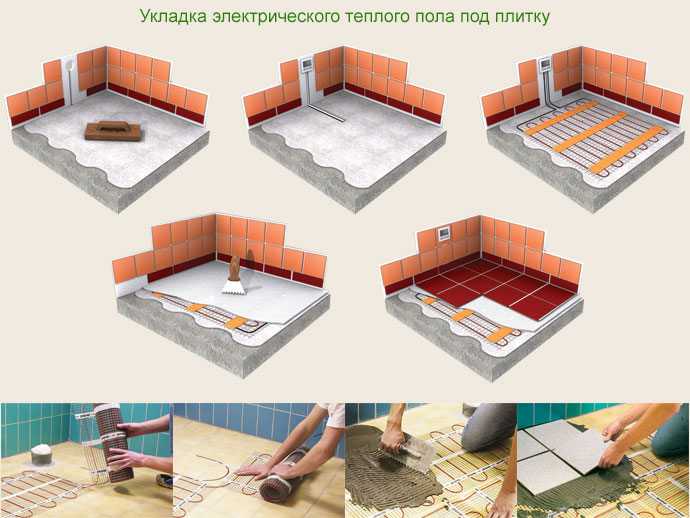
Step by Step Installation of ETP:
- align the rough surface and eliminate all its defects;
- lay a heat insulating layer. The foil side should face the ceiling;
- lay the ETP itself, which consists of a wire, heating mats or infrared film;
- fasteners in the form of a screed are used for the cable, glue is required for thermal mats, and a finishing surface can be immediately installed on the film;
- after laying the warm floor, you can connect to the thermostat and check for all performance.
Installing the thermostat
The place under the thermostat must be determined before installing the floor heating, because it is the beginning of the entire system. The work of the thermostat is to monitor the temperature of the room and its support at the right level. You will also need this component to make an electrical connection to the entire circuit.
If you choose a thermostat with an integrated air temperature fixer, the distance from the ETP is 1.5 m. For choosing a place, make sure that the sun does not fall on the thermostat. Otherwise, he will not be able to configure the necessary data for operation.
There are two types of thermostats:
- mechanical;
- software.
Programmed automatic control is available, they are able to independently monitor the temperature not only of the floor, but also of air, including heating at the required time.
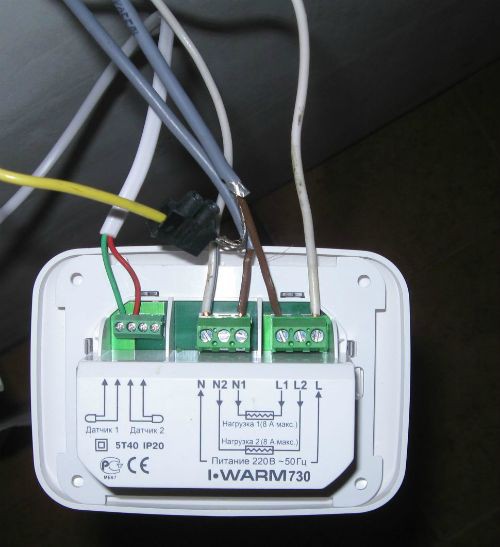
Each thermostat has its own connection scheme. On some models, this information is indicated directly on the case.
How to install the thermostat:
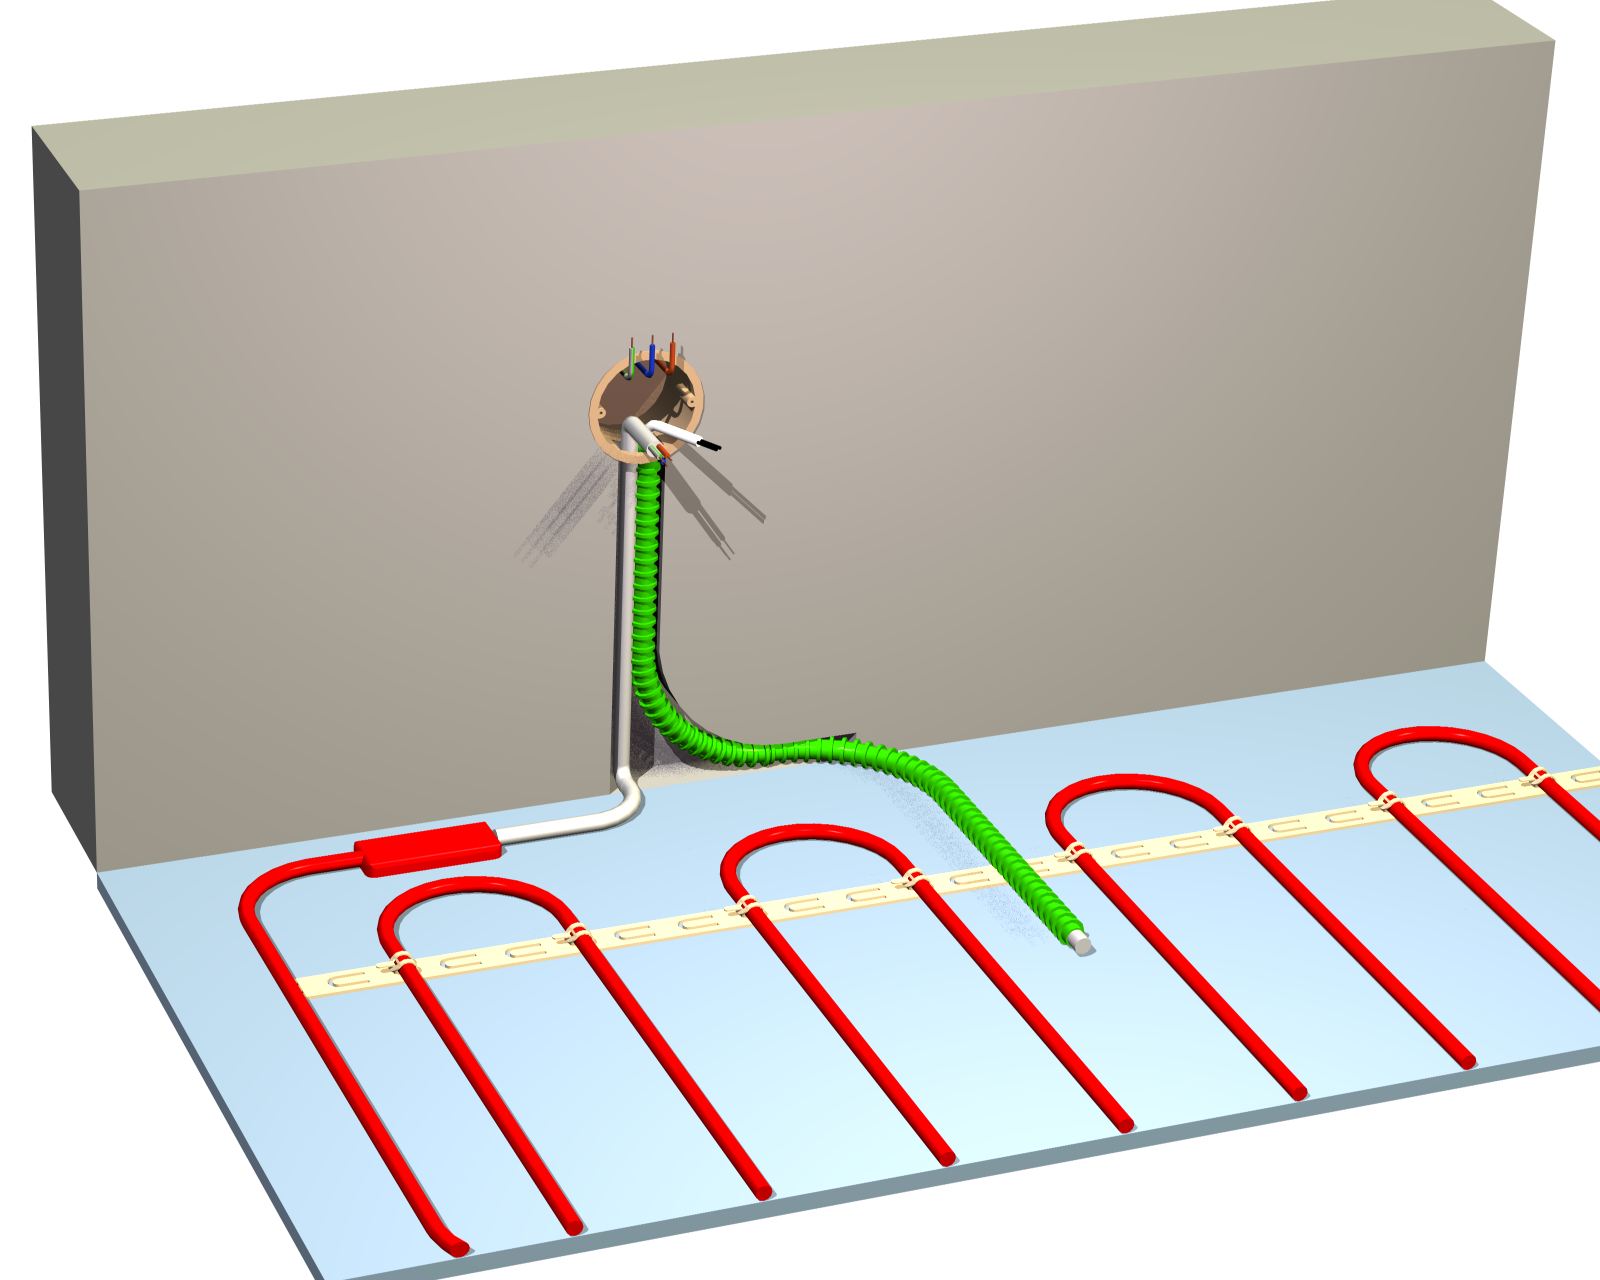
- having decided on the installation site, it is necessary to create a hole and make a groove from it to the floor;
- bring cables from the ETP, network and thermostat wires to the recess made;
- when the thermostat is installed, it must be connected to ground, phase and zero;
- If your thermostat does not include a temperature sensor, you should buy it yourself. Acquire a sensor whose maximum current is identical to that of a heated floor.
Cable selection and connection
Heating cables vary in their performance. To date, there are two types:
- self-regulating;
- resistive.
The ETP system itself is made up of power cables, which are intended for connecting the system and the wires, through which the heating process is carried out. To reduce the resistance between the heating and power wires, the use of a specific coupling, which is made specifically for this purpose, is required.

Resistive
In the role of a key heating component that is present in the cable, there is a core with an increased level of resistance. When an electric current enters this core, it turns into thermal energy. To eliminate the possibility of electric shock, the heating core is covered with insulation, over which a metal sheath is placed.
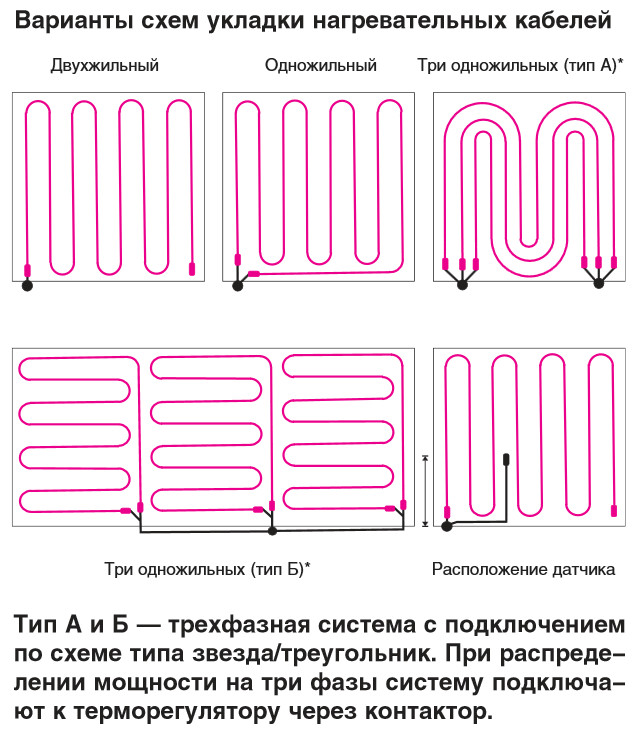
This braid will act as a ground, and will also be a screening protection against the effects of electromagnetic fields. Each layer should be covered with outer insulation. In the resistive wire may be present as one, and a pair of conductors.
Systems in which there is a single-core cable are a simplified version of the ETP. The installation of such a system is based on laying a cable over the entire area of the ETP. To perform this manipulation, you need to think about the way in which you can connect both ends of the cable to the power grid. Thus the wire will be located on the floor surface in the form of a loop. Despite all the simplicity, such a system has a significant disadvantage, which is enclosed in the flow of electricity through the cable core, which is why the formation of an electromagnetic field. With the help of the braid you can smooth out a similar reaction, but the result will not always be positive.
In the two-core cable there is a core, which is responsible for conducting the current. It is located between a pair of heating cables. The electric current moves in opposite directions, so the electromagnetic field, which is formed in different wires, compensates each other.When installing such a cable, you need to put it well in a tie to prevent overheating. If you ignore this rule, you run the risk of malfunctioning the wire.
Self regulating
These wires do not have the negative qualities that are present in resistive cables. These shortcomings are eliminated due to the polymer matrix, which is a heating element. It helps to create a situation where, when one of the sections overheats, the current in that area decreases. This reaction helps to reduce the heat supply and the temperature in the overheated area decreases. The rest of the system works without changes. The price of such wires is much higher compared to resistive, but such a purchase will last much longer.
Many novice masters are wondering how you can shorten the heating wire. Such a question can be formed only in that situation, if you incorrectly calculated the footage and you have nowhere to put the surplus. Cables are sold in coils where there is a certain level of resistance. At the end of the wire is a coupling. In each of the sections formed some resistance.If you decide to cut the wire, an imbalance will occur, during which resistance will decrease along with an increase in current.
These actions cause cable to burn out. For this reason, you should use all purchased footage. If you do not have such an opportunity, ask for help from a specialist who will be able to calculate the number of lost resistance and supply a current-limiting resistor.
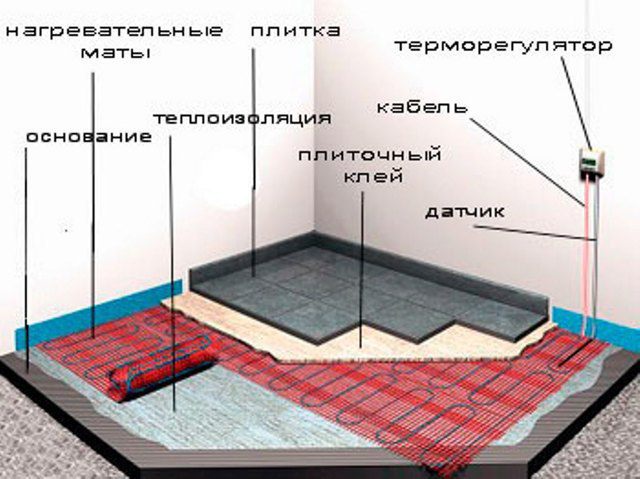
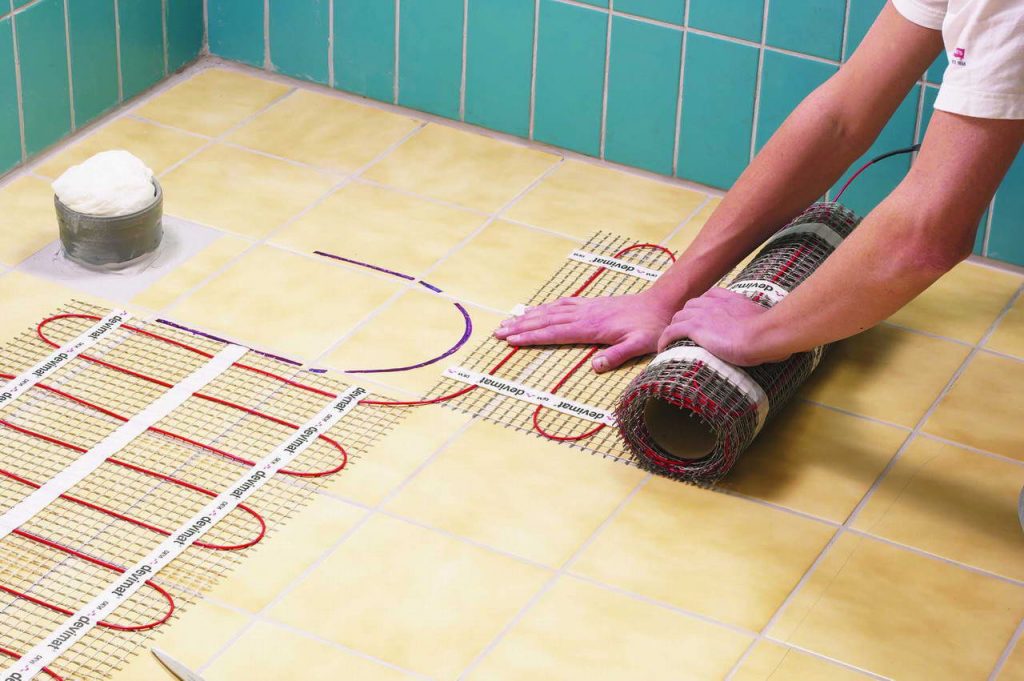
How to connect the heating mats?
There are two options with which you can lay the heating mat:
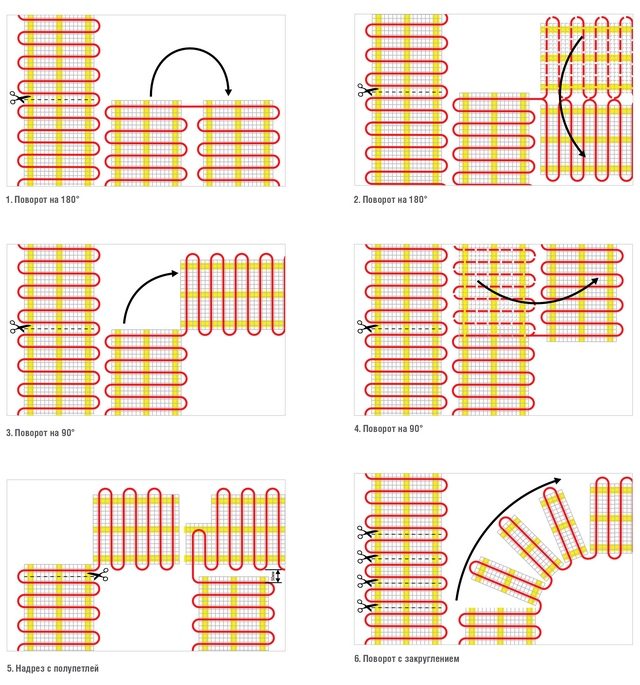
- The arrangement of the heating cables is at the top, along with the grid being placed down. Before starting work, make a floor marking on which the layout of mats will be displayed. An adhesive is applied to these areas to help join the mats;
- The location of the heating cables below. You will need to draw a scheme on the heating grid, after which it should be carefully cut. Take care not to damage the wires. When you finish the pattern, roll the mat into a roll and apply glue to the base. After that, you can roll the roll by pressing the wires into the glue.When choosing this method, make sure that the minimum distance of five centimeters is maintained between the mat segments.
Rules for laying infrared film
Work with infrared floor involves the patience of the master. This is due to the fact that from each section that is present in the film, there is one pair of wires. If there are many sections, the number of wires also increases. All these wires need to be properly attached to the thermostat.
To simplify the task, experts advise to mount the terminal box and mark each wire. Already in the box, the wires are connected phase to phase, zero to zero using a spike. Make sure that you end up with two wires. These wires are already attached to the thermostat.

Each thermal strip must be insulated on one side, and on the other side a power cable is connected. To avoid a mistake, you need to lay the sheets parallel to each other.
The installation of the thermostat, as well as the strobe, is done in a familiar way, which is relevant for other systems. In this case, the temperature sensor should be packaged in a corrugation and fixed on the floor.After that, it can already be attached to the thermostat.

Tips and possible mistakes
Before installing the ETP, you need to examine all common errors:
- The main mistake that most people face is the incorrect layout of the heating system layout. While working on it, carefully observe the placement of large furniture and household appliances. If you put a heavy sofa on the heated area, it will lead to overheating of the wiring and further failure of the system;
- Before connecting the wires or heating mats to electricity, wait until the screed is completely dry. Otherwise, the heater will break or completely blown. To verify the integrity of the cable, you need to connect using resistance. An infrared mat can be immediately connected to the network;
- Before installing the screed, carefully check the insulation of the system. Adjustment of the resistance of the structure should be the same as recommended by manufacturers. Maximum support of 10% is allowed;
- Place the thermal sensor in a special corrugation, and then pour it into the screed.This rule exists so that in case of a breakdown you can replace it without any problems.
Compliance with these recommendations will help make the ETP installation process easy and avoid many mistakes that can cause a lot of trouble and completely disable the entire system.
How to do the installation of a warm electric floor, see in the next video.


