Features of the installation of a heated floor
Underfloor heating is widely used as additional heating in many modern homes. This heating technology has become widespread, not only because of obvious comfort, but also because of energy savings. This article discusses the features of mounting such a system by hand.
Special features
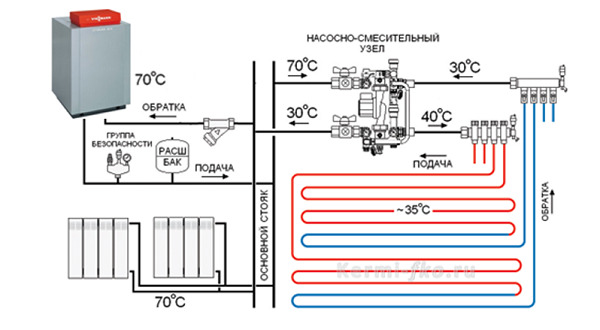
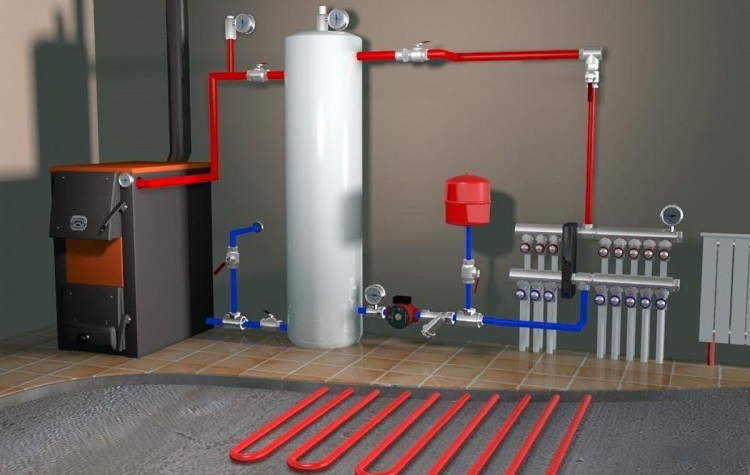
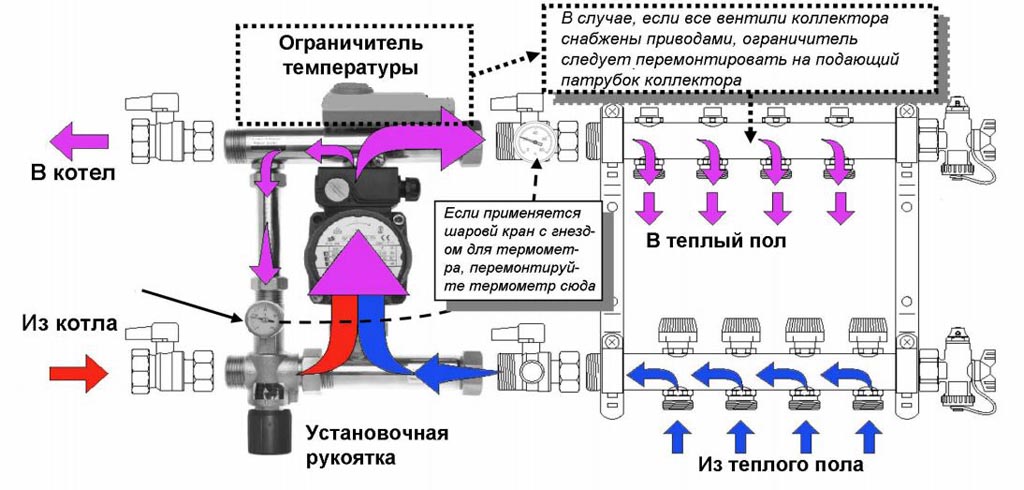
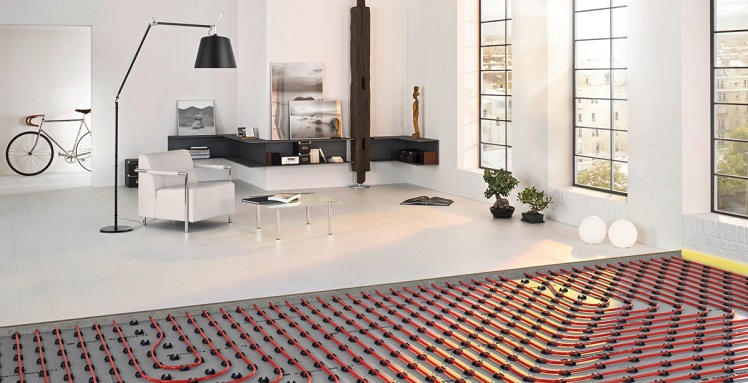
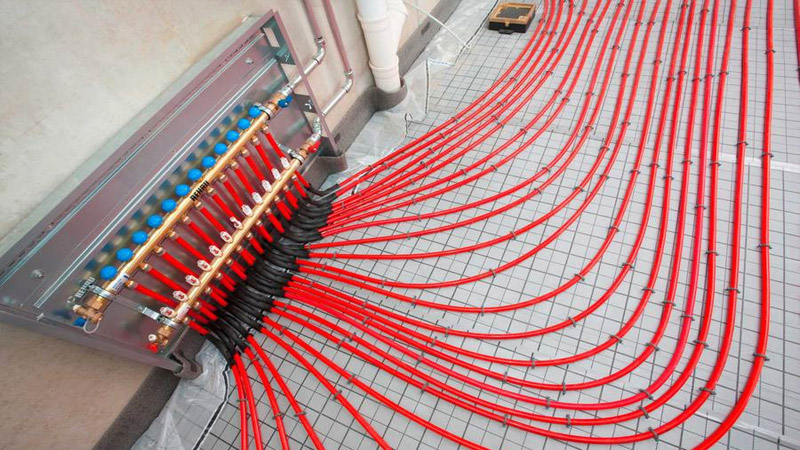
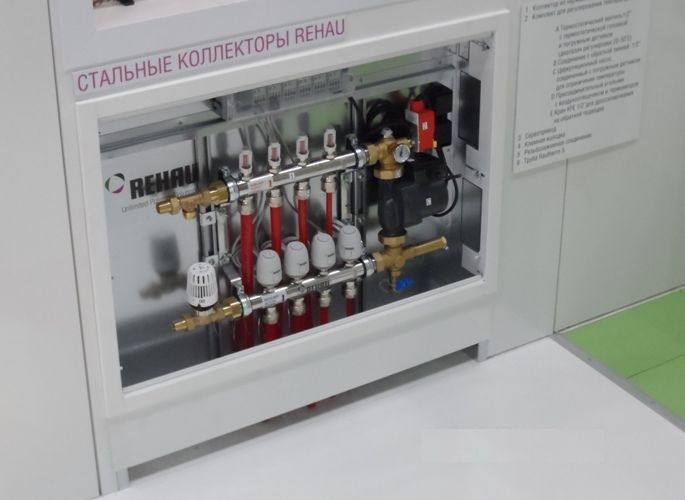
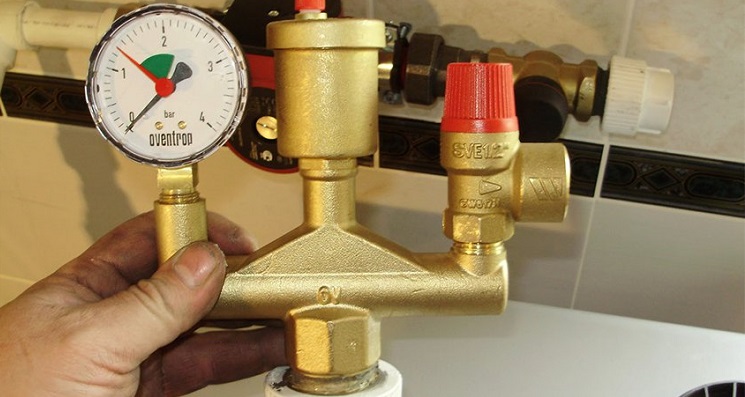
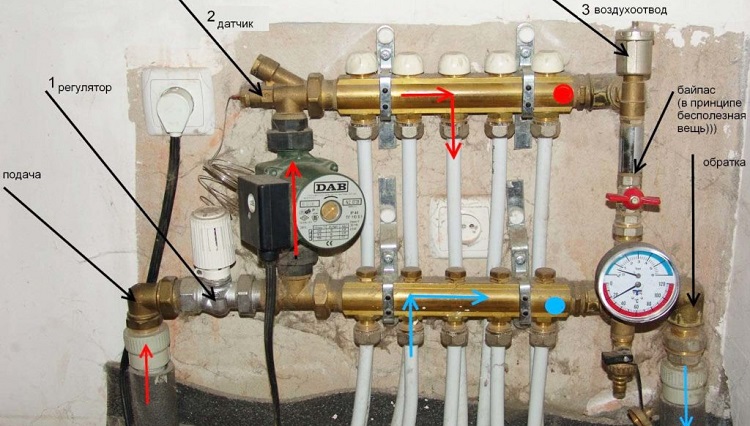
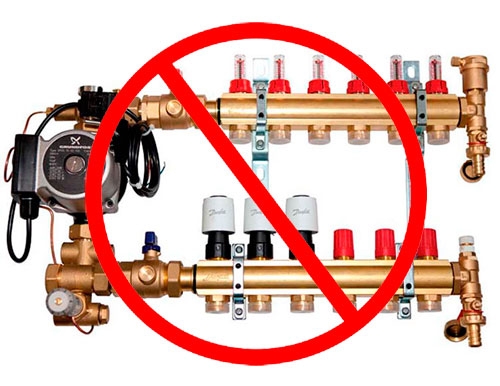
The warm water floor is a pipe system laid according to a special scheme. This scheme is chosen directly by the owner of the house. From the boiler the hot coolant circulates through the pipes, thermostats regulate its temperature.After cooling, the liquid moves back to the boiler, resuming the process. A collector is a heating control unit that combines different streams of heated fluid.
The boiler works not only on electricity, but also on gas, solid or liquid fuel. The composition of many models of boilers included a pump for circulation. Installation technology requires a preliminary calculation of the pump power: floor heating requires high electricity costs.
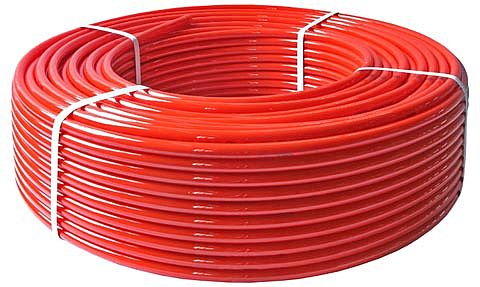
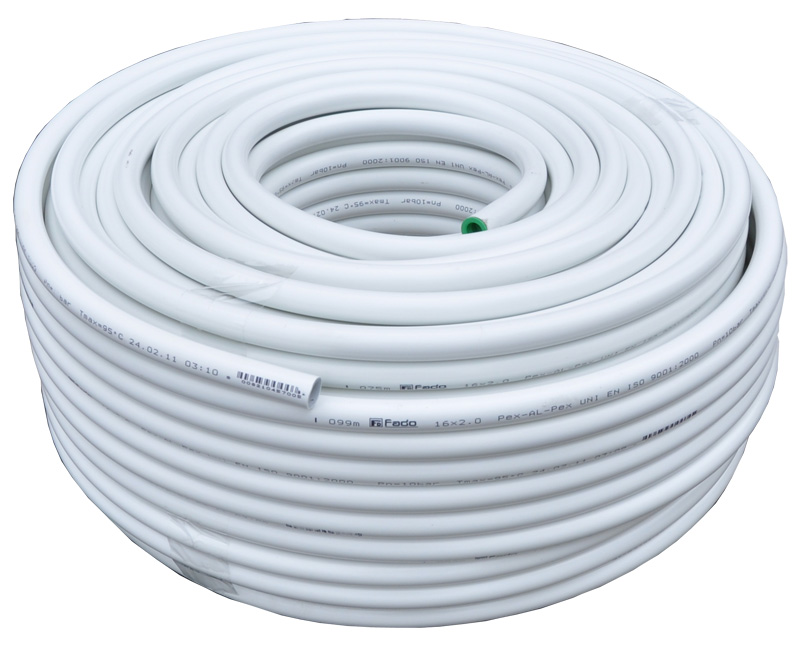
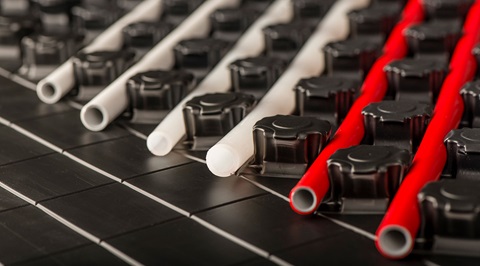
The operational life of the system depends on the quality and reliability of the selected pipes. It is accepted to use both PVC, and metalplastic pipes because of the long term of their service. However, tenants prefer to use the second option. Metal-plastic pipes are more reliable, work well for bending and can take any shape.
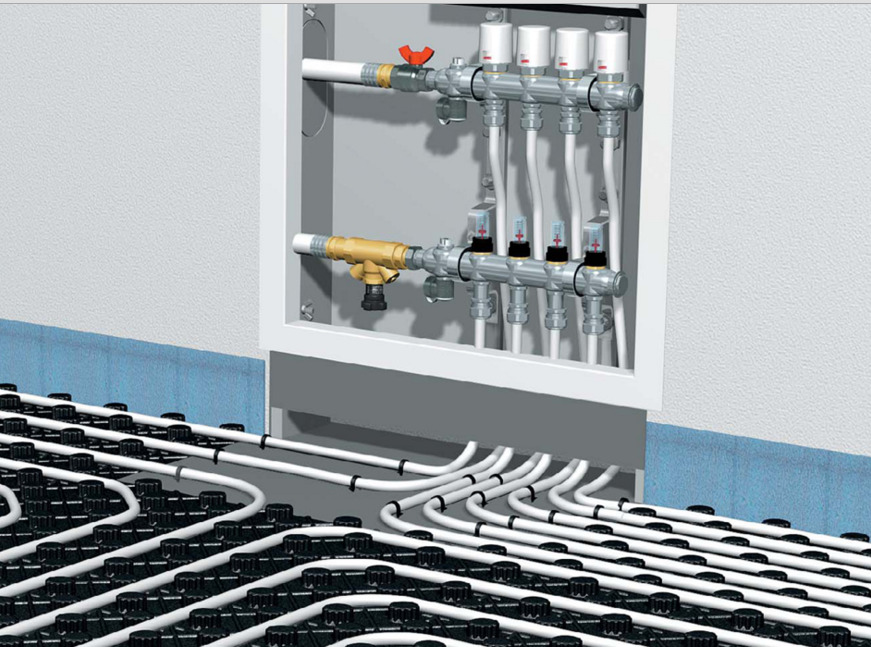
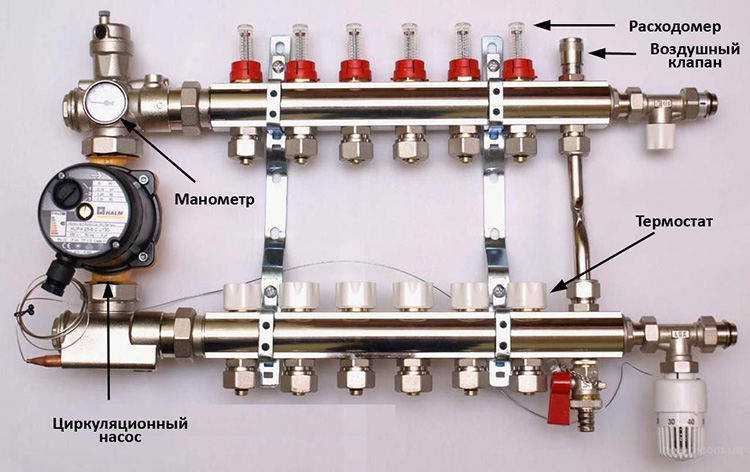
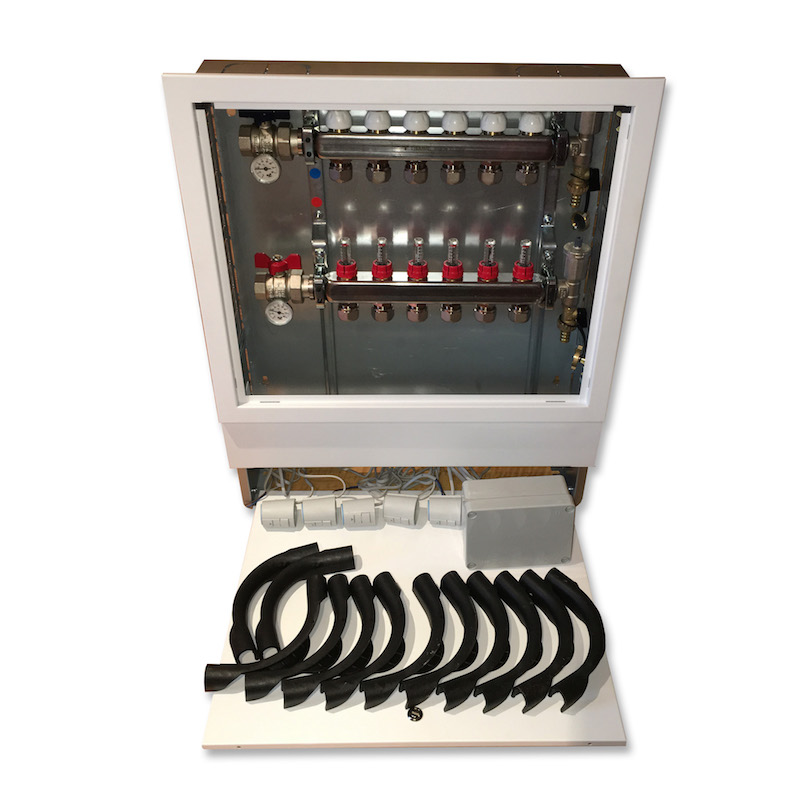
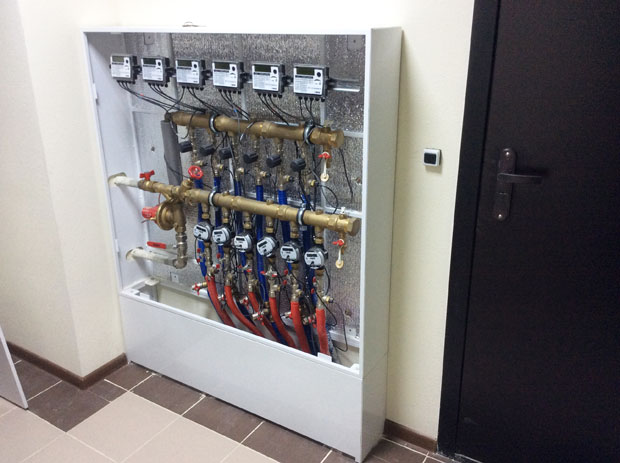
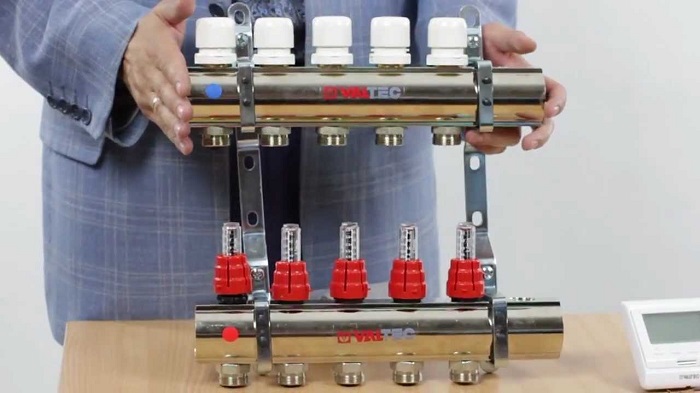
The collector-mixing unit, in addition to distributing the coolant to the circuits, performs a number of the following functions: it controls the flow of water, regulates its temperature, and also removes air from the pipes.
The design of such a device includes:
- Manifolds equipped with shut-off valves, balancing valves and flow metering device;
- Automatic air vent;
- A set of fittings connecting individual elements;
- Drainage taps for draining;
- Anchoring brackets.
The system can be independently assembled and connected, which is not difficult, but economical.

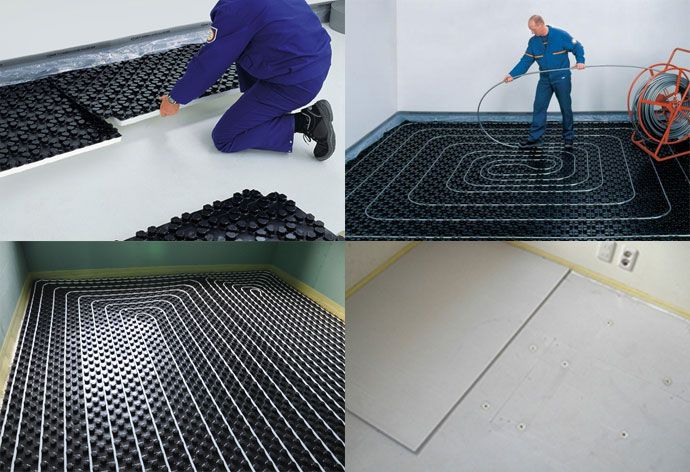
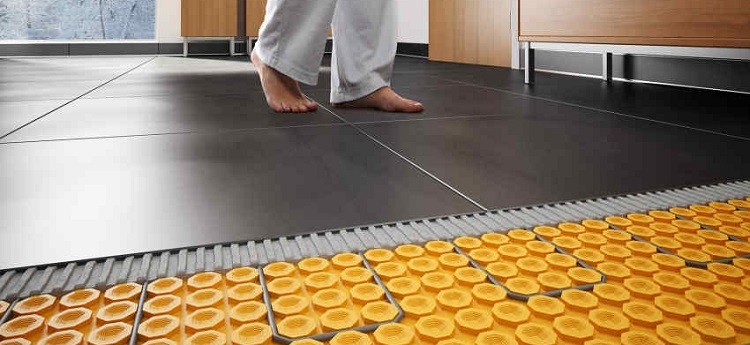
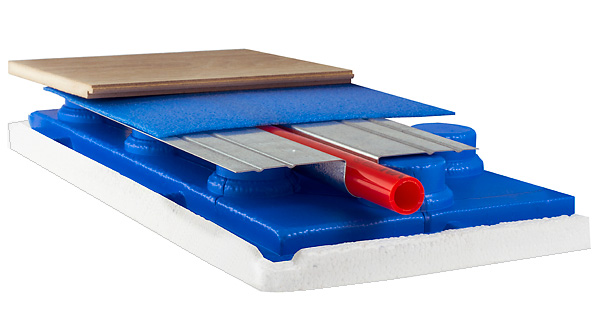
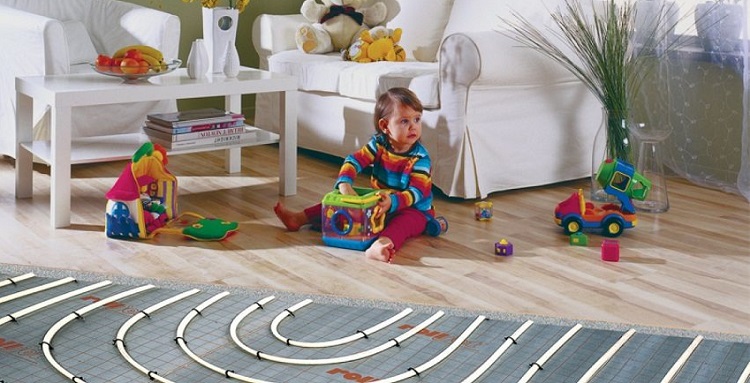
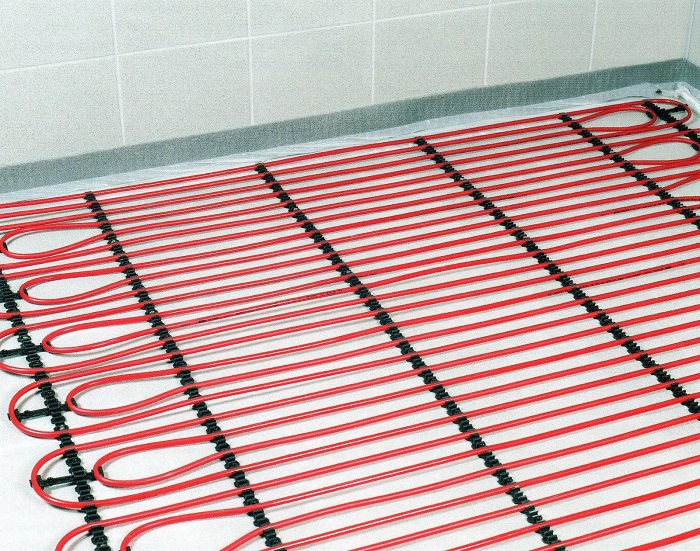
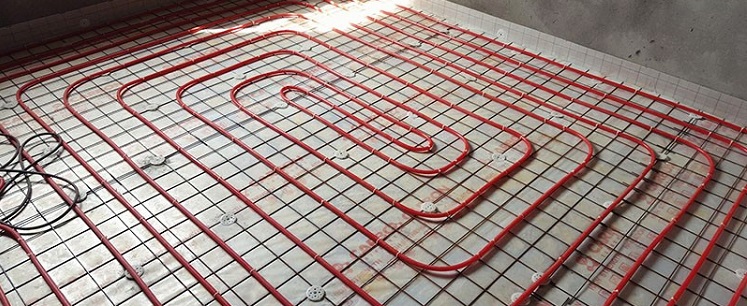
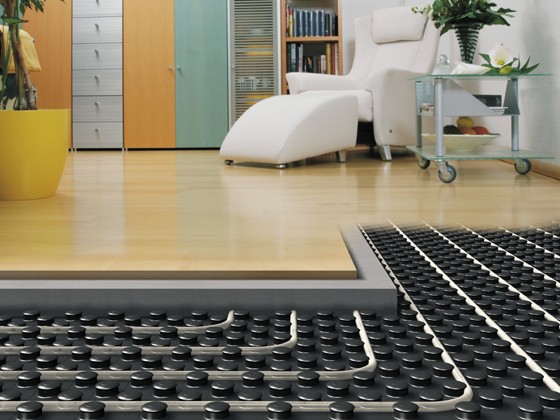
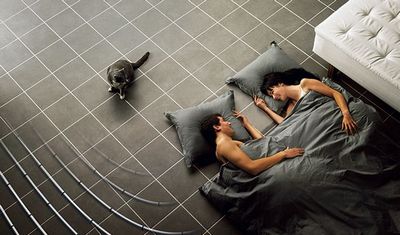
Water floor heating laid in three stages. Such a “pie” consists of a reflecting substrate, a heating circuit and a finishing coating. The film with a mirror coating can protect the circuit from heat loss, therefore it is used as a screen.
The above device is significantly different from the floors with electric heating. Water-heated floor has a complex structure and will cost more in the installation process, but will save during operation. Adjusting the heating TVP is more difficult. Initial floor heating longer than water.
Electricity should be made the main source of heat in a small area of the room, while in large rooms it is better to use a water system.
Technology
Pipes made of plastic or metal are immersed in a cement screed. Under the action of the pump, the coolant moves along them, which receives heat from the boiler. It heats the screed and moves back to the boiler.Thanks to convection, the screed temperature is transferred to the surface. If ECP is the only source of heat, then the degree of heating is controlled by the boiler.
If water heating only supplements radiator heating, then the temperature is balanced by the mixing unit. Cold and hot air is mixed in predetermined proportions. As a coolant can act as ordinary water, and antifreeze.
Advantages and disadvantages
Before deciding to install the TVP, it is necessary to familiarize yourself with all the strengths and weaknesses of this heating system.
Among the positive, the following are noteworthy:
- Efficiency. When compared with electric heating, water floor is cheaper to maintain. Such a system is most advantageous to install in a private home.
- Comfort. Heated air is distributed over the entire surface of the floor. This eliminates the possibility of thermal burns and provides a pleasant feeling.
- Security. The device is hidden under the floor plates, which minimizes the risk of injury.
- Environmental friendliness. Electric heating system creates an unsafe electromagnetic field.TVP does not produce such a field, so it does not violate the healthy microclimate in the room. This system is fully compliant with sanitary and hygienic standards.
- Aesthetic appearance. The total absence of bulky structures does not hinder the implementation of design ideas, does not imbalance the interior and does not accumulate dirt and dust.
- Alternative heating system allows significantly expand the useful area of the room.
- TVP is completely silent, therefore, it does not have a negative impact on apartment dwellers - for residents of larger cities this item is particularly relevant.
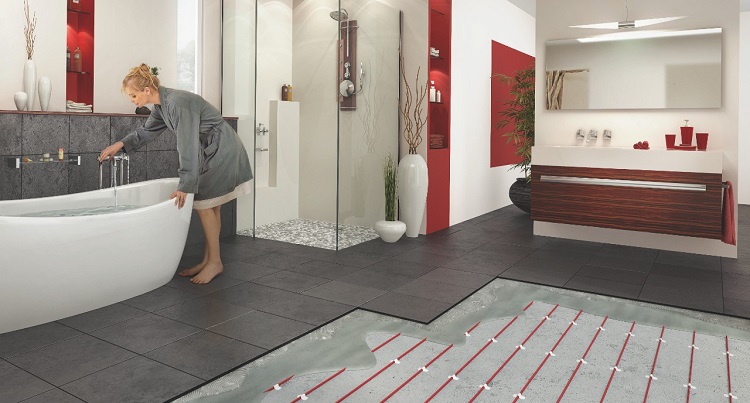
- Heated floor prevents the formation of dampness, because it is preferred to use in the bathroom.
Do not forget about the significant shortcomings:
- The complexity of installation. Before laying it is necessary to carefully align and prepare the rough surface. The coating includes three layers, each of which requires consideration of all the details of the installation.
- The impossibility of laying the TVP in small corridors or on staircases without additional installation of the radiator.
- The difficulty of troubleshooting. Even for partial repair of the system, the floor will need to be dismantled.

- Water system is preferable to install in a private house. Due to possible leaks, as well as the risk of pressure surges in the central heating system, this system is not recommended to be installed in high-rise buildings. In the process of installation, the “cake” of the substrate can make the floor slabs much heavier, and this is dangerous for old buildings.
- With prolonged heating, such a floor can significantly dry out the air, so it is better not to lay it in initially dry rooms. Humidity can be replenished by installing an aquarium or buying home plants.

Device
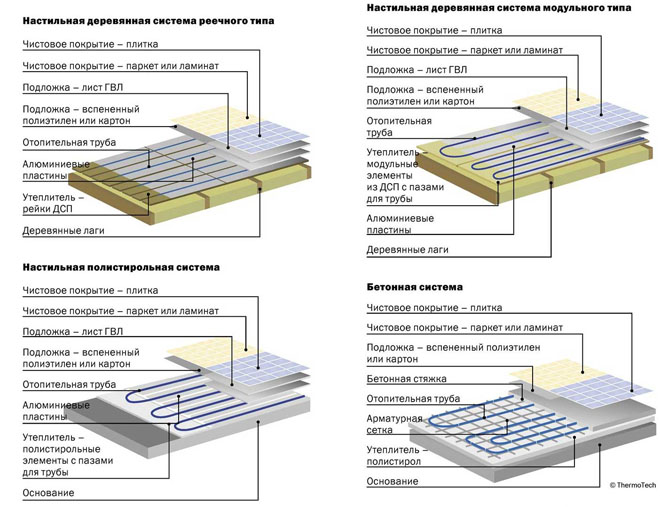
Water floor - a multicomponent system. Today, “wet” installation technology is often used: during the flooring, “wet” construction processes are used, for example, pouring cement screed. The process of laying dry floors is much easier, but they are used, for the most part, in wooden private houses.
This floor is laid in several ways:
- The first method is the most popular - concrete screed.
- The purpose of the following method is to install the contours inside the special holes in the expanded polystyrene. The grooves have to be cut by yourself.This slightly lengthens the installation process.
- Laying in trenches inside plywood sheets is mainly used in houses with wooden flooring.
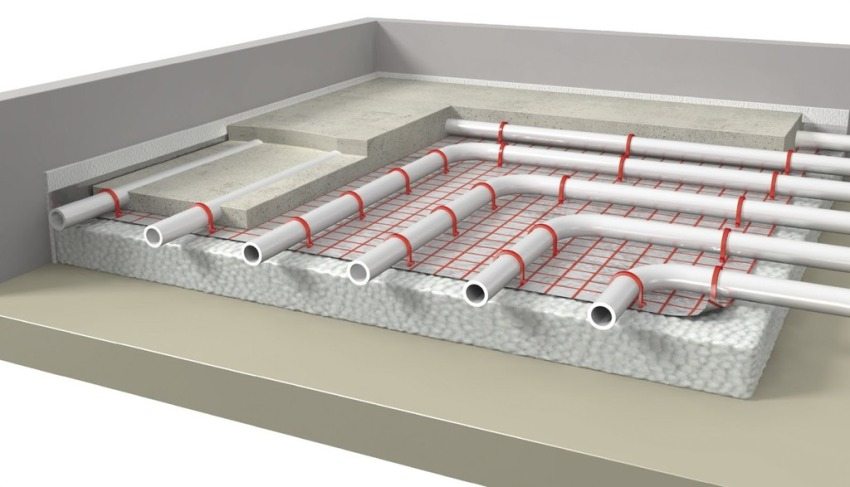
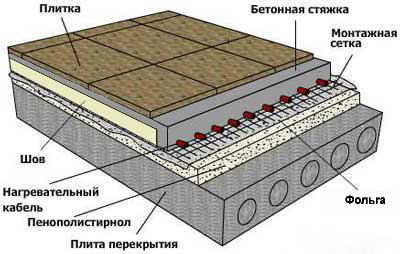
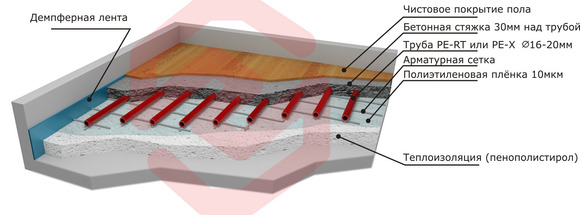
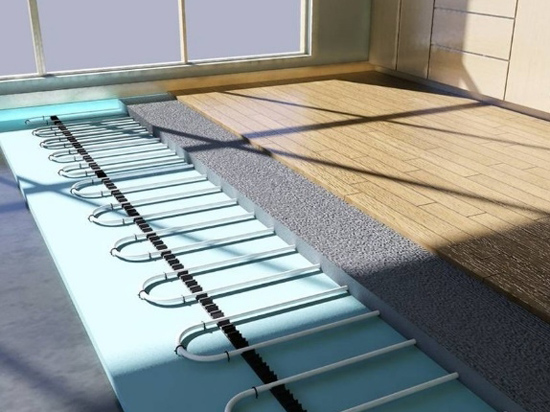
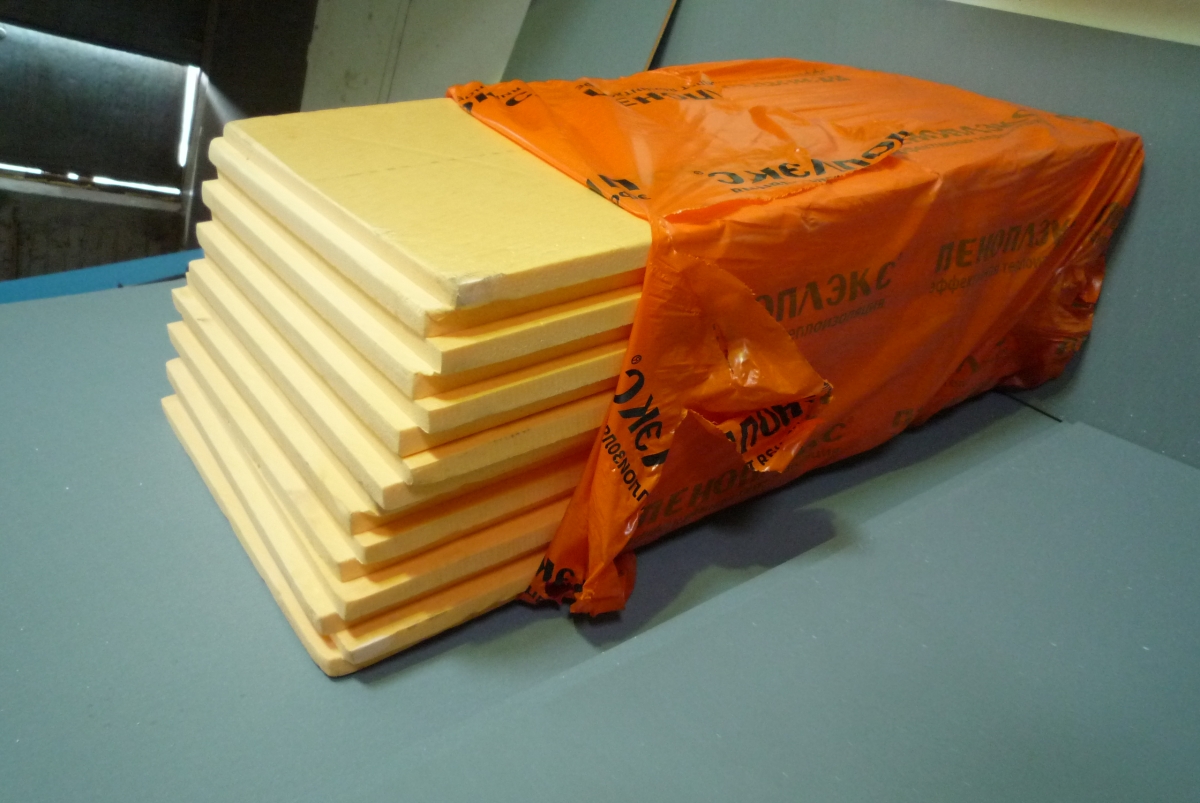
In the typical construction of the “cake” of the coating, with the first method of laying the base is a concrete floor slab or ground. The main requirement is stability and durability. A vapor barrier film of polyethylene or glassine with a thickness of about 0.1 mm is laid over the base. The next layer is insulation. It should have a low coefficient of thermal conductivity and high mechanical performance, therefore, preference is given to an extruded polystyrene insulator.
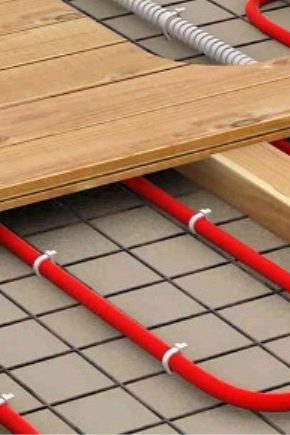
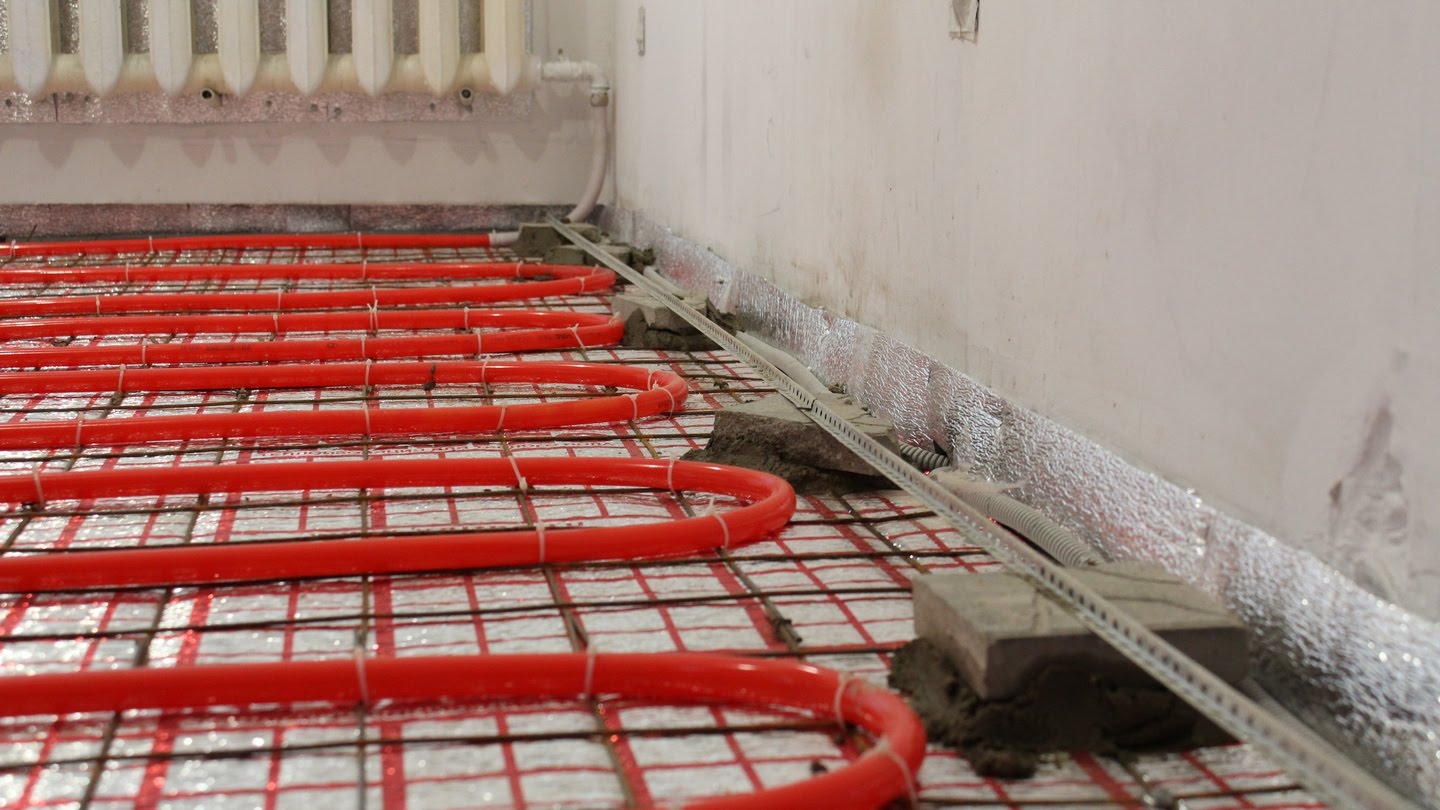
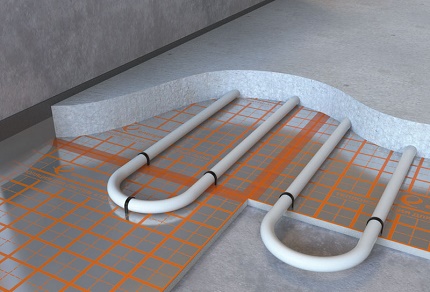
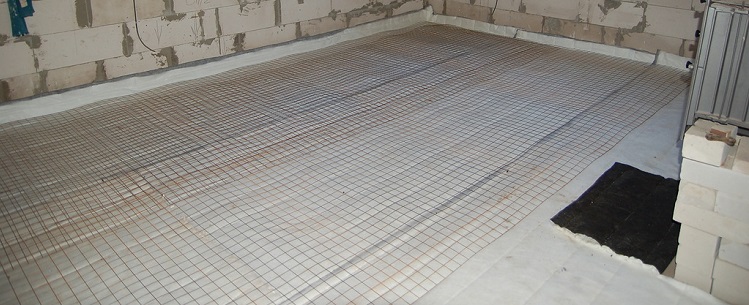
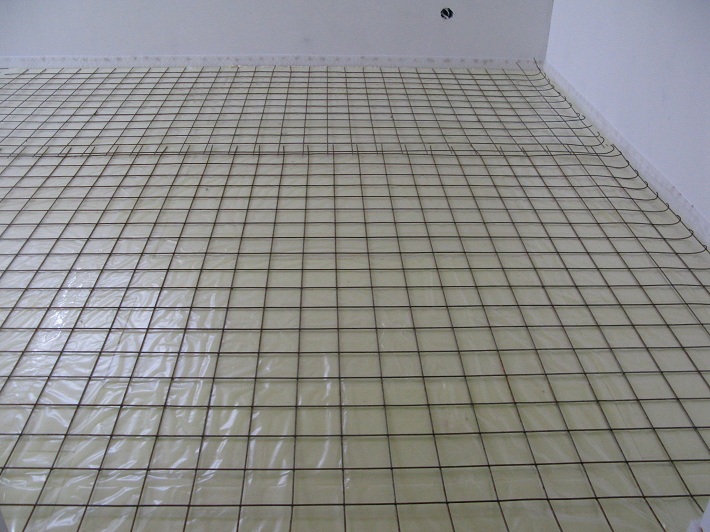
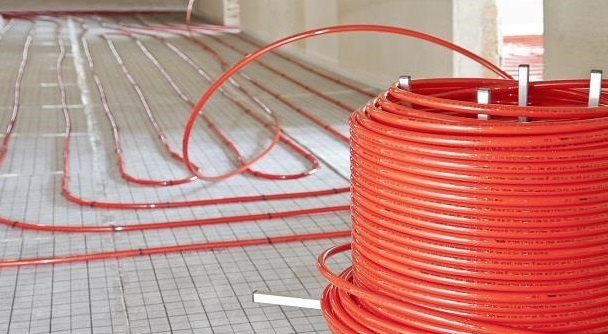
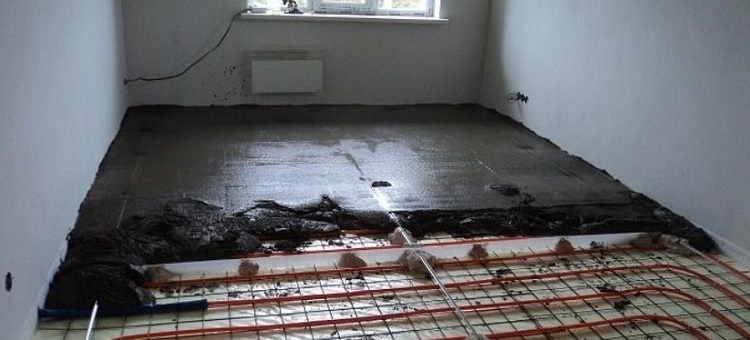
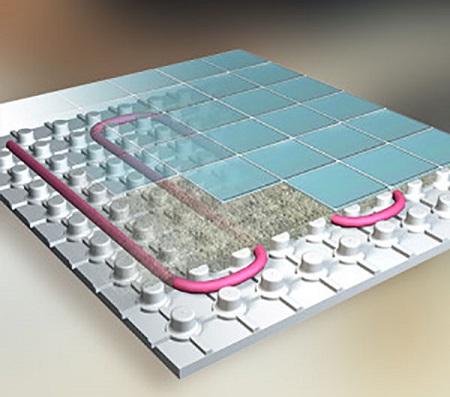
A new layer is a screed of a mixture of cement and sand and the addition of a plasticizer to achieve the desired mobility and reduce the ratio of water and cement. The contours of the pipes and the wire mesh are immersed in the mixture, the cell spacing is 50x50 or 100x100 mm. The optimal height of the screed above the pipes to ensure uniform distribution of heat and increase the strength of the structure is 5 cm. But it is also allowed to lower it to 3 cm.
To compensate for the thermal expansion of the screed at the borders of the heating circuits and at the points of contact with the walls, a damper tape not less than 5 mm thick is mounted.The finishing layer can be presented both in the form of a ceramic tile, and other types of a covering: linoleum, a laminate or a carpet.
It all depends on the functional area of the floors. It is important to know that fire-hazardous coatings require strict adherence to the heating mode.
The installation of the contours can be done in different ways.
Consider some options, their pros and cons:
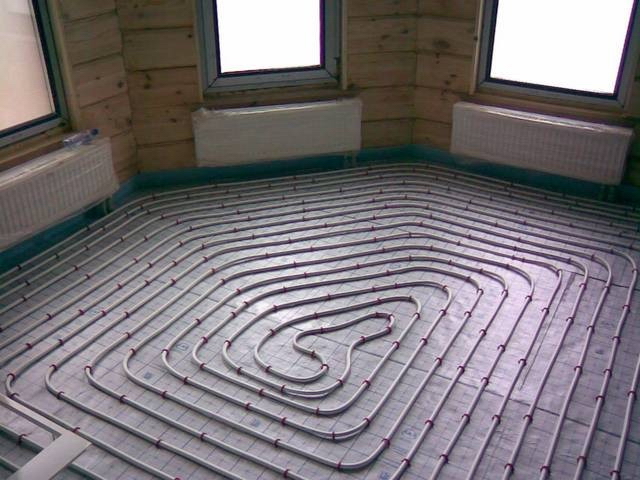
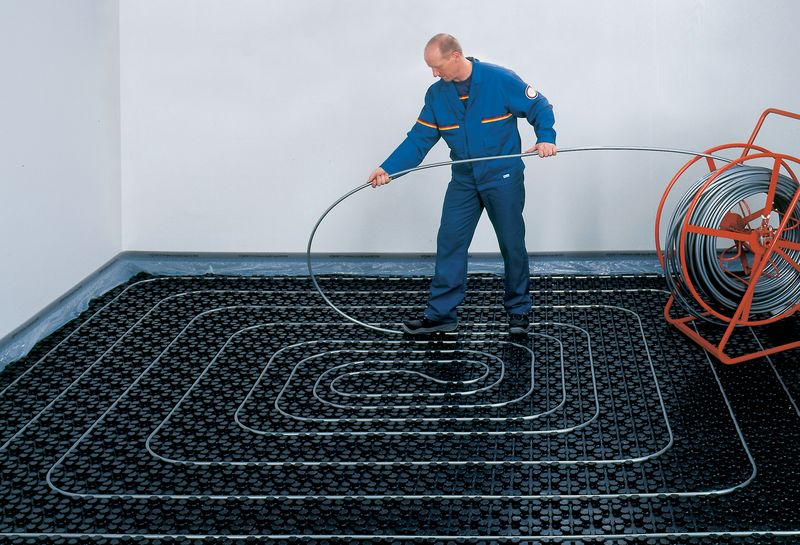
- "Snake" - the easiest to perform, but less common option for mounting circuits. The disadvantage is the temperature difference of about 5-10 degrees over the entire surface. Hot fluid when moving from the collector and cools back, so the center of the room is usually cooler than the walls.
- Installation of pipes "snail" is quite difficult to install, but helps to ensure uniform temperature distribution around the perimeter of the room. Direct and reverse movement of the coolant flows inside each other. This method has become more widespread.
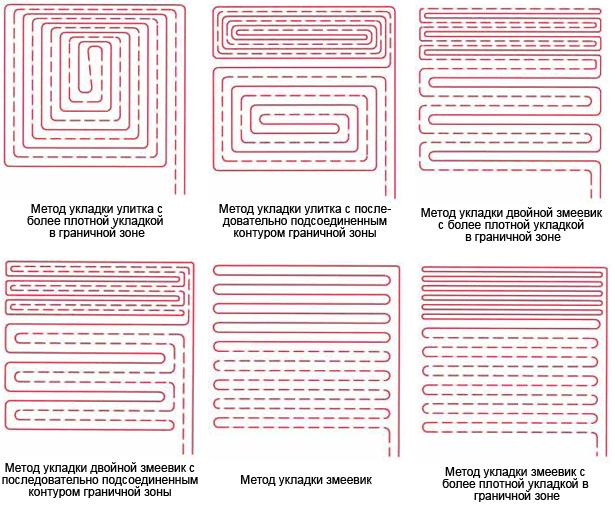
- Assembly systems can be combined. To maintain the desired mode of heating space builders advised to lay the edge zone of the first method, and in the center of the floor to run the pipe in a spiral.
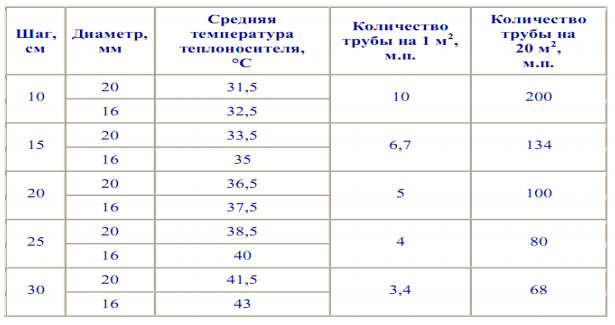
Stacking step - the required distance between the contour turns. It is directly dependent on the diameter of the pipe. Uneven ratio can cause voids or overheating, violation of the integrity of the heating system. Properly selected step size can reduce the load on the collector. The distance varies from 50 to 450 mm.
The step can be both constant and variable, this is influenced by the functional areas of the room. For rooms with strictly regulated heating requirements, changing the pitch of the circuits is unacceptable. However, a properly selected size can smooth out the temperature drop.
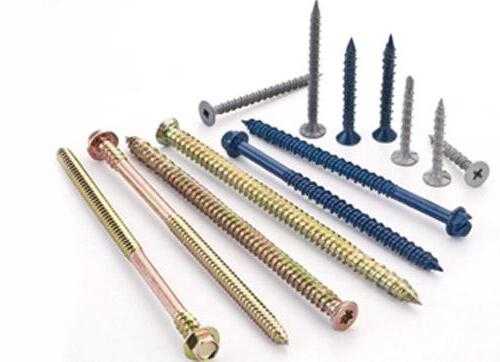
How to choose a pipe?
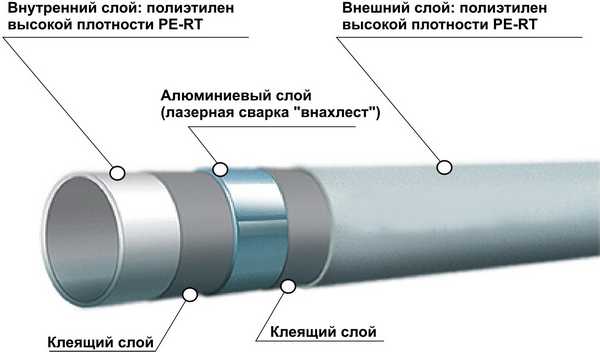
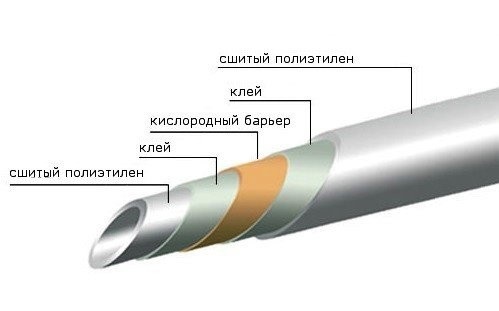
Requirements for pipes depend on their operating conditions. The main criterion is high corrosion protection. The material should not be destroyed with time, from high temperature or chemical composition of the coolant. It is necessary to choose pipes with a special "oxygen barrier" that prevents diffusion processes at the boundary of the material walls.
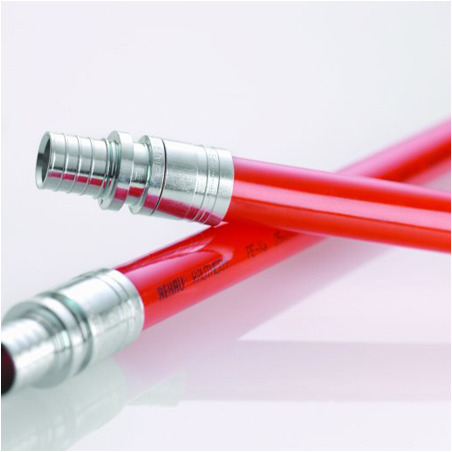
The use of welded pipes from any material is unacceptable in the installation of closed circuits. Steel, galvanized or stainless pipes are suitable only for moving the coolant from the boiler to the collectors.Pipe joints are a weak point of the TVP, therefore the ideal contour is laid from a single pipe length. The material of such pipes must be plastic, resistant to the formation of cracks and able to retain the desired shape.
The external diameter of the pipes should be 16, 20 or 25 mm. It is important not to forget that the narrowing of the contours is aware of the extra load on the equipment, and a significant expansion makes the coupler heavier by raising the floor.
Concrete exerts considerable pressure, so pipes should be selected for high strength. The walls must not only cope with the external load: the pressure drop of the coolant can reach 10 bar. Also, the material must withstand temperatures up to 95 degrees to ensure the safety of the system.
Common mistakes consist in the choice of pipes with an internal rough surface. Hydraulic resistance in such systems is large enough, which leads to the appearance of unwanted noise of the circulating fluid.
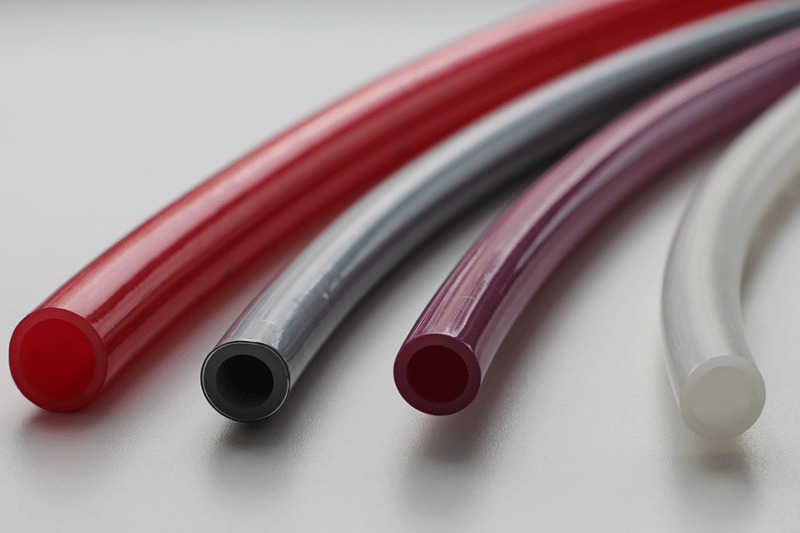
The above conditions are met only by certain types of materials:
- Pipes from polypropylene. This material has a low cost.Among the mechanical characteristics of polypropylene, one can distinguish a low level of heat transfer and the absence of plasticity. Pipes from such material are not suitable for installation of a warm water floor. Even after laborious welding, such a system will remain unreliable.
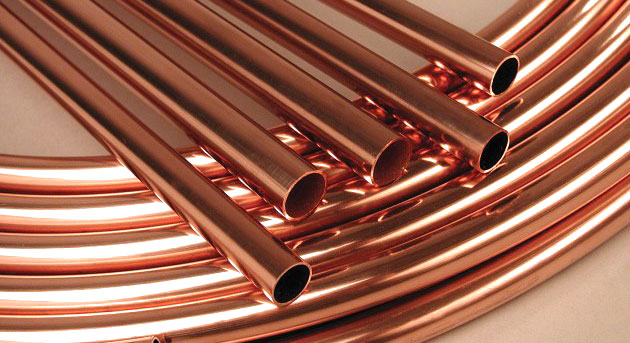
- Copper. This material has good thermal conductivity and high dynamic strength. In modern samples, a special polymer film is applied to the inner surface, which enhances their mechanical properties. Among the existing shortcomings can distinguish the complexity of installation and high cost.
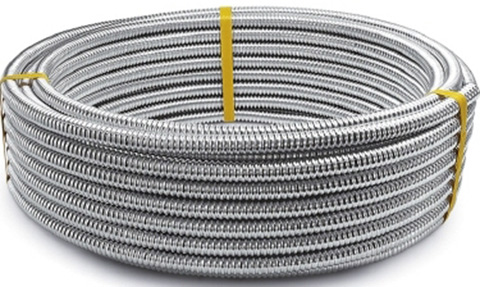
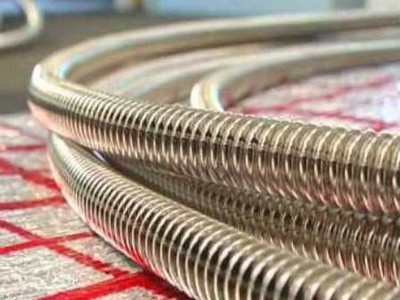
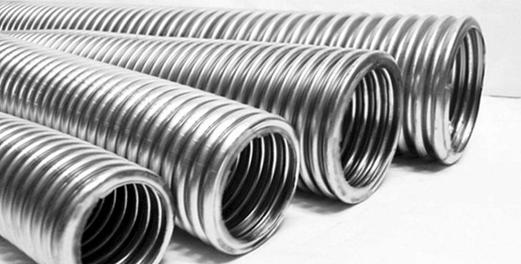
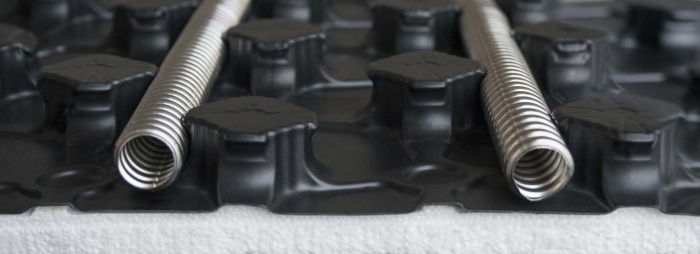
- Corrugated steel pipes. Fitting connections of structures made from this material are considered reliable and are allowed when installing the TVP. Stainless steel works well on bending and is not susceptible to corrosion, and the plastic inner lining gives the contours additional strength. Unfortunately, this material has not yet become widespread in the field of installing underfloor heating because of its novelty.
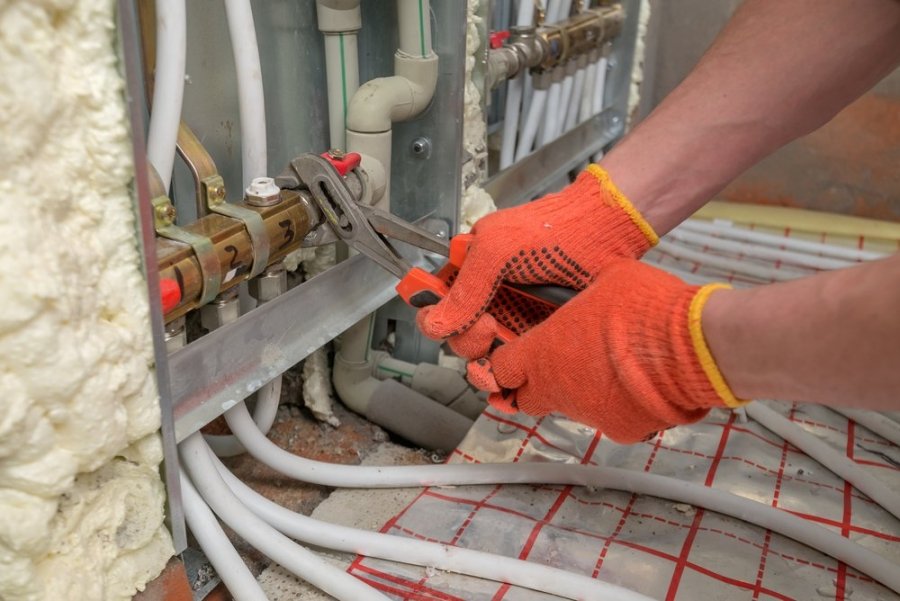
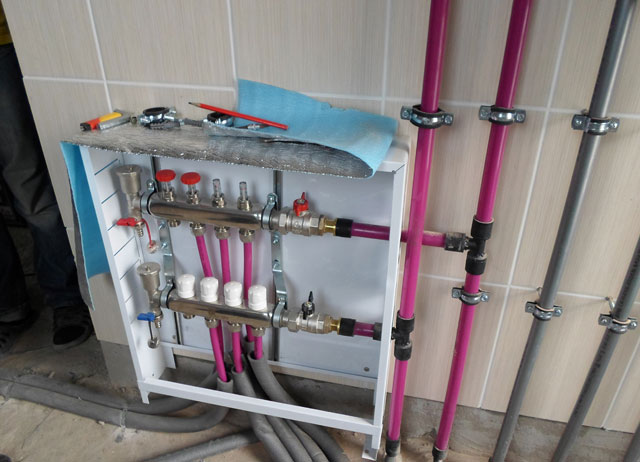
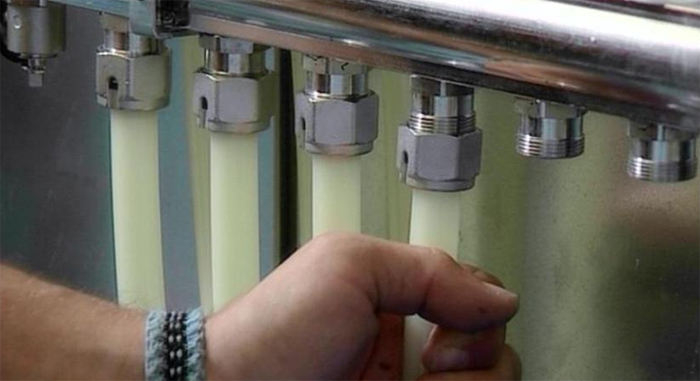
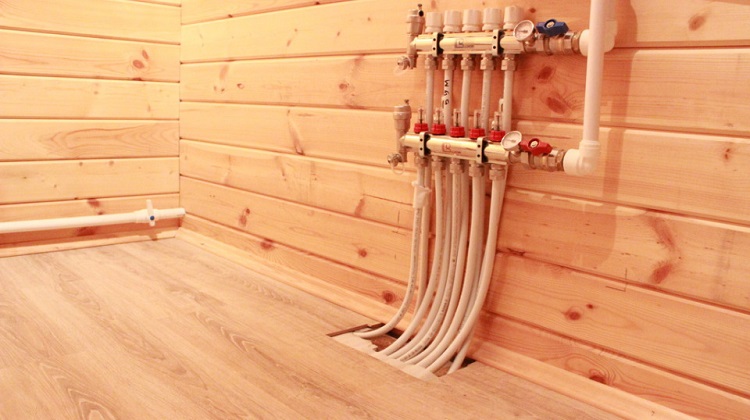
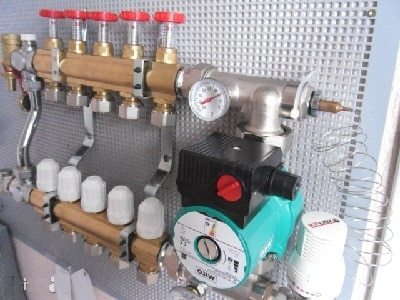
How to choose and install a collector?
The collector-mixing unit performs many of the most important functions; therefore, the smooth functioning of the entire heating system depends on its competent choice.It is better to entrust the choice of device to specialists, but if you want to make a purchase yourself, you must rely on some principles.
Feed manifolds must be equipped with balancing valves. They can be installed flowmeters, but their presence is not required. Reverse units should be equipped with thermostatic valves or shut-off valves.
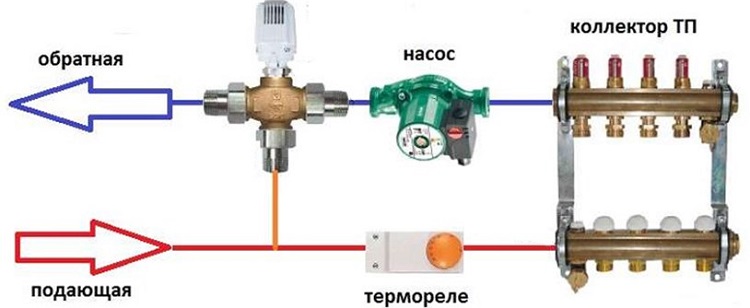
In any collector must be an automatic air vent. Drainage valves are provided to remove air or drain coolant.
Individually matched fittings for each system ensure that the manifold is properly connected to the pipes. And the fastening of the mixing unit with the observance of the necessary distance between the axes is carried out using special brackets. In the collector group may be included thermostat. If you wish to fully automate thermoregulation, preference should be given to systems with electromechanical actuators on the valves. However, they require additional installation of mixers.
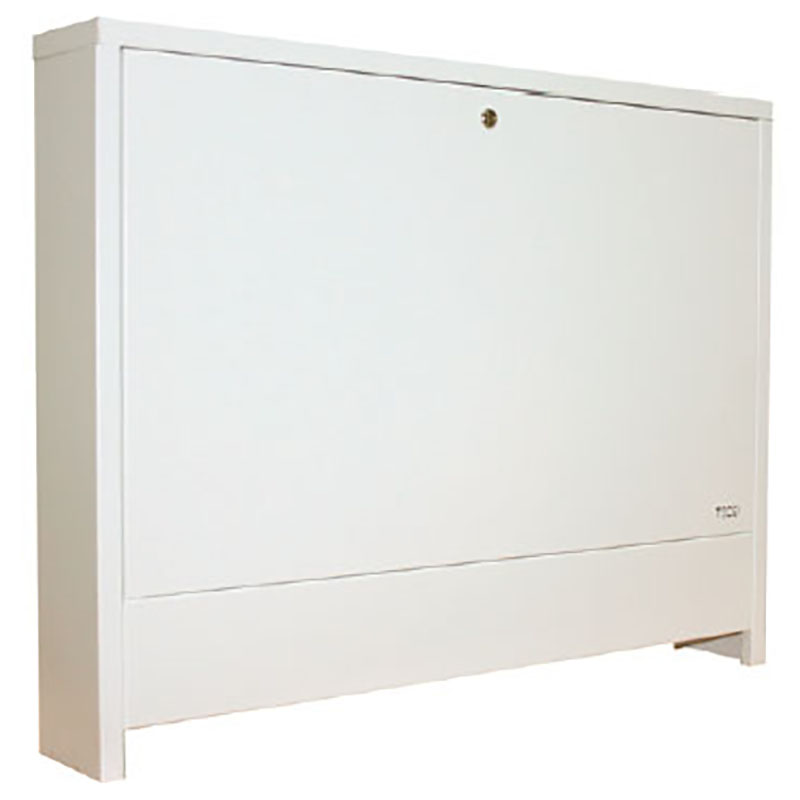
The entire collector complex should be located in a specially equipped cabinet, installed in a niche or open.In order for the air to escape correctly, the cabinet must be located above the floor level. The thickness of the walls, as a rule, reaches 12 centimeters.
Calculation and design
The calculation of the future floor is made before the purchase of materials. Pre-compile a drawing of the installation of pipes: in the locations of furniture or existing plumbing are not advised to lay the contours. Each turn occupies no more than fifteen squares of area, and pipes should be chosen of approximately equal length, therefore, large rooms must be divided. If the room has good thermal insulation, then the optimal laying step is 15 cm. When the temperature drops in winter to -20, the step must be reduced to 10 centimeters. The average consumption of pipes for each square meter of room at a step of 15 cm is 6.7 m, at a step of 10 cm is 10 m.
The flux density is equal to the total heat loss in the room to the floor area minus the distance to the walls. To calculate the average temperature, take the average value at the inlet and outlet of the circuit. The difference of these temperatures can not be more than 55 degrees. The length of the contour is equal to the area of heating divided by the step of laying. The distance to the collector box is added to the result.

The calculation is made individually for the premises, depending on their purpose and dimensions. The required power value is determined based on the obtained data on the planned temperature, heat loss and the top layer of the floor covering. If the room is weak enclosing structures, the base is carpeted with granite or marble slabs.
After the calculations, a drawing is carried out reflecting the mutual arrangement of the turns of the pipes, taking into account the fact that the contours should not intersect. It is forbidden to lay pipes close to the walls, you need to retreat at least 10 cm.
Preparatory work
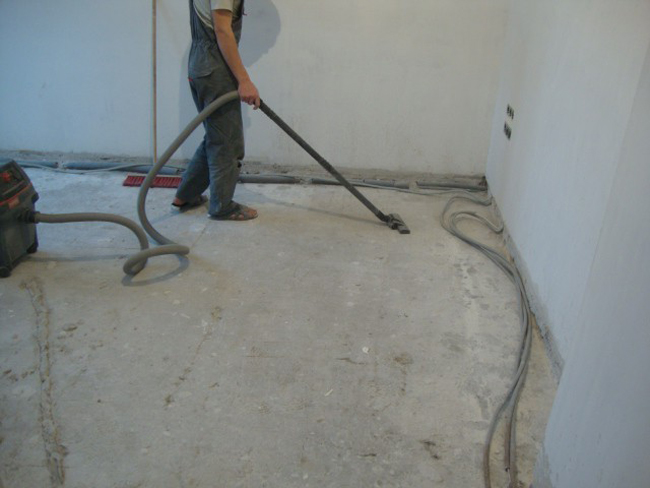
Installation of the floor can only be carried out in a fully finished room. Preliminary communications are carried out, windows and doors are installed, and niches are installed to install a collector shield. The basis for laying should be leveled, differences should not exceed five millimeters. Otherwise, high hydraulic performance will have a negative impact on the system - the laid pipes will “air up”.
The old floor must be dismantled and the surface leveled. If the base slab has an excess greater than 5 mm, then it is poured with an additional cement screed. In rooms with different levels of the floor it is impossible to achieve uniform heating.Next, the surface is cleaned and placed waterproofing. The waterproof layer prevents the penetration of moisture from the lower levels into the floor heating system.
Laying waterproofing is optional in the case when using extruded polystyrene foam. Also, its position does not play a decisive role: the insulating layer can be put both below and on top of the insulation.
It should be borne in mind that in the second case from above it is necessary to lay a mounting grid. Waterproofing should cover 20 cm adjacent walls. For reliability, the seams are fixed with adhesive tape.
On top of the waterproof material on the walls around the perimeter of the room they glue a damper tape with a thickness of 5-8 mm and a height of 10 to 15 cm. The upper edge of the tape should be trimmed after the final casting with a coupler. If you want to make such coverage yourself, then you should remember to screw it to the wall.
The next stage of construction - laying insulation. The choice of sheet insulation thickness depends on the height of the room: for the first floor - from 23 to 25 cm, and in the rooms of the second and third floor it can be limited to 3-5 cm. To increase the connection of the coating plates, the joints are usually shifted.
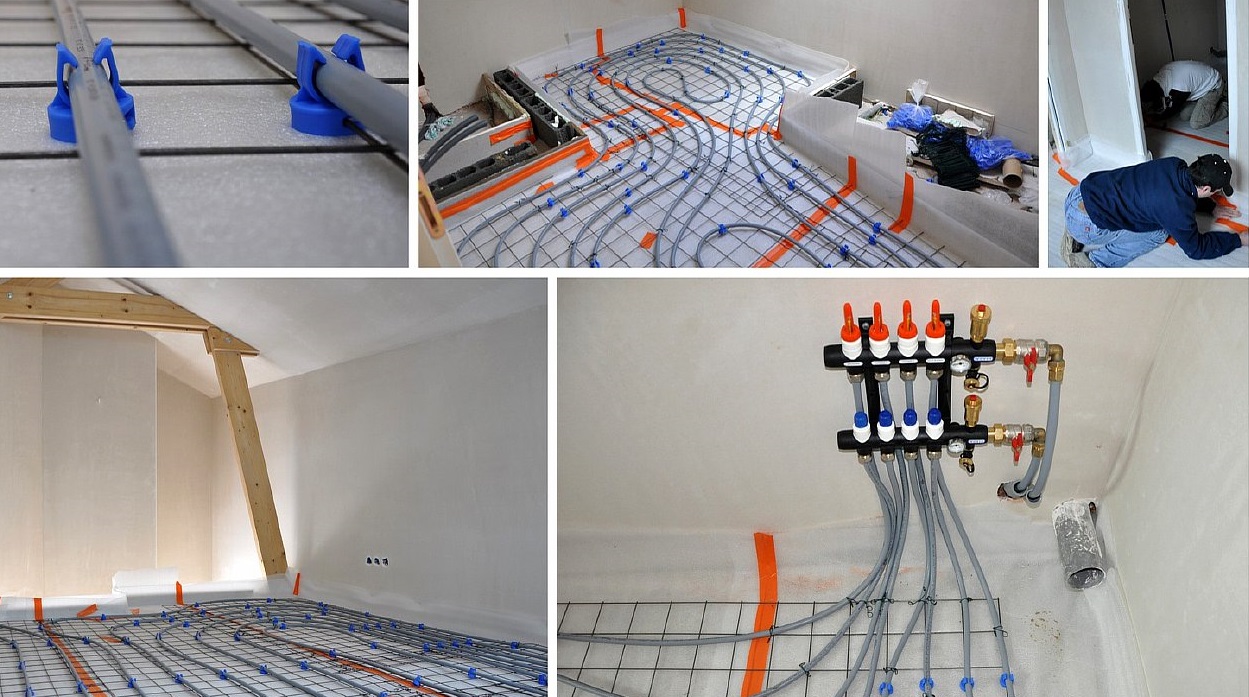
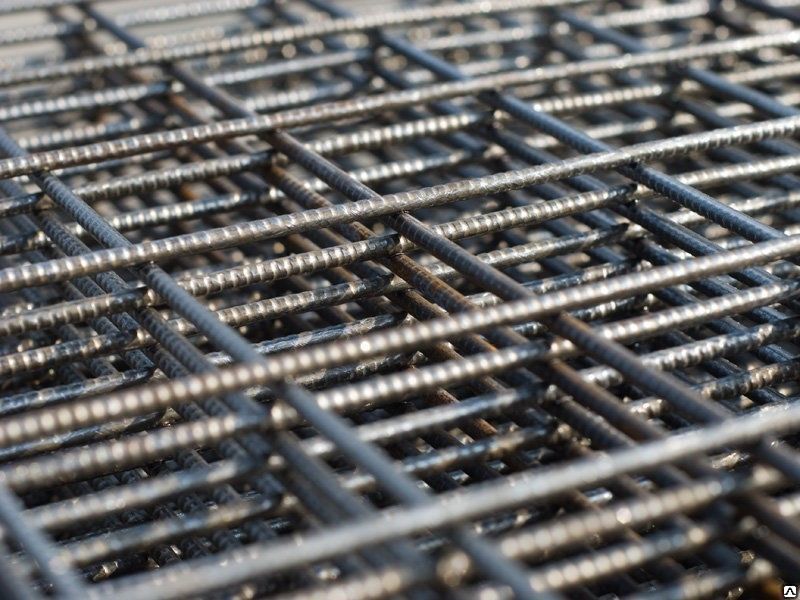
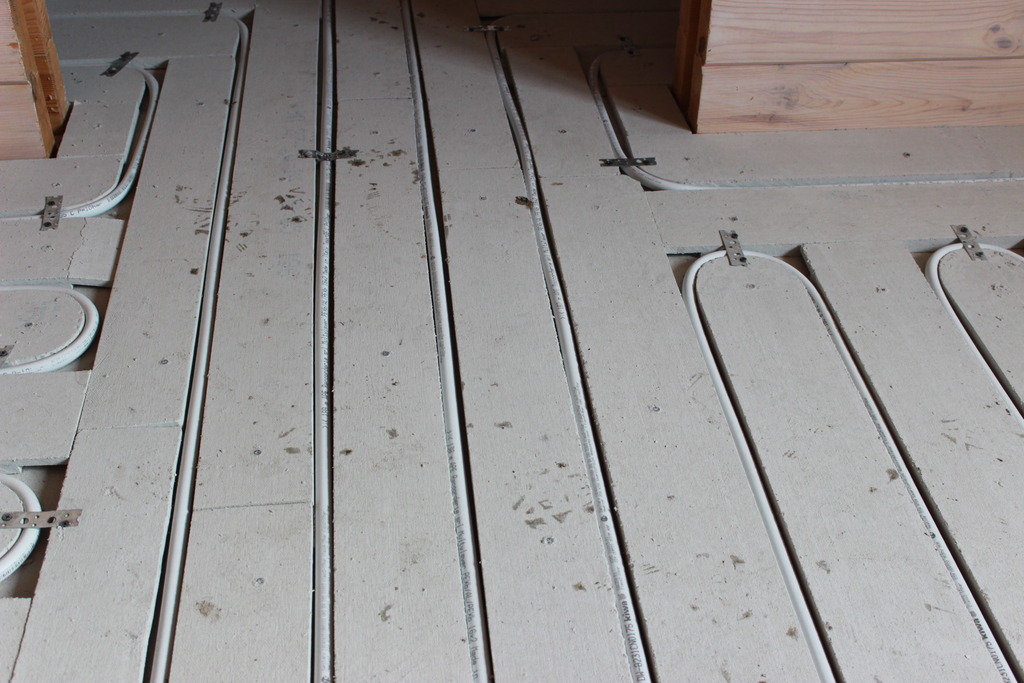
The final step of the preparatory work is the reinforcement mesh device. This design is necessary for the subsequent fixation of pipes. The diameter of the rods - 4-5 mm, and the width of the cell is selected depending on the value of the step of laying the contours. Mesh sheets are fastened together with wire.
Installation
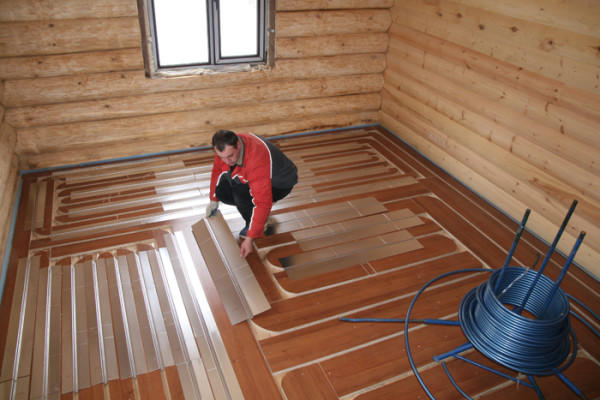
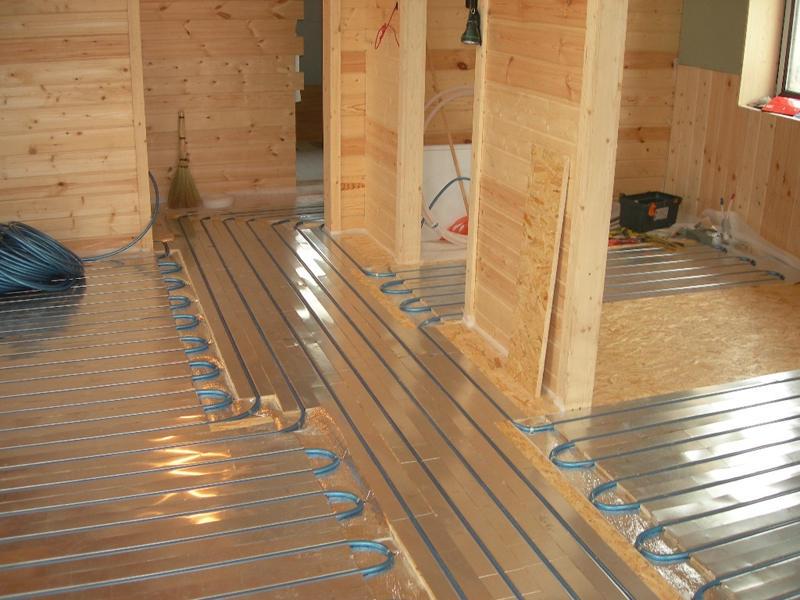
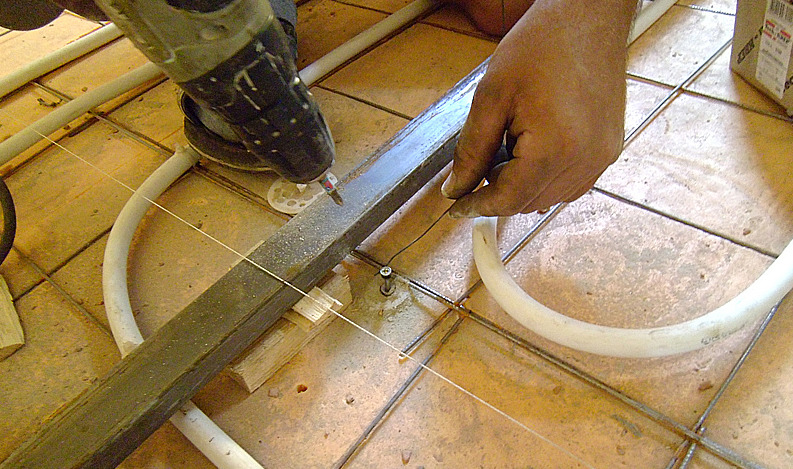
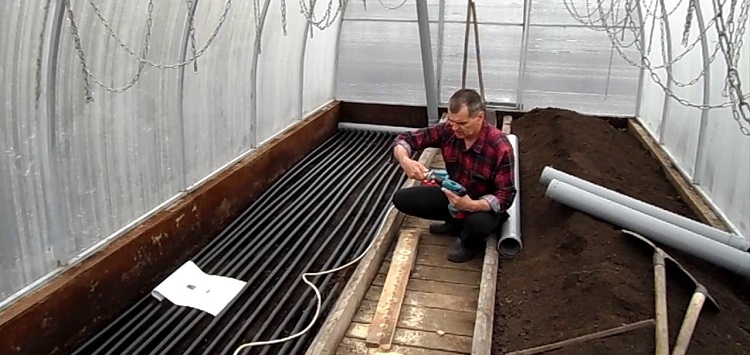
When installing by hand, it is recommended to use a special device for unwinding the bay. When pipes are removed by rings, a stress arises in the material, which significantly complicates subsequent work. The bay is made to turn. Next, on the layers of EPPS (insulation) produce the marking of the trajectory of the installation of future contours in compliance with the step.
First set the collector. Pumps and mixers are connected separately. Pipes must be protected with corrugation. Significantly save the replacement of corrugations heat insulation suitable diameter.
The contour assembly should be started from the parts of the room furthest from the panel. All intermediate pipes should be covered with foamed polyethylene insulation. This method will help to preserve and maintain the heat and energy balance for a long time.Then the end of the pipe is “removed” from the EPPS and allowed to follow the intended contour without covering it with insulation. At the end, the pipe is led back to the insulation and lead to connecting to the collector.
To hold the pipe in the insulation was not difficult, builders advise to pre-cut through the material in the trench passage. If the insulation is laid in two layers, the communication should be started through them. In cases when communications of hot and cold water supply pass in the places of future laying of the heated floor, they are usually fixed in a bundle under the EPSS slabs.
Cavities and voids after installing the contours must be eliminated by using foam.
Installation rules
Directly installation of pipes consists of several stages.
The following is a generalized instruction:
- 10-15 m of the reeled pipe is connected to the supply of the selected collector outlet.
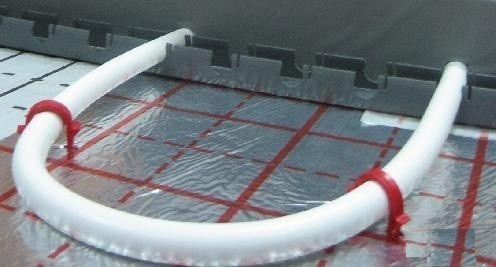
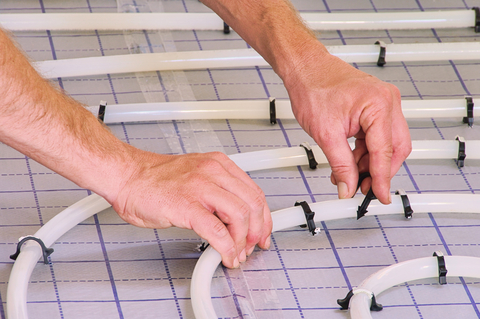
- The pipe goes along the intended trajectory, it is fastened with brackets on straight sections every 30-40 cm, while turning - 10-15 cm. Kinks and tensions should be avoided.
- If the cramp is broken, it must be duplicated at a distance of about 5 cm.
- After completion of the bypass and the final pipe output, special insulation is put on it. The end must be connected to the manifold by fitting.
- The data lengths of the contour must be fixed for subsequent balancing.
Before filling the screed it is necessary to carry out hydraulic tests of installed circuits. To the collector down the hose connected to the sewer. It is more practical to use a hose of transparent material to view the movement of air particles. Connect the pressure pump to the circuit outlet.
Next, the system is checked in the following sequence:
- On the collector they leave one not blocked circuit, they open automatic air vent.
- Water is turned on and through the attached hose its movement and exit of air bubbles is observed.
- Drain valve overlap after complete purification of water and the release of all air.
- The circuit is turned off and the cycle is repeated with all pipes.
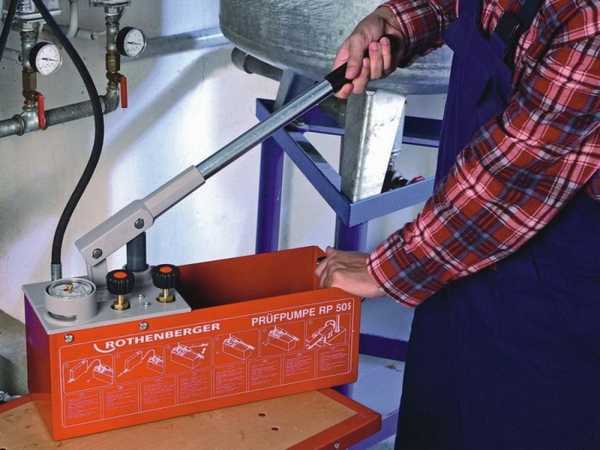
If leakage is detected, the pressure should be lowered and faults should be eliminated. Properly laid heating system is an airless piping system filled with purified coolant.
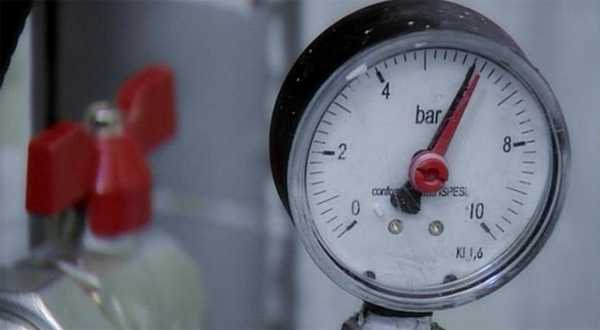
Testing with a pressure pump involves the opening of all contours of the heated floor and the pump supply valve.The pressure is set to twice the working pressure of the system - about 6 atmospheres. Its value must be controlled with a pressure gauge. After half an hour the pressure is increased to 6 bar. Between approaches, a visual analysis of the pipe joints is carried out. After the discovery of defects, the pressure is relieved, the violations are eliminated.
If no malfunctions were found, the system is started for a day at a constant pressure of 6 bar. Manometer readings should decrease by no more than 1.5 bar. When this condition is met and there are no leaks, the pipes are considered to be correctly and safely laid.
In order for the contours to withstand high pressure without straightening, they must be fixed.
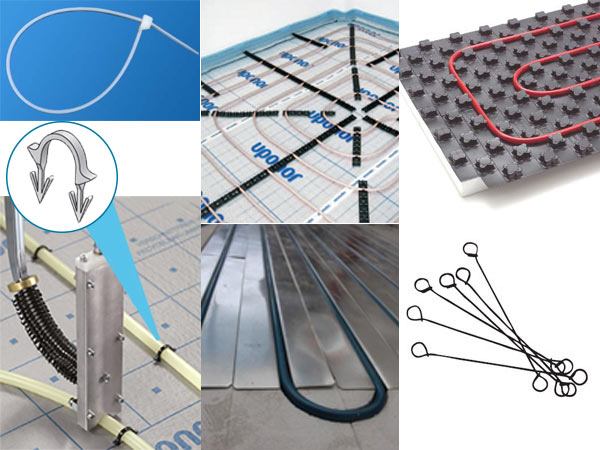
There are several ways of fixing pipes of a water heated floor:
- Tightening collar. The material from which it is made is polyamide. This type of fastener is widespread due to easy use. Approximate consumption: 2 pieces per 1 m.
- Steel wire for fasteners.
- Fixing with a stapler is a convenient option for quick installation of circuits to insulating plates.
- U-shaped PVC bar called fixing track.Such fasteners are used to hold pipes with a diameter of 16 mm.
- Polystyrene mats.
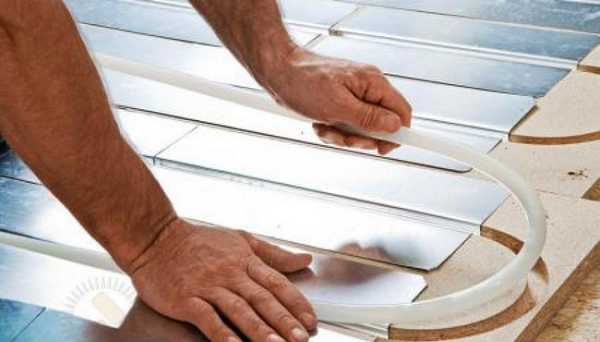
- A distribution plate of aluminum sheet is used when laying on a wooden floor. It is able to evenly spread the temperature over the surface.

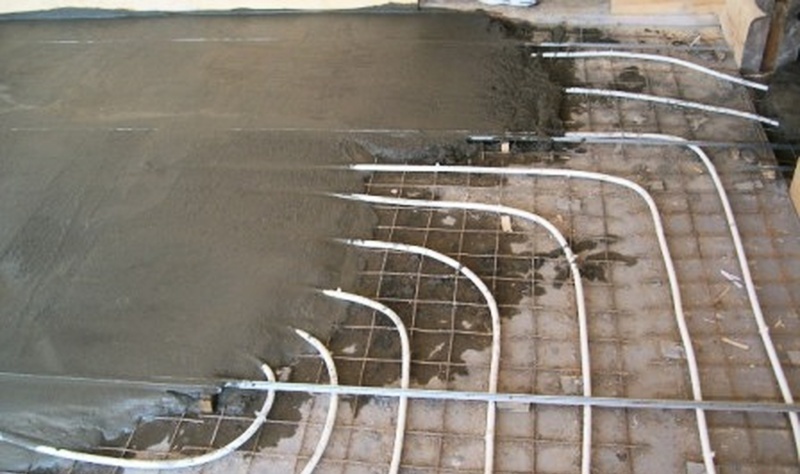
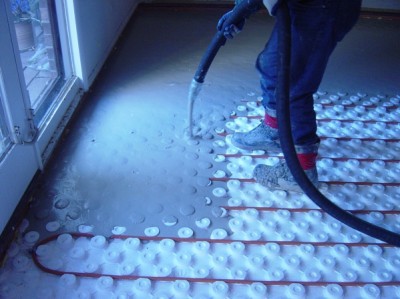
Screed performance
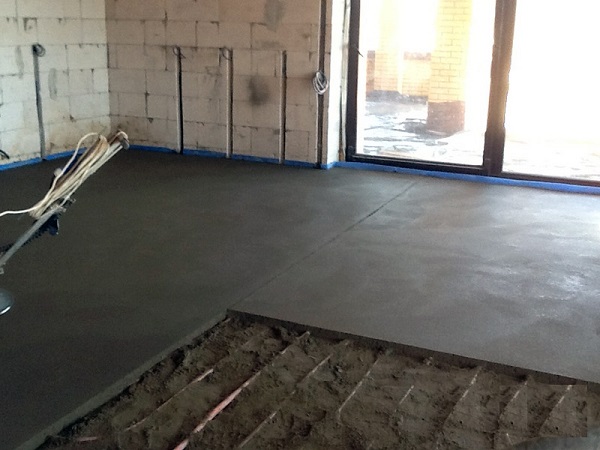
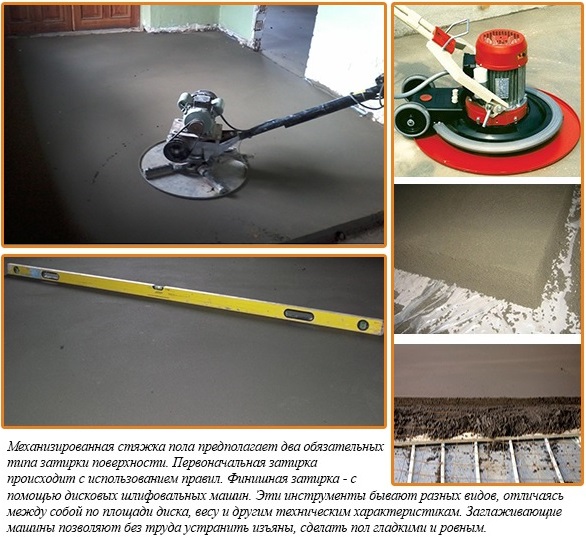
After testing the pipes, it is necessary to fill the system with a coupler. The brand of concrete should vary from M-300, the aggregate - crushed stone fraction from 5 to 20 mm. The fill must cover the pipes by at least 3 centimeters. This is a necessary condition for the uniform distribution of heat over the surface area of the floor, and to obtain the desired strength. From the calculations it follows that with a thickness of 5 centimeters a square meter of coating will reach a weight of 125 kg.
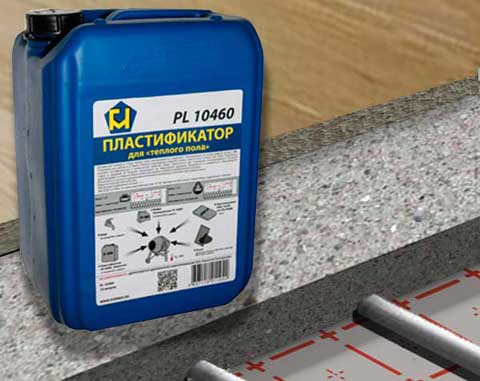
The heating time of the screed and the inertia of the TVP is directly proportional to its pouring. If the thickness of the material obtained reaches 15 cm, then the system will need to recalculate the thermal regime. Also on the value of the indicator of floor heating affects the thermal conductivity of the screed. The strength characteristics of the screed must be increased, since this coating during the operation is not only subjected to mechanical loads, but is also under constant temperature pressure.To achieve high physicomechanical characteristics, components such as fiber and plasticizer are added to the concrete mass.

The plastic modifier is used to lower the water-cement ratio, which leads to an increase in strength characteristics and an increase in slip. These properties are extremely important when laying the screed. Similar material characteristics can be obtained by increasing the water content. But such a decision may affect the strength of the screed. The plasticizer is produced both in dry and in liquid form.
By adding fiber to concrete, the durability of the material increases and the service life increases. Fiber resists abrasion and increases the strength characteristics during deformation. Microfibers of this material are made of basalt, metal or polypropylene. For screed floor heating in the apartment, preference should be given to the latest material. It is recommended to add at least 800 grams of this material per 1 m3.
Before pouring the room must be cleaned of excess items and dirt.
The coupler can be poured only once, so you should work quickly.It is necessary to limit the penetration of cold air and direct sunlight into the room.
You can prepare the cement mortar yourself using tools such as a construction mixer or a concrete mixer.
Dry base - Portland cement is mixed with washed sand in a 1: 3 ratio. Water accounts for one third of the total mass of cement paste, but adding to the mixture of modifiers can reduce its consumption.
The time and technology of preparation of cement paste depends on the tool used. Mixer first, at low speeds, mix dry ingredients, and then gradually pour in water with previously added soluble plasticizers. Mixing time - from 5 to 7 minutes, depending on the power of the device. The concrete mixer is first filled with water, and after that the dry ingredients are introduced and mixed for 4 minutes. You need to know that the fiber is forbidden to throw into the drum without first loosening.
The finished solution has a uniform consistency and color. The material must keep its shape and, when compressed, release water. Concrete must be plastic, otherwise laying will not work.
Begin to fill the stripes from the far wall of the room. In the process of laying the tie must be leveled, avoiding the occurrence of grooves. Some cement flows are allowed at the joints of the plates - they can be adjusted at the end of the process. High-quality coating should not delaminate. While maintaining the temperature in the room at 20 degrees and observing all the rules of laying the surface will begin to harden after 4 hours.
The floor is cleaned after a couple of days: this is enough time for the coating to harden. The screed must be regularly moistened and covered within 10 days after work. Completely the floor will harden only after 28 days. Until this time, it is not recommended to turn on the TVP.
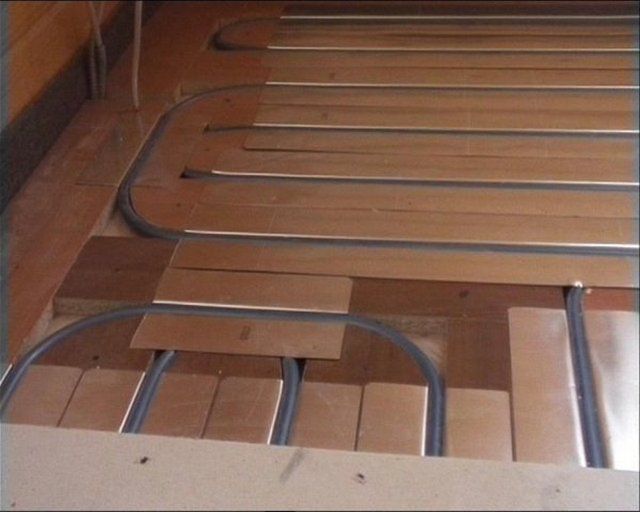
On wooden floor
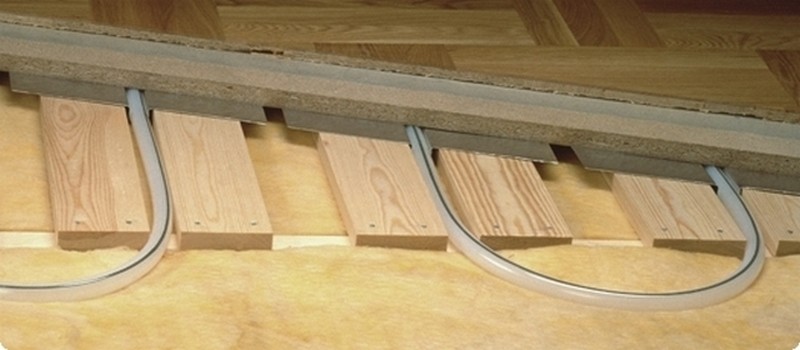
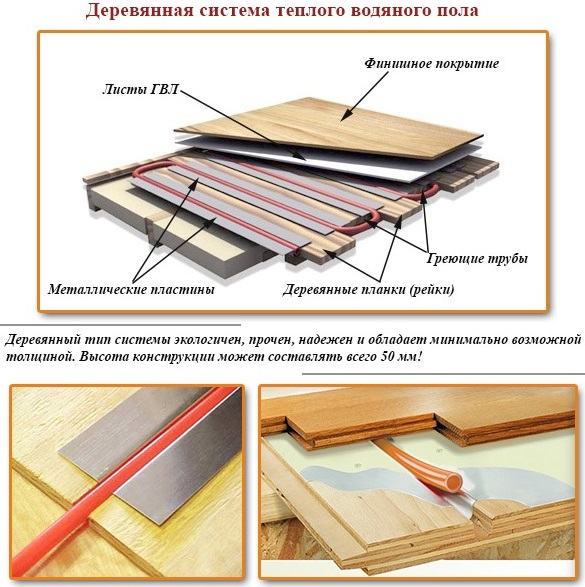
In houses with wooden floors, the heating floor can be divided into several types:
- Single layer construction. Based on the thickness of the boards and the nature of the supporting structures, such systems are erected on logs, the boards are laid on beams, keeping a distance of about 0.5 m between them.
- In two-layer constructions A layer of insulation about 80 millimeters high is laid over the boards. An additional layer of insulator is allowed between the finishing and the subfloor, leaving a gap of 4 mm.Due to this distance, the air can circulate freely, preventing the destruction of the material.
Before laying the water floor wooden structures require a detailed inspection for damage. Violation of the integrity of the wooden base - a system of load-bearing elements, lags and ceilings, prevents the laying of the PVC. The gap must be filled with insulation.

You must first familiarize yourself with the state of the lags on which the floor is mounted. Heat-insulated flooring as an independent structure is laid on top of the supporting wooden frame of the house.
To assess the condition of the floor, a visual inspection of the surfaces of the boards is carried out, and the condition of the wood structure is checked. It is important to replace rotten and cracked boards. If the distance between the bearing elements exceeds the allowable, you need to add lags. The surface of old boards is leveled so that the irregularities do not exceed 2 mm.
This system does not use a substrate, so you need to carefully prepare the future surface for laying. It is customary to lay sheets of plywood or boards on the lags, forming a raised floor - the base for a heat insulator.Next, the structure is covered with a vapor-protective film so that the heat produced by the circuit comes up. Insulation thickness of not more than 10 cm lines the gaps between the lags. And on top of the design place an additional layer of insulator.

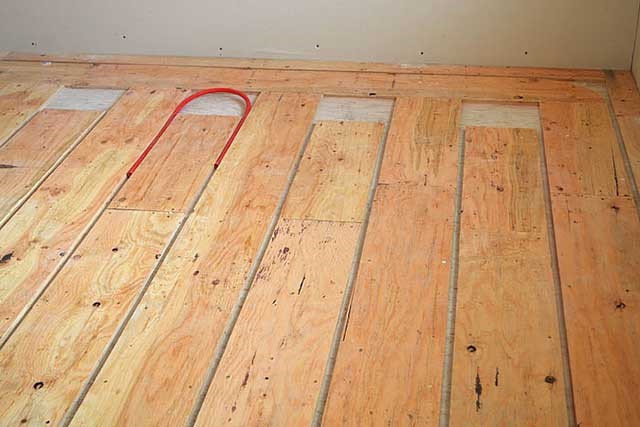
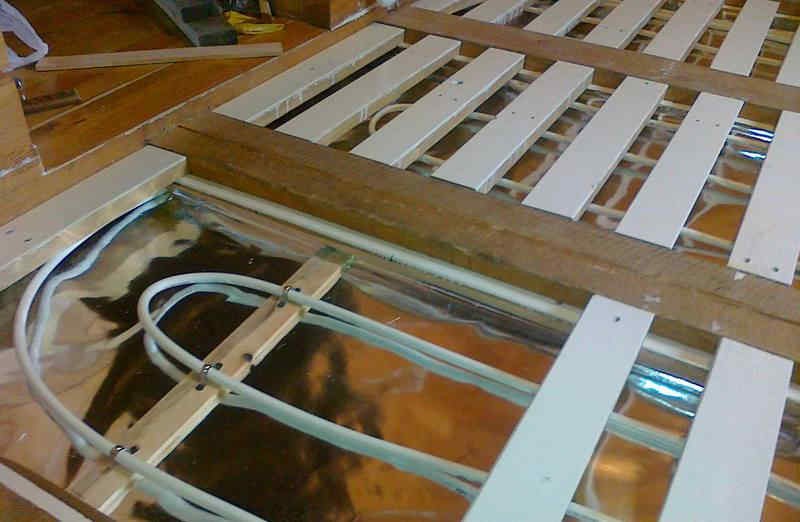
Installation of pipes "snake" in this case is impossible. At first, boards of a special configuration are laid with grooves of size 20x20 mm. The edge of the boards round out for comfortable installation of pipes. The contours of the water floor fit directly into the prepared grooves without much difficulty. Pipes are selected with a diameter of not more than 16 mm. For maximum heat transfer, you can wrap the contour with foil, the edges of which are fixed with brackets to the boards.
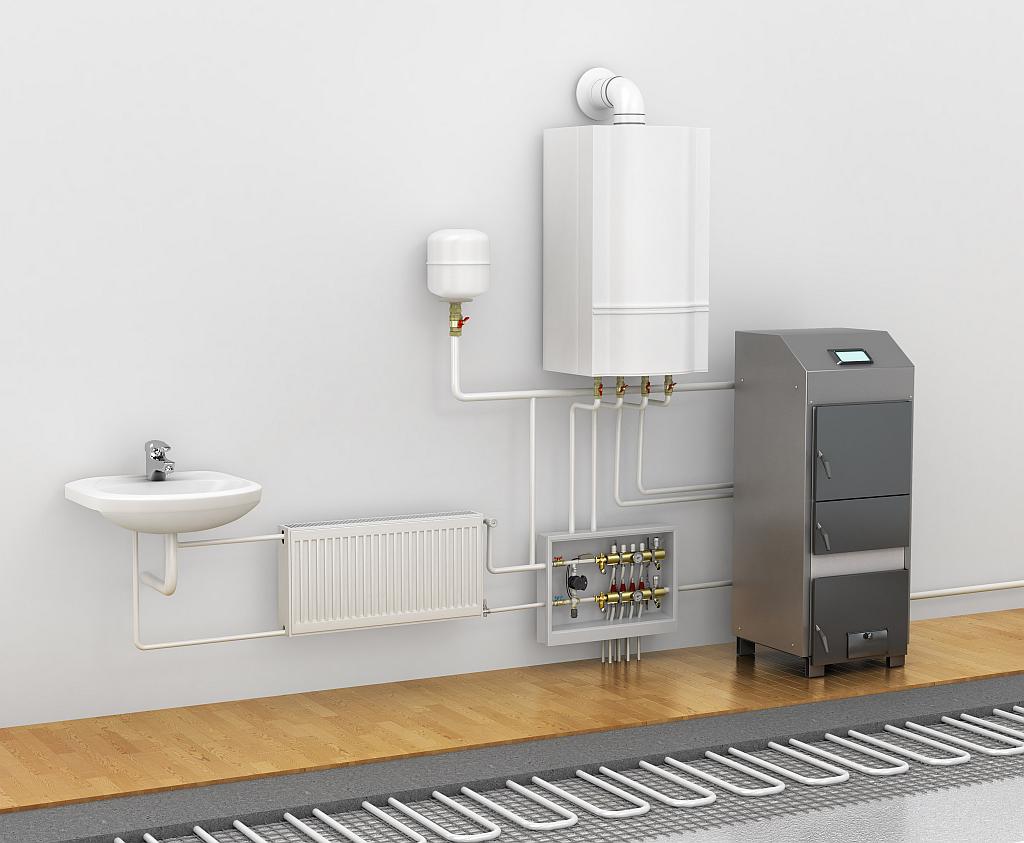
Wood has a poor thermal conductivity. Therefore, when the repair of the premises is carried out with the installation of the TVP, metal plates are mounted on top of the pipe system. Such a “battery” should cover the entire floor area. At the final design stages, it is necessary to make sure that the shield of the mixing unit is located above the floor level, and the choice of materials for the topcoat meets the sanitary and hygienic standards.
System startup
After 28 days from the start of the pouring of the screed, you can proceed to start the system. Balancing is carried out using flowmeters and balancing valves on the manifold. Installation of the pumping and mixing unit is carried out, the collector is connected to the supply line. All valves open and all contours of the water floor are connected. Turns on the circulation pump.
First, the mixer set the maximum temperature without connecting the boiler. The moving coolant should not be warmer than the air in the room. The system sets the operating pressure of 1-3 bar. Then overlap all contours, except for the longest, and record its consumption. A similar operation is performed with the second contour along the length. The flow rate is aligned with a balancing valve. The readings of each pipe system should not differ from each other.
Testing of the heated floor can only be started if the flow in all circuits is the same. At the beginning of the test, the minimum temperature is set, increasing by 5 degrees every day.
At the mixing unit, a temperature indicator of 25 degrees is set and a circulation pump moving at first speed is connected. In this mode, the system should work for about a day.In the course of work, the circulation is monitored with its subsequent correction. Every 24 hours when the temperature increases by 5 degrees, it is necessary to compensate for the difference in readings on the supply and return manifolds.
The speed of the circulation pump is increased with a difference of 10 ° C. The maximum possible collector temperature is 50 degrees. Nevertheless, experts recommend to consider options for setting the temperature in the range of 40-45 ° C. The pump must operate at minimum speed.
Changes in temperature can be felt only after several hours of uninterrupted operation of the water floor system. To get the desired floor heating, it is necessary to set the indicators of balancing valves and thermal heads for a long time and painstakingly.
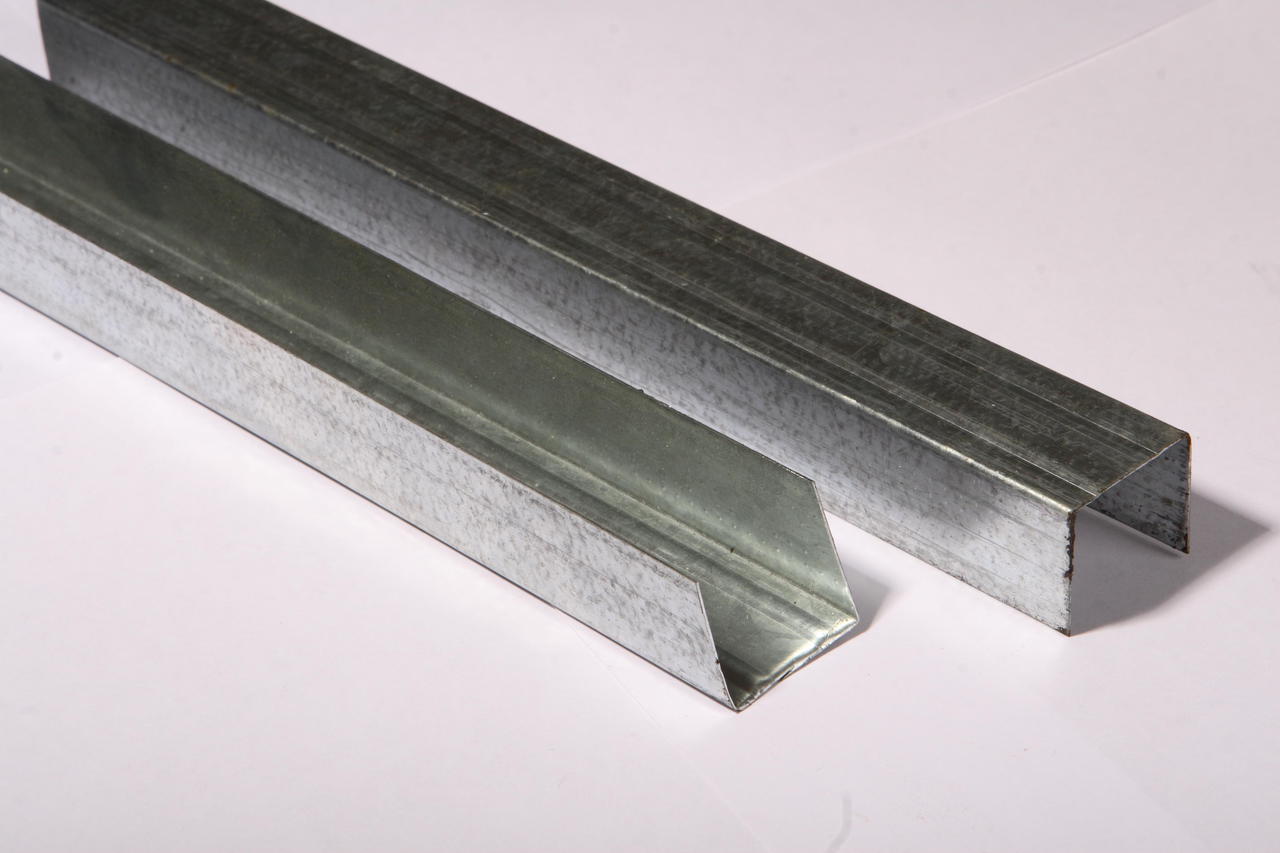
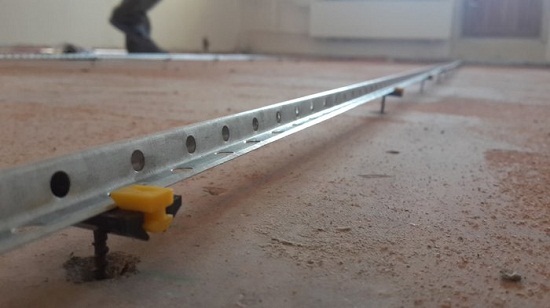
Tips for choosing
Significantly facilitate the task of filling the floor with a cement screed will help the installation of beacons. In the role of lighthouses, profiles PN 28 * 27 / UD 28 * 27 of gypsum cardboard are mounted, with a smooth surface and the necessary rigidity. The lighthouses are attached to the height of the clean floor without taking into account the finishing coating. The guide profile of the lighthouses should be placed on a solid support: dowels and screws of sufficient size will be suitable for fasteners.
Bolts - special screws for concrete that do not require additional installation of dowels, will be the best solution. They reduce the drilling diameter while maintaining the surface. Lighthouses are fixed at a distance of 0.3 meters from the walls. The optimal distance between the devices is 1.5 m.
Installation is as follows:
- At a distance of 30 cm from the entrance to the room draw lines for the installation of future devices.
- The lines are divided into segments, multiples of 150 cm, the strip at the entrance may be slightly smaller than the rest.
- With a step of 40-50 cm on the floor plan the location of lighthouses
- According to the specified bores, the necessary holes are made through the perforator and pins are installed.
- The lighthouses are fixed on the caps of the dowels, and their position is leveled by the building level. The guide profiles are fixed with cement mortar screed.
Common mistakes
Highlighted a number of errors committed not only by beginners, but also by professionals. When they are taken into account, anyone can assemble a complete, safely functioning floor heating system.
The most common mistake is the installation of a pipe that is longer than the maximum allowed. The length of the contour should not exceed 70 m.Otherwise, there are problems in the design of the circulation of the coolant, which creates cold zones, increases energy costs.
Replacing the damper tape with analogs or the lack of it leads to the destruction of the screed coating. The resulting condensate at the junctions of the floor and wall surfaces has a negative effect on the concrete web.
Error in choosing the method of installation. The best choice for all beginners when laying the floor - the way of "snail". It is not necessary to lay pipes with a complex geometric pattern, this can lead to problems in the further operation of the structure - the appearance of cracks in the material due to increased internal pressure.
In addition to the above nuances, there are several rules for pouring a screed:
- If a tile is laid as a final coating, the screed should be made from 3 to 5 centimeters thick, distributing the pipes at a distance of 10-15 cm. If this is not done, the thermal gradient will be noticeable. This phenomenon of alternating bands of different temperatures has been called "thermal zebra".
- Under a light final layer, for example, laminate, the coupler should be made as thin as possible.A layer of reinforcement is laid over the warm floor to achieve the required strength characteristics. Such a system will significantly shorten the path from the contour surface to the floor covering. Under the laminate or linoleum does not stack insulation material.
In the greenhouse
TVP is currently the most effective and economical solution for heating soils in greenhouses. This statement is true only in the case when the greenhouse is located at a distance of about 15 meters from the central heating system of the house. Otherwise, it will be necessary to purchase a heating boiler and pump installation. A small area of the greenhouse will allow you to combine underground heating with radiator.
The contours of the pipes are mounted directly into the ground to the depth necessary for a particular type of plant. The average value reaches approximately 40-50 cm. Each circuit serves as a heating for its ridge. Preference should be given to pipes made of polyethylene, since the metal after treatment with anti-corrosion agent reaches high temperatures and can damage the root system.

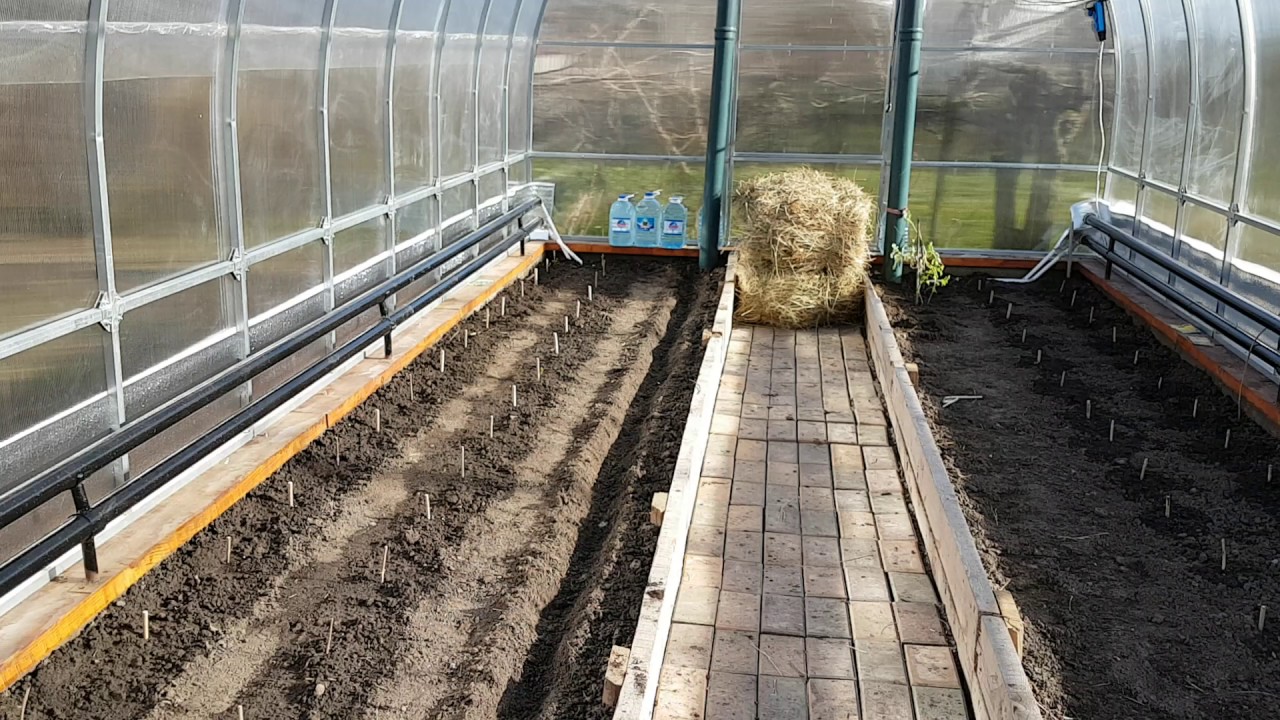
The first stage of the installation of the heating system is the development of a trench at the depth of the future structure. The trench is lined with a layer of plastic film that provides waterproofing.Next, lay the insulator and once again lay the film. This sequence prevents condensate from running off.
A layer of wet sand is placed between the pipes and the insulating coating. The compacted mass should be not less than 10-15 cm thick. Concrete screed in greenhouses is not used. To protect the contours from mechanical damage, an array of sand is covered with slate or metal plates. It is advisable to make the thickness of the upper layer of fertile soil at least 35-40 cm.
Fine finish
After screed, the finished surface is covered with a finishing material. Tile and laminate for many years remain the leading goods in the market of building materials. Installing a laminate on a cement screed requires consideration of some features. In contrast to the laminate flooring on a cold floor, it is not customary to lay insulating material under the heating coating. It is also necessary to leave a gap of 10-15 cm at the edge of the walls for air circulation.
The floor can not be covered with cold material: you must first make the laminate in the room to its room temperature. Sheets are recommended to decompose, but not to keep in piles: so the surface warms up evenly.
Laminate gives good performance in durability and durability. However, its thermal conductivity is significantly lower than that of a floor tile. Some samples may contain chemical compounds that evaporate under the influence of heat and may harm the health of their owners.

Reviews
Consumers note the high profitability of self-laying such a heating system. Customers recommend using polypropylene pipes. In metal counterparts, the joints look unreliable, and the material itself does not work well for bending. After the time, the metal-plastic pipe under the influence of hot water collapses and leaks. Many advise to install the floor under the strict control of specialists, because such a system requires a serious approach.
Consumers are advised not to neglect the rules for installing a heated floor. After pouring the screed, you must wait at least 28 days, and only after that start operation. Otherwise, the coating will become unusable and will have to be dismantled. Opening the floor and re-pouring - the process is not cheap and quite time-consuming.
Customers also note that the installation of TVP is a profitable acquisition not only for owners of private houses. As the main source of heating in the apartments of a residential multi-storey building, water floors can significantly save money.
Many say that the installation process only looks complicated. In fact, it can cope with anyone who has ever made repairs in the apartment. Many errors can be prevented at the initial stages, if you follow the instructions. The system will function correctly and will last for a long time if the materials are not replaced by low-quality counterparts.
Successful examples and options
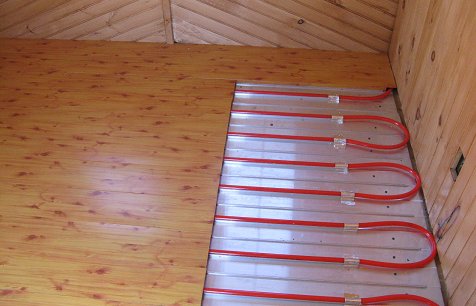
If the houses have wooden elements of the coating, it is better to refrain from a wet method of applying a screed and give preference to the dry. GVL is used as a topcoat. Made from a mixture of gypsum with wood fibers, the coating conducts heat well and is highly durable. The pipes are laid in special grooves cut into sheets of plywood. This design will be a good solution for rooms with low ceilings, since the thickness of the TVP does not exceed 10-15 centimeters.Dry construction leaves a minimum of construction waste during the assembly process. However, the heat transfer performance of this type of coating is less compared to traditional styling.
The main method of installation on the veranda is to install the floor on the logs. The base is lined with plates with a section of 50x150 mm. When installing bulky furniture, the lag cross-section is recommended to be increased to 75x150mm. Boards before laying must be treated with anti-foil to prolong their service life.
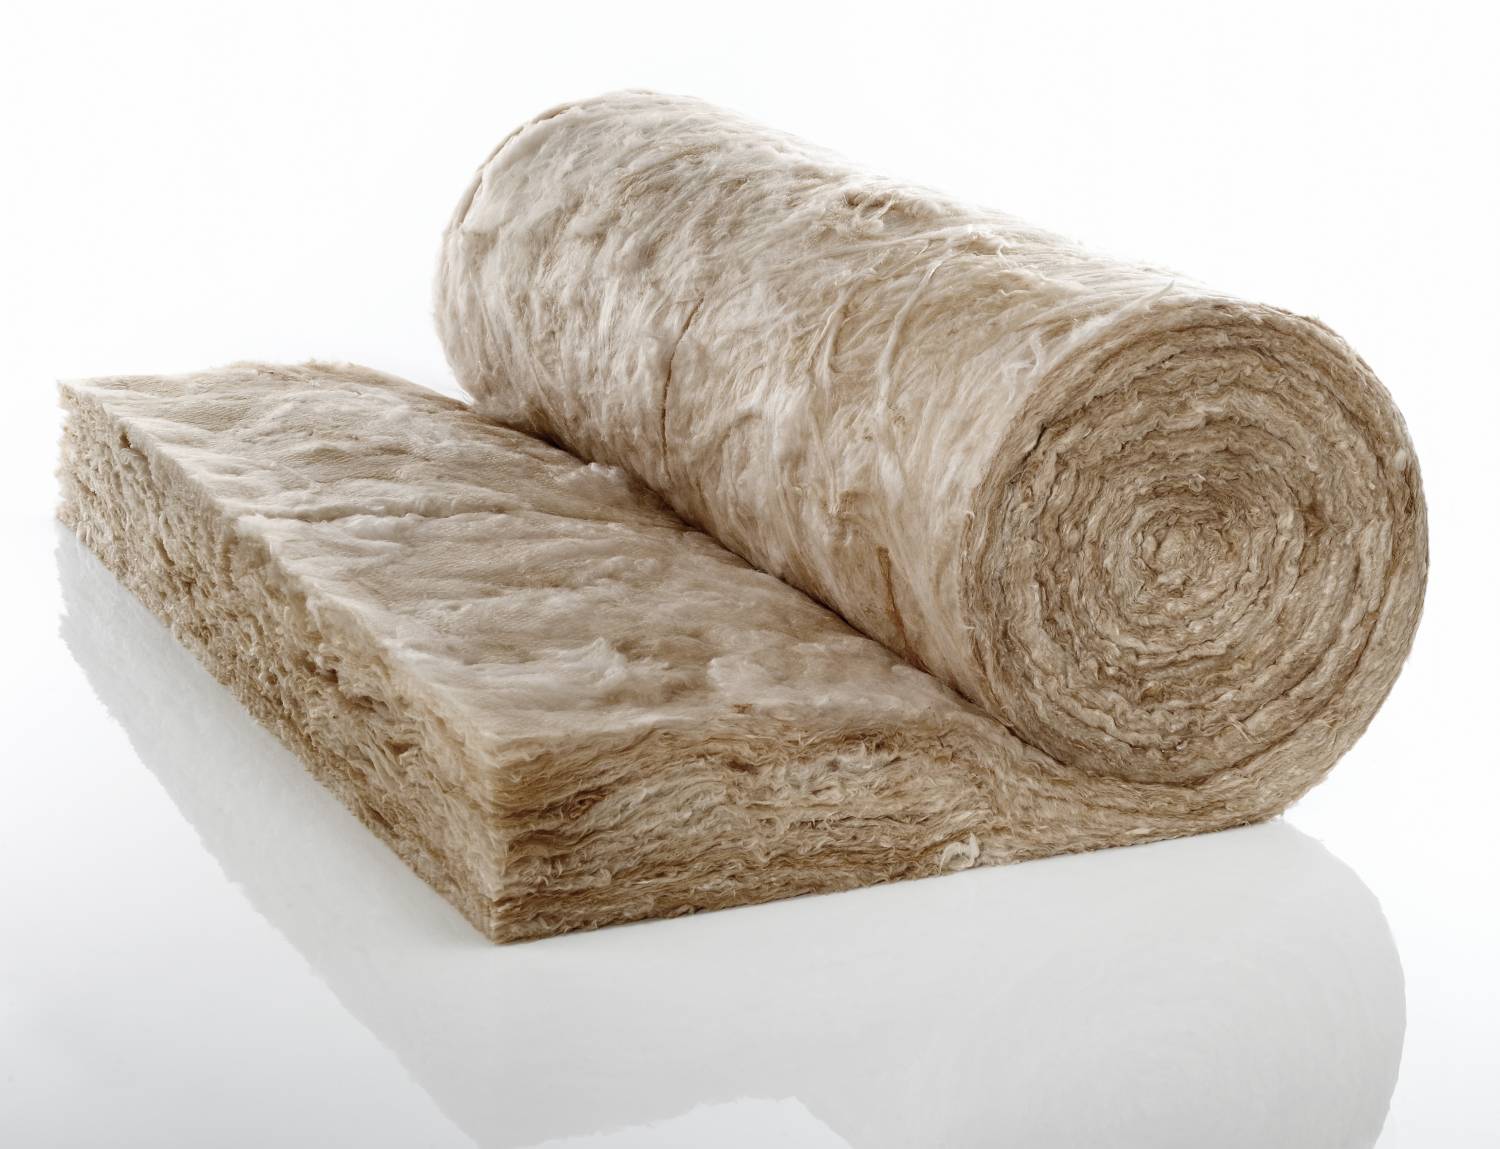
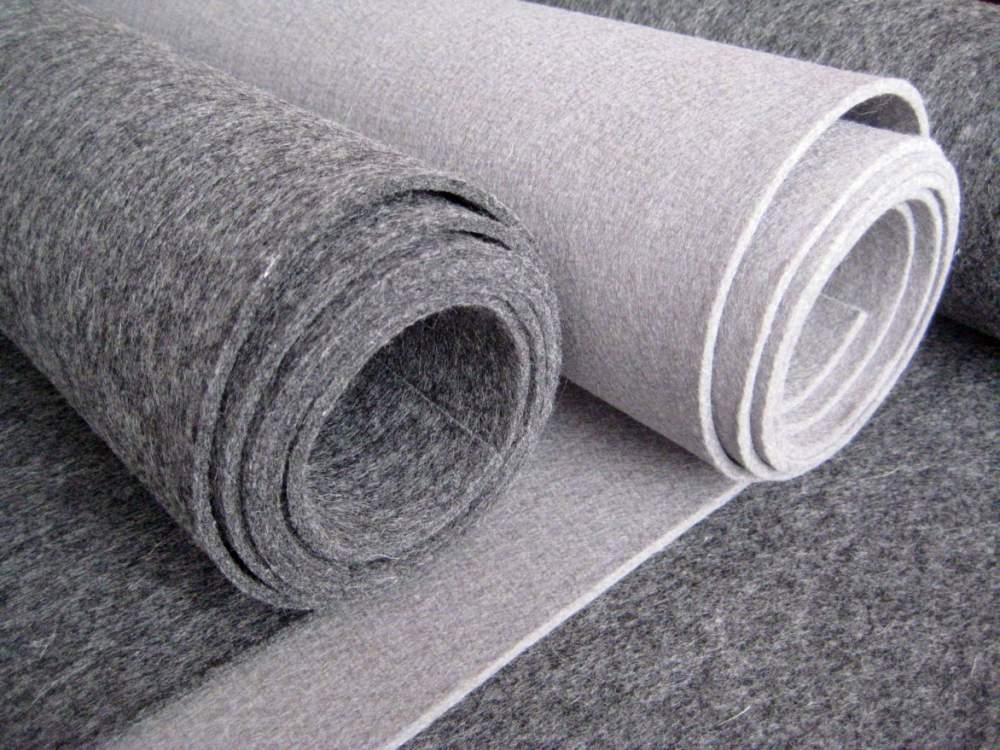
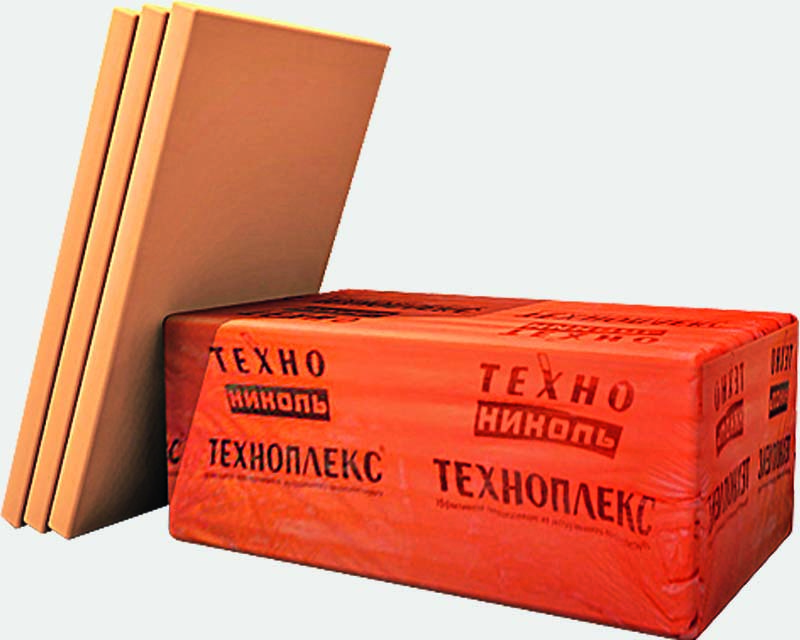
As a heater for filling the voids between the lags, materials such as mineral wool, polystyrene foam, technoplex and felt are widely used. Coatings can be combined, but it is necessary to leave voids for ventilation. Rolled material, as a rule, alternates with tiled.
The device of water heating on the balcony is made in the same way as in other rooms. Laying characteristics may differ due to the type of material of the supporting structure. The option of a finishing coating can be chosen arbitrarily for design reasons and does not depend on the type of the original structure. If the base is a reinforced concrete slab, the pipes are allowed to be immersed in the thickness of the screed.
If the structural elements of the porcelain stoneware balcony are represented by light metal plates, then the surface is not necessarily filled with cement mortar. The pipes are fixed in the slots of the insulation plates. The wooden base allows you to position the contours between the modules of the floor or lags.
In this video you will find a video instruction on connecting the collector of a water heated floor.


