What is a drip for a roof?
The roof structure contains many elements - it is both bearing and directly protective. Its main function is to protect the attic and the house itself from various negative environmental influences. However, in order for this function to be performed properly, additional elements (additional details that increase the life of the roof) are important, including a roof drip that will save the gable and the eaves from natural precipitation.
Special features
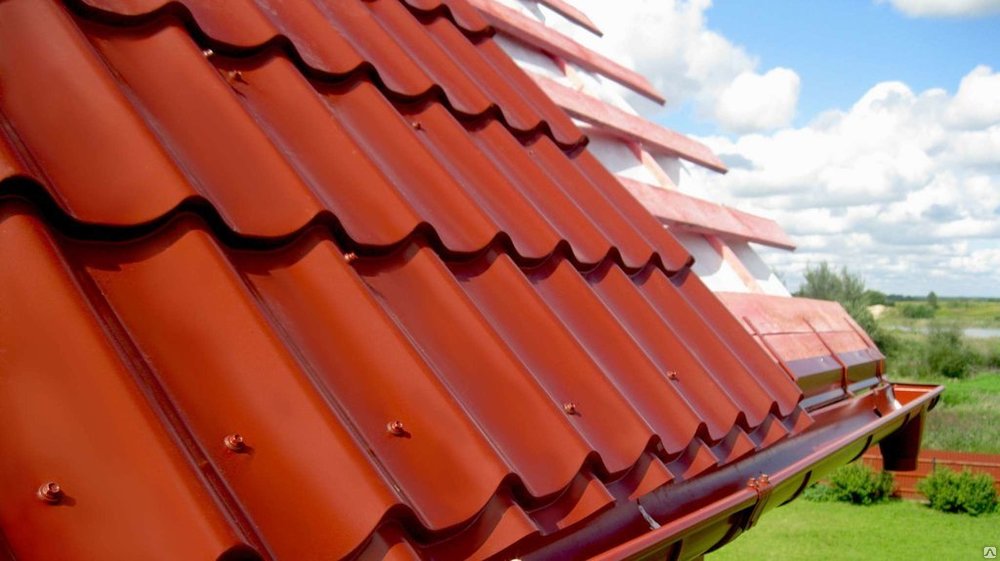
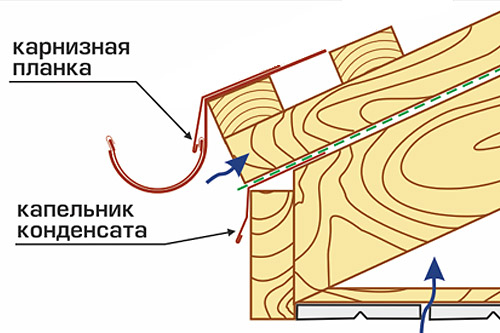
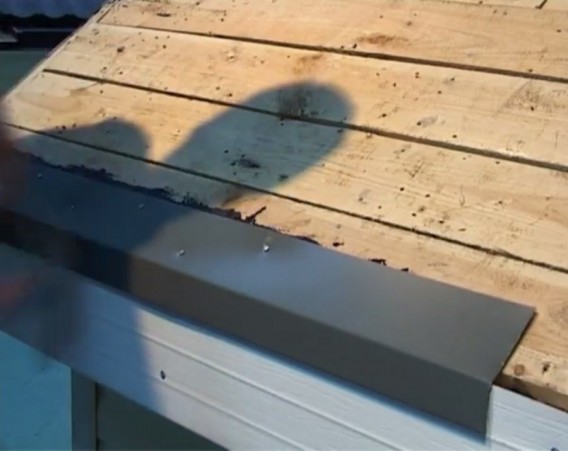
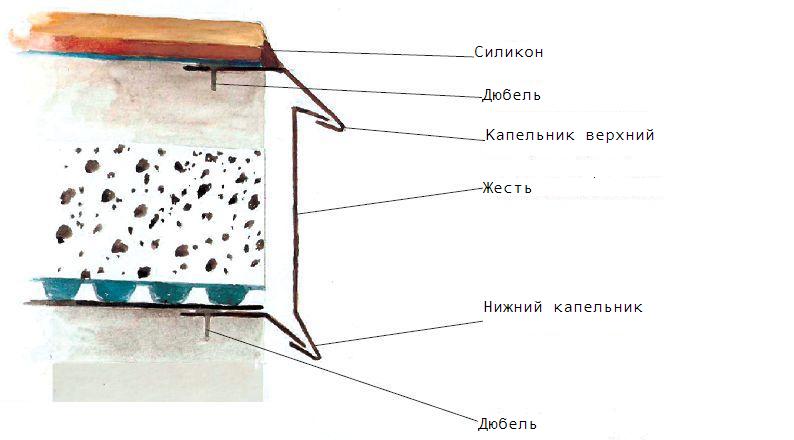
If you disassemble the construction of the drip, then we can come to the conclusion that the device is the so-called apron overhang. It is a flat metal bar mounted on the eaves, which protects the facade and basement from water.
Its principle of operation can be described as follows:
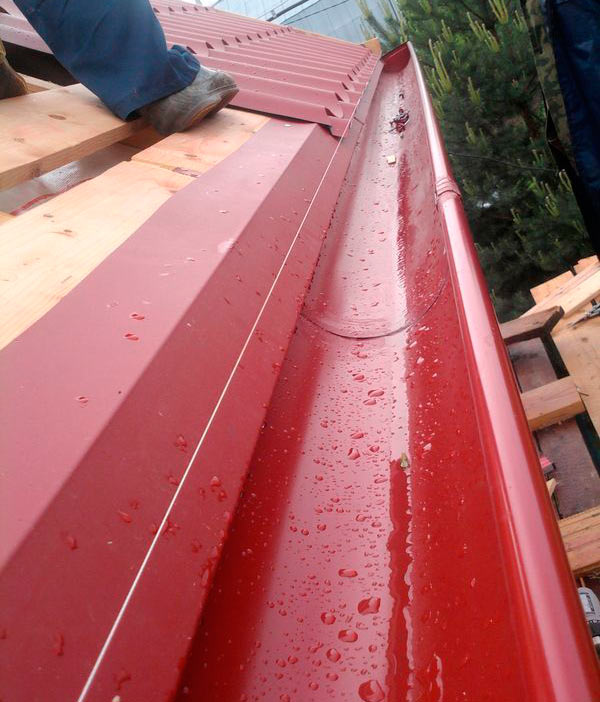
- formed due to rain or snow melted under the influence of heat, the liquid begins to flow down the roof and passes to the drip;
- passing through the apron, the liquid is redirected to the chute and from there through the drain pipe is output to the outside.
In the summer, this system prevents the development of mold fungus on the surface of the walls and in the space under the roof. And also it does not allow the masonry mortar to wash out, and the cornice to rot due to excessive moisture. In winter, heating the drip does not allow the ice to spread into the space under the roof, additionally protects and strengthens the edge of the roof from strong gusts of wind and icicles. If you refuse to install the apron, then later in the roof space will accumulate condensate, which will fall on the frontal board and rafters. As a result, all wooden elements will come in complete disrepair. And also it is important for the flue steam room to remove condensate that forms.
On top, the drip serves an aesthetic function, decorating the appearance of the roof. Thanks to him, it is possible to build both simple bends and complex, multi-level reflux systems with drainage channels and accumulative tanks.The installation of an apron is not limited solely to one roof, it is also successfully installed above window and door openings.

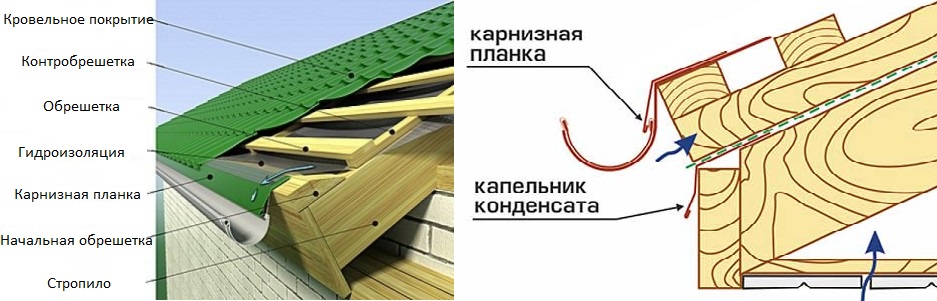
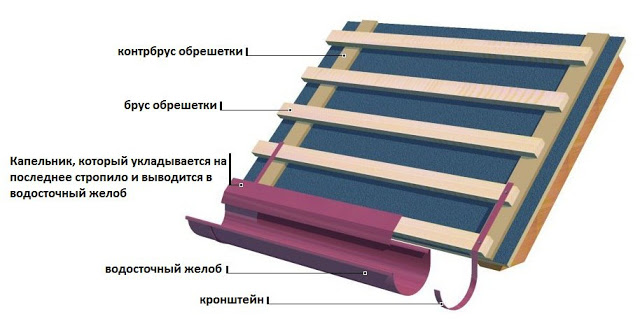
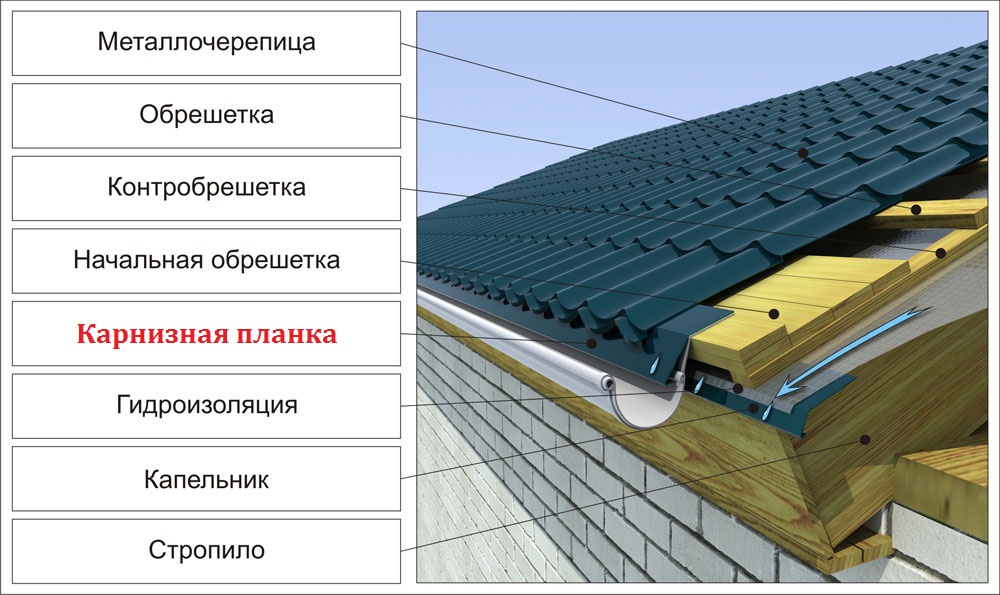
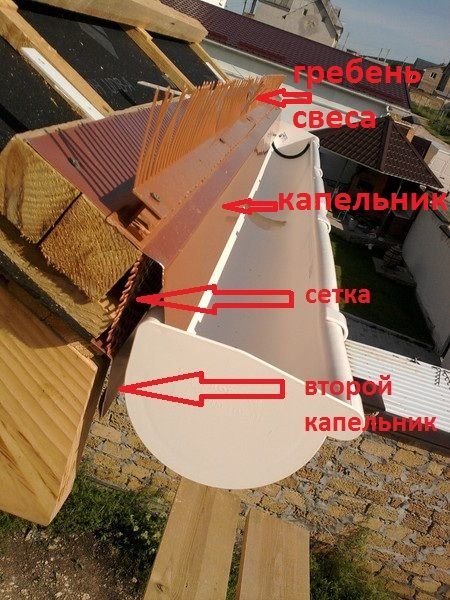
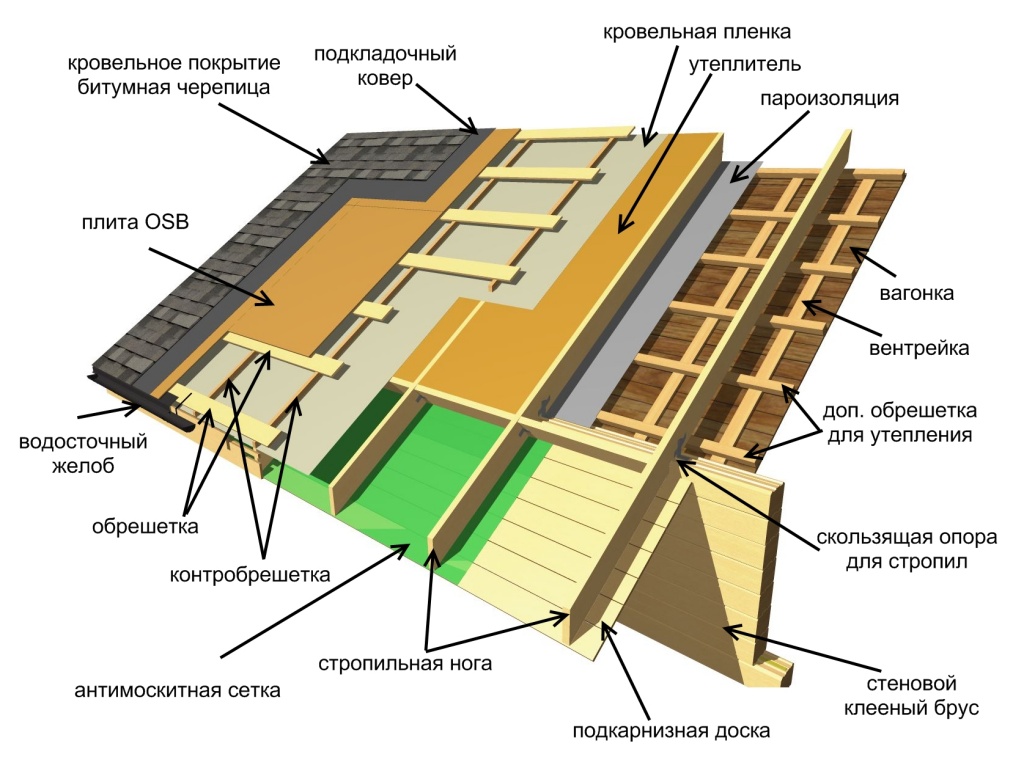
If we consider the finished roof, we should get a kind of multi-level construction consisting of such elements as:
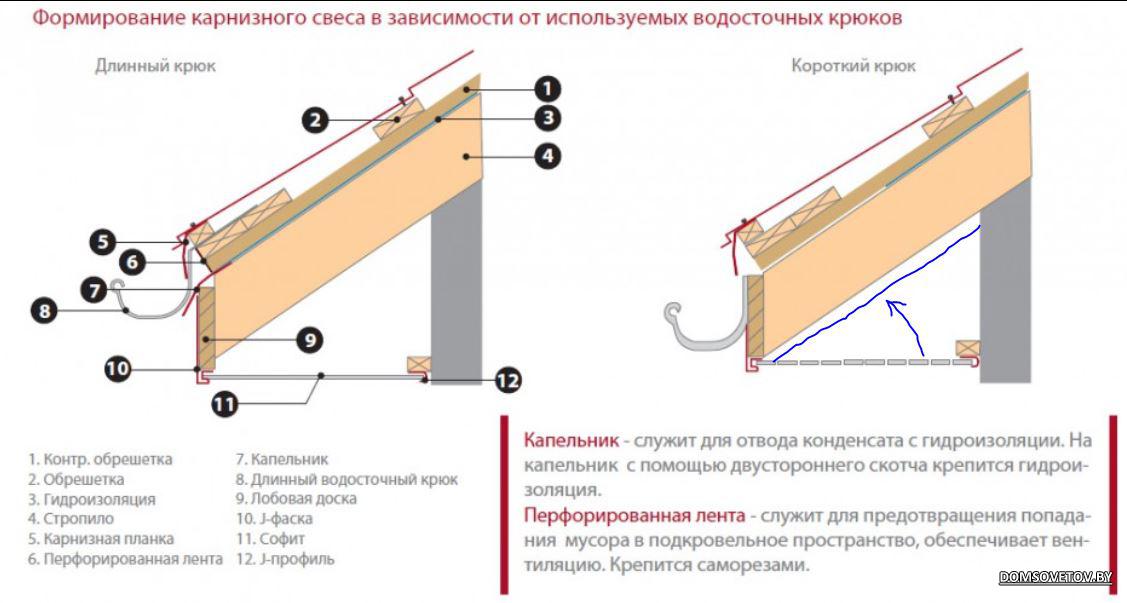
- kontrabretki - part, which is responsible for ventilation and is a roofing system, consisting of wooden bars. They are installed above the rafters, on top of the barrier;
- crates - frame, which fits on the rafters at right angles;
- waterproofing film (water-repellent layer) or roofing felt;
- apron slats;
- drain hook;
- gutter;
- outer curtain rail.
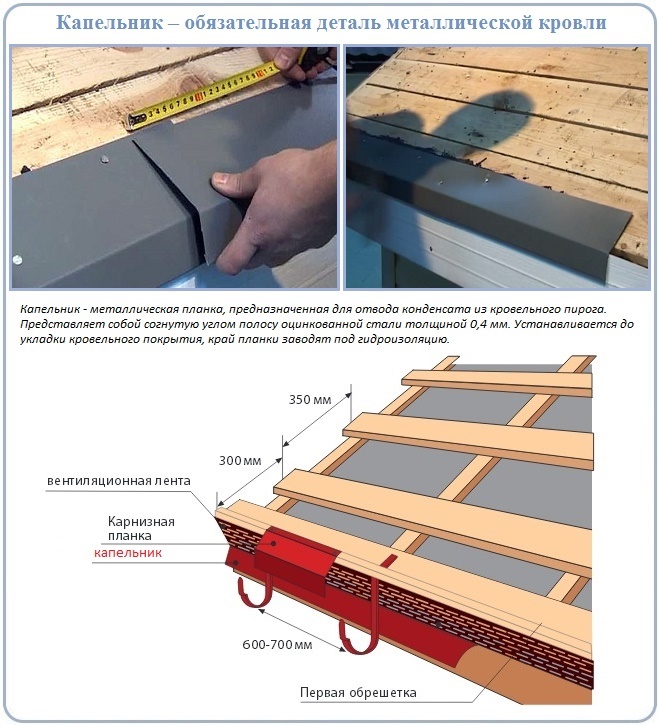
Quite often, the ledge bar and the dripstick are confused with each other and summarize them as elements for removing moisture. Such confusion leads to the fact that only one element is installed. In no case should they be confused, since both are extremely important for maintaining dry roof.
Therefore, it is important to remember that the main differences between these parts are as follows:
- Kapelnik serves to remove droplets that accumulate on the waterproofing layer, and is mounted under it;
- eaves strap is installed under a layer of coating material and helps in removing fluid from the outer part of the roof.
Types and purpose
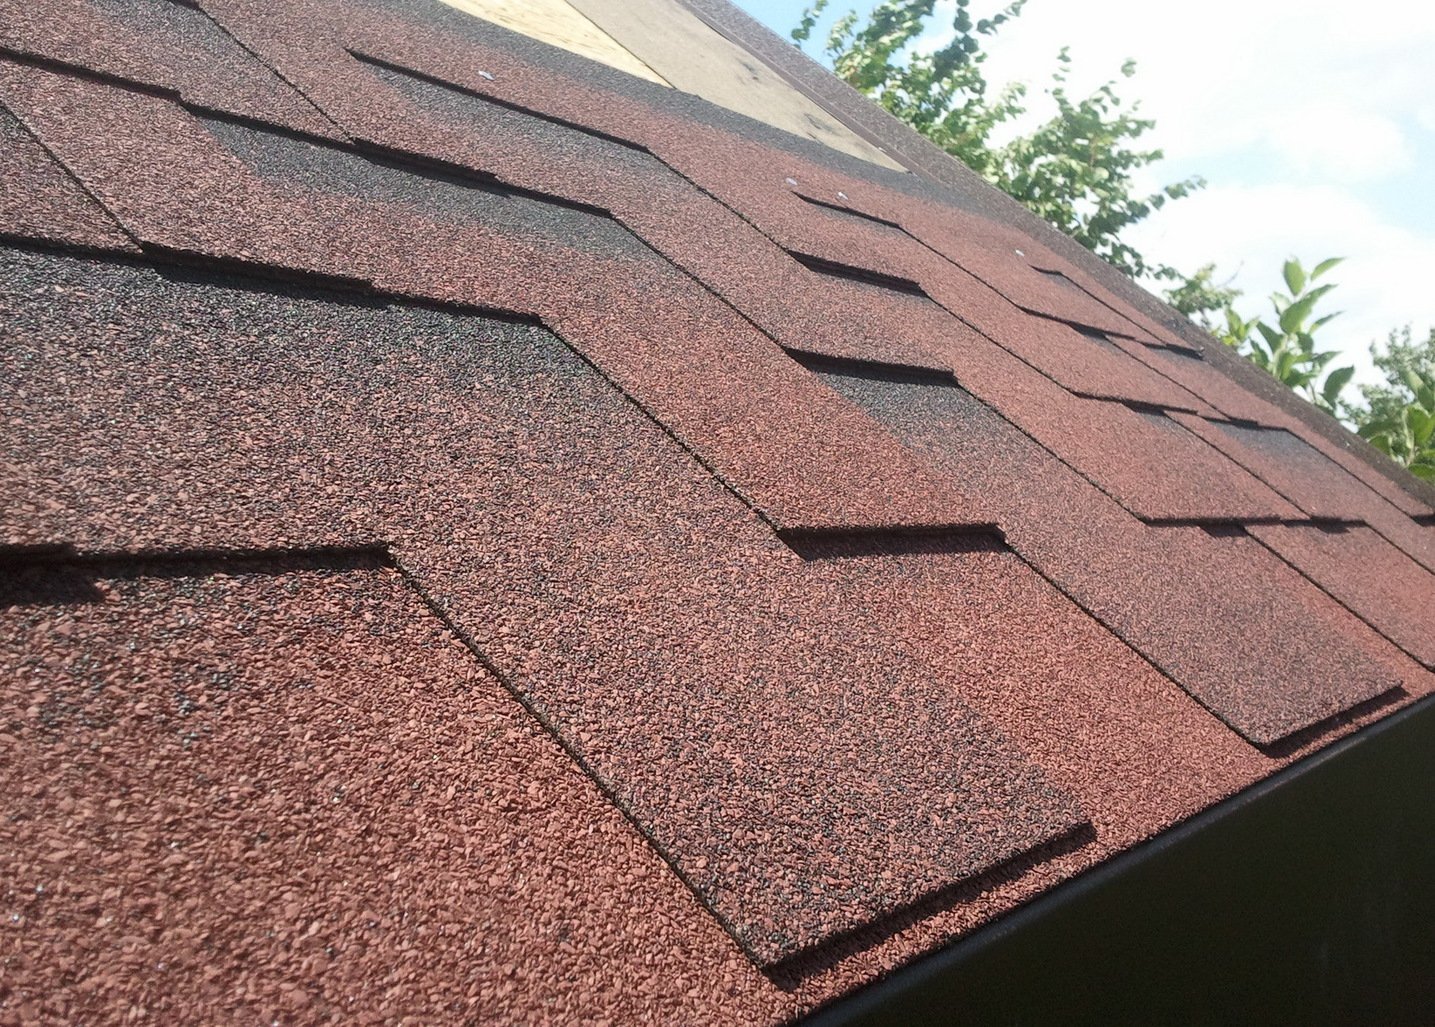
In appearance, the dripstick is a curved strip made of metal. Quite often it is compared with the ridge plate for corrugated board, just a different configuration. Skates are additional elements that provide air exchange in the area under the cover. An additional element is cast from galvanized steel, and a protective polymer coating is applied on top, which can be of different colors. Due to this, it is not difficult to choose an apron in color to any roof.
Materials
Based on the purpose of the strap and the place of its attachment, there are two types of apron.
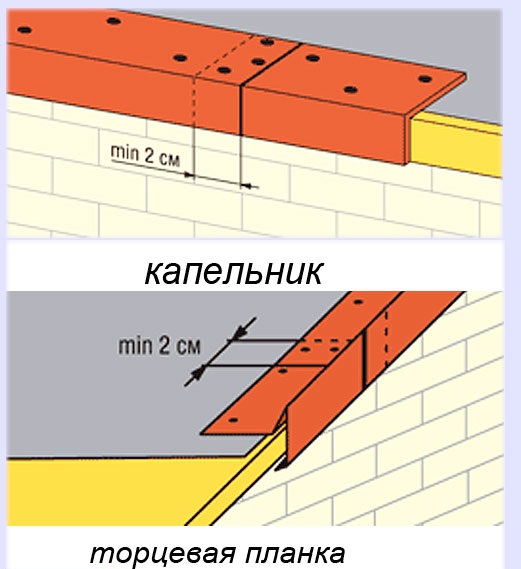
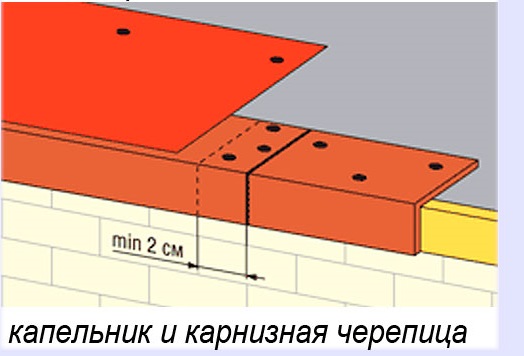
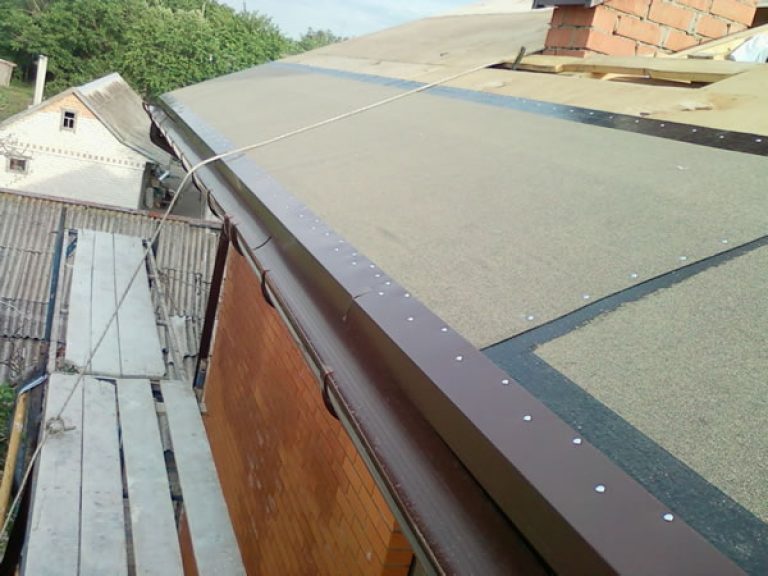
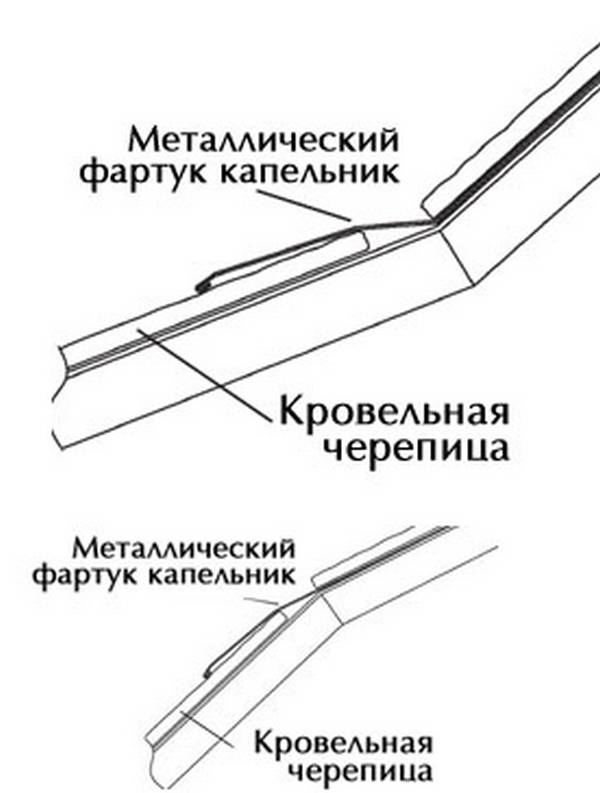
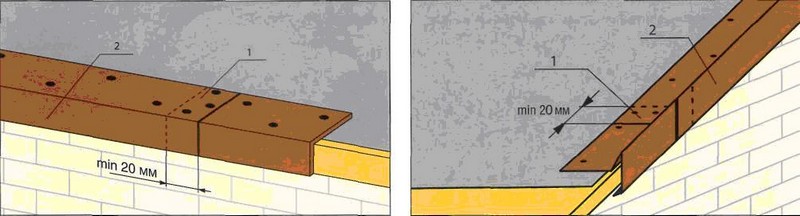
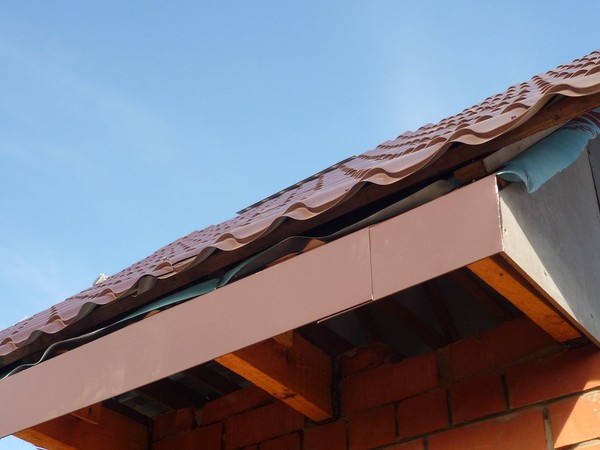
- Kapelnik eaves. It is installed on the eaves of the building. In the angular form there are two bends: the first is located in the middle between the skirt and the apron itself, thereby separating them; the second is necessary to increase the level of the ability of resistance to deformation under the influence of external influences. The correct construction of the roof includes gutters, before installation of which the eaves must be hung with special fixing hooks, at the same time the slats are installed.It is worth considering that it is better to fasten aprons overlap, they come at each other by about 2–3 cm, and knowing their size, you can calculate in advance how many elements are needed for the entire eaves. All this work is carried out until the moment the roof is laid, for example, a professional sheet.
- Kapelnik gable. It is used if the work comes with a waterproofing carpet. Such a double drip protects the overhang of the gable from the destructive influence of natural factors. It is attached over the lining carpet and after that it closes with the strip of the cornice, then moves towards the ridge. However, if the finish is made of hard coating, then other materials are used, for example, end platbands.

The basis of the apron is galvanized steel with a coating of polymer (PVC). The material "stainless steel" is characterized by high strength, resistance to moisture and sudden temperature changes. Aprons are made from thin aluminum sheets using special machines "listogibov." The coating is a polymeric material, which is sometimes specially designed for soft shingles and is characterized by resistance to corrosive changes.The thickness of one sheet usually does not exceed 0.5 mm. Polyester can be matte (REMA) or glossy (PE).
Gloss polyester has lower technical performance and therefore costs less. The surface is smooth and glitters when exposed to sunlight. Usually, a special protective film of polyethylene is applied to the front side (where the paint is) to protect the material from light mechanical damage during transport and at the time of cutting. Matte polyester is similar to glossy, but its technical indicators are higher, which means it will cost more. On the front surface there are imperfections imperceptible to the human eye, due to which the sun's rays are reflected differently and the sheet does not give shine.
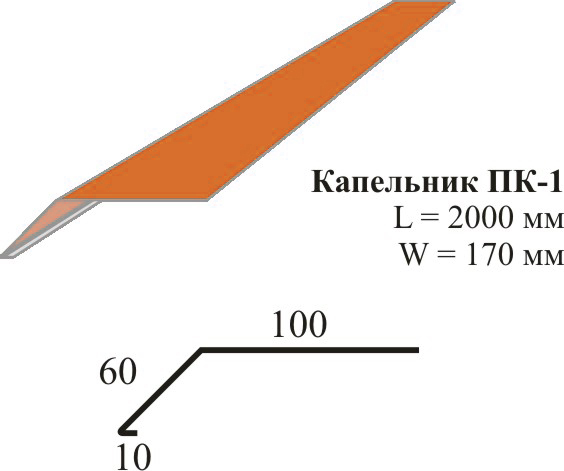
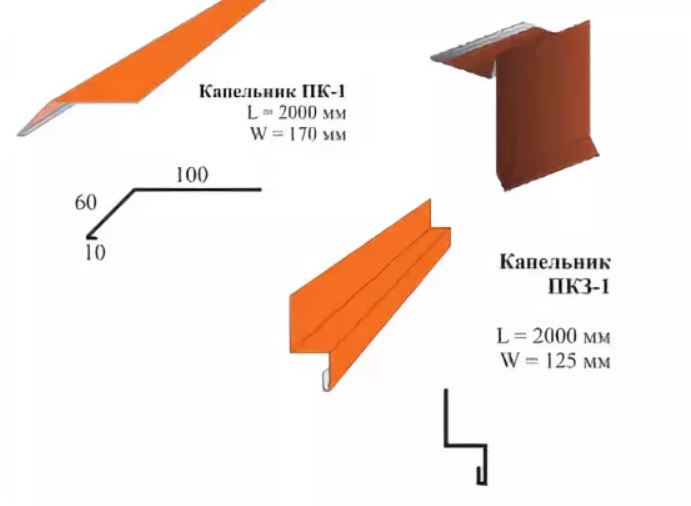
Dimensions
Before you buy slats around the perimeter of the house you need to count their number, so it is important to know their length. Typically, the length of the drip is not more than 1-2 meters, however, there are one and a half meter models (150 cm). The price of the product depends on its length, width and what kind of coating is used. In order to calculate in advance the approximate costs of the work, it is necessary to measure the length of all the processed sides to which the aprons will be attached. One linear meter will cost about 100-250 rubles.Therefore, you need to multiply the resulting length by the cost of one running meter and you get an approximate amount spent.
But do not forget about consumables: self-tapping screws, riveting, silicone sealant, mastic and others. It is also important to consider if the work is carried out independently, then the probability of hiring professional workers is not excluded and this can cost up to 500 rubles per linear meter. They cannot be purchased in construction shops, as they are produced only by individual order in a construction company. This takes into account the parameters of the house and roofing.
Installation and installation
The slats are mounted at the stage of completing the construction of the roof, but, as mentioned earlier, prior to the beginning of the laying of the roof. At the time of work necessarily take into account the structure of the product used. If there is a need to shorten the bar, then it is preferable to carry out manually with scissors or an electric jigsaw. If you do this with a grinder, then the upper polymer layer will simply burn due to the high speed of rotation of the cutting disk, which will adversely affect the drip and it will rust later.

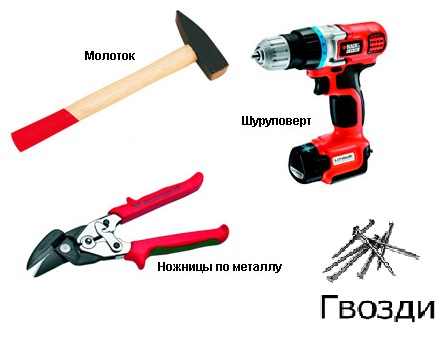
The work will require the following tools:
- scissors for metal;
- hammer;
- galvanized roofing nails;
- For self-tapping screws with a size of 1.2–2 cm, a screwdriver is required.

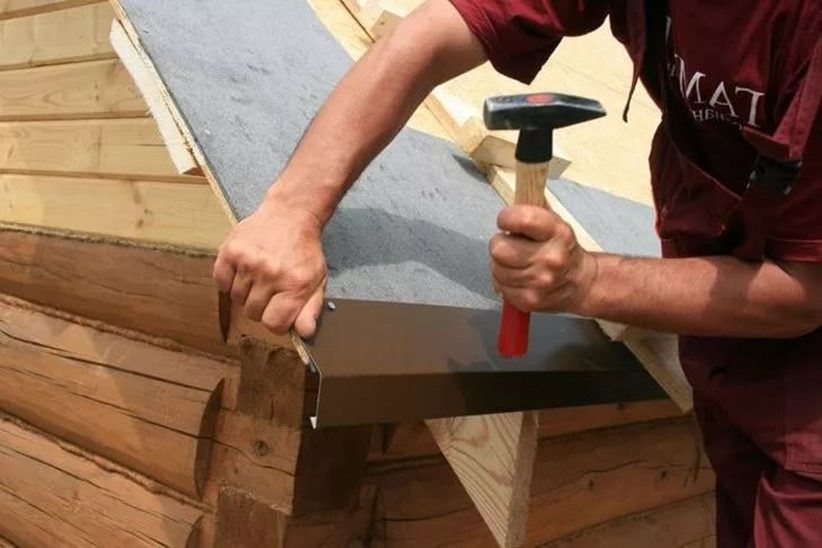
Installation of eaves drip includes several steps.
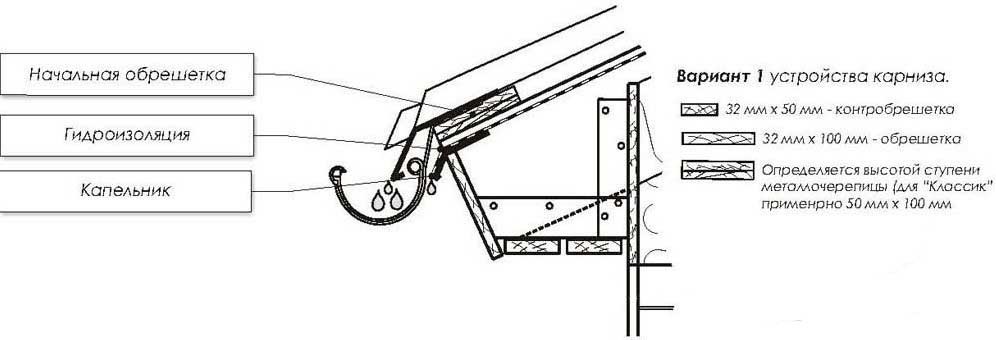
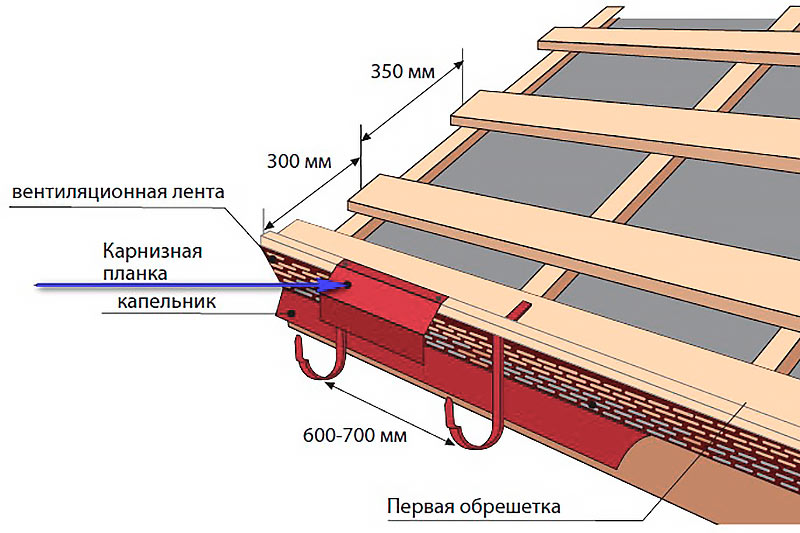
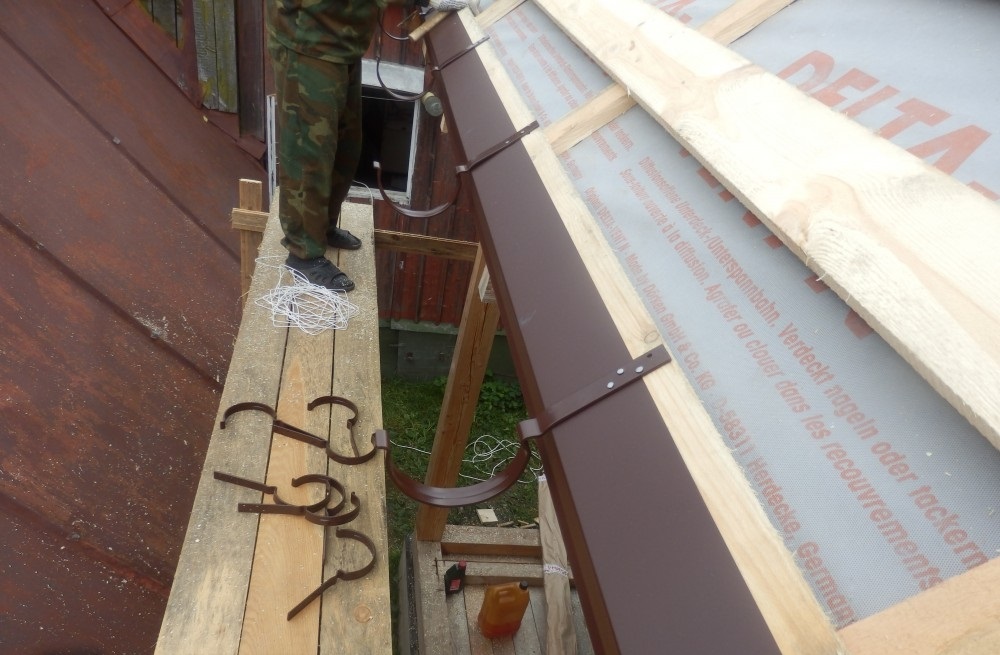
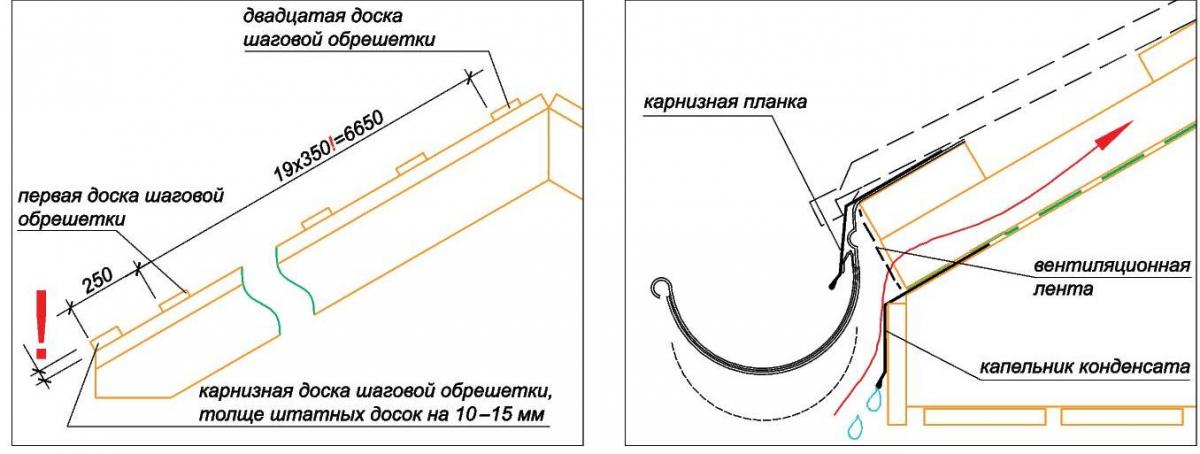
- Initially, you need to install gutter hooks. The important point of this stage is that it is necessary to increase the level of strength of the eaves part of the batten, so that under the load from the weight of ice or water it does not undergo deformation along with the roof. Further, one is necessary to make the laying of the cornice, they should lie slightly in tension and not hang out.
- It is necessary to fix the initial level with self-tapping screws with an indent of 20 cm. Then the next level is laid with an overlap and it must also be fixed. To prevent the ingress of liquid to the wooden coating of the purlins, at the time of fixation, under the caps of the screws you can put rubber seals. If at the time of work the rigid edges interfere with the joining of elements, then they are simply cut off with special scissors for metal.
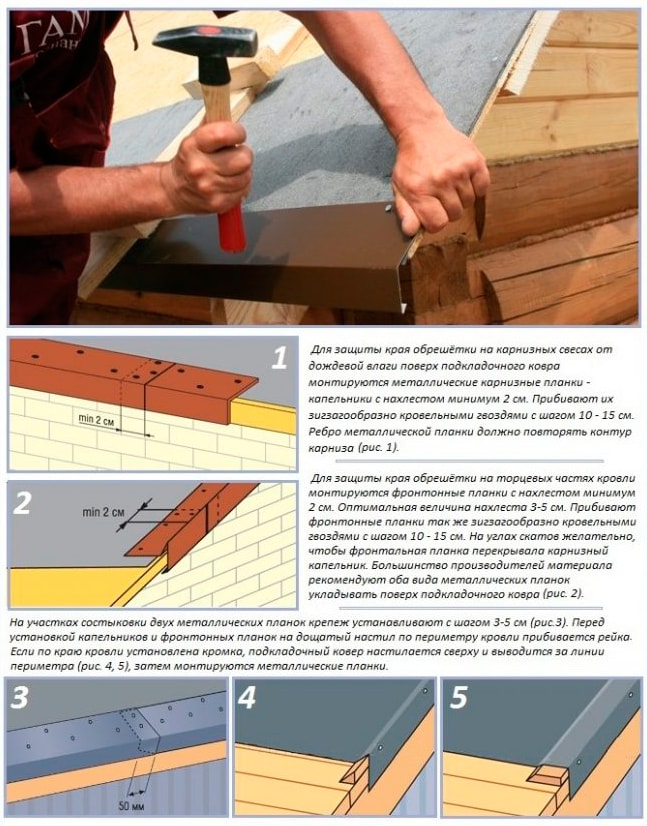
- So that at the time of transportation the surface of the apron is not damaged, there is a special film coating.Before you begin installation, this film must be removed. At the end of the fastening, you should carefully inspect each element to check the fit. Quite often, masters put sheet rubber under the drip pan, which provides complete waterproofing. Only after installing all the slats, you can proceed to laying the profile.
Step-by-step mounting of the pediment drip includes several simple steps. If you choose a waterproofing carpet, for example, shingles, then after fixing the strip of the cornice, you can begin to install the gable apron.
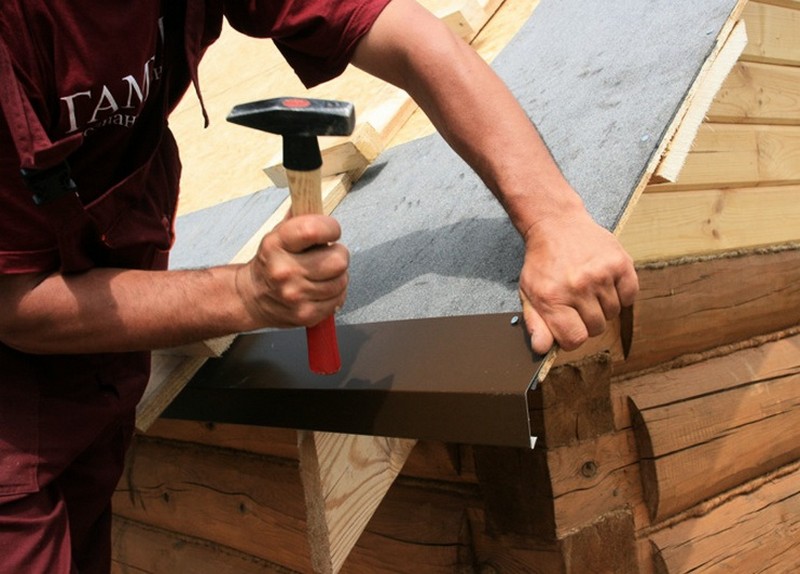
- The starting point in the installation should be the eaves, since it is necessary to preserve the natural runoff of the water being removed. For mounting, the left or right end of the strip is joined to the edge of the latest eaves drip. It is necessary to overlap the ends of each other with an overlap of 2 cm, and in the area of contact to fix the nail, then continue diagonally every time with the calculation of one nail per 10 cm. To ensure complete tightness, the surface can be treated with mastic.
- Further actions are identical to the first element,but at the same time the distance between the nails is not 10, but 15 cm. And, if necessary, you need to cut stiffening ribs and remove the manufacturer’s protective film.
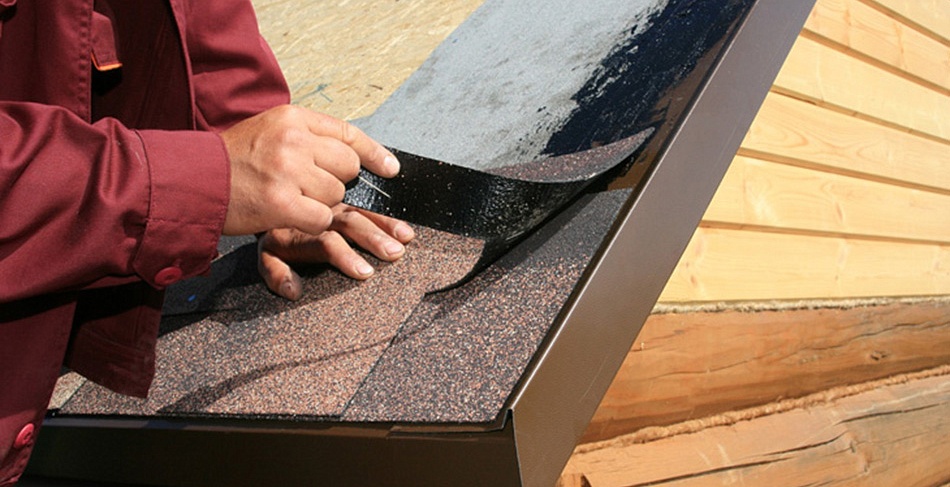
- When working with a soft roof, it is important to consider the correct location of the slats. They need to be fixed on top of the lining, and above them stick eaves tile. At the end of the work, a shingle roof or metal tile is laid over the gables relative to the first row with overlapping glued tiles.
- Do not forget that the pediment gutter rather serves as a guiding element that prevents water from entering the gable and sends it down.
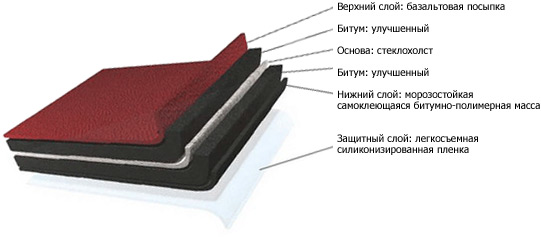
Materials made on the basis of bitumen are characterized by the following features:
- waterproofing and good water repellency;
- roofing does not require knowledge of any special techniques and takes a short time;
- soft roof withstands exposure to ultraviolet rays and sudden changes in temperature;
- provides noise insulation;
- low cost of material.
Meet the waterproofing carpet can be in several basic forms.
- The flexible tile looks like a rectangular module with figured cuts located along one edge. The basis of the tile is pressed fiberglass, which is subsequently impregnated with a bitumen solution. The front part of the sheet is covered with a sprinkle of copper or balzat, it provides high-quality preservation of the material from adverse effects. The inner part is represented by a layer of polymer with a protective film. Modules can be used to finish any type of roof.
- The rolled version contains fiberglass with the addition of synthetic materials, which are then impregnated. The downside is insufficient steam and heat insulation.
- The membrane can be rubber or polymer. To ensure reliable tightness and increase the strength of the existing gaps filled with hot air.

To make the crate, you need to take such materials as:
- board, not less than three centimeters thick;
- plywood sheets;
- oriented strand board.
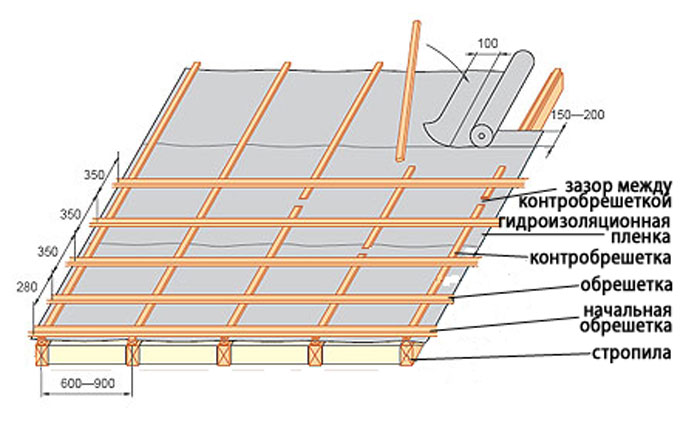
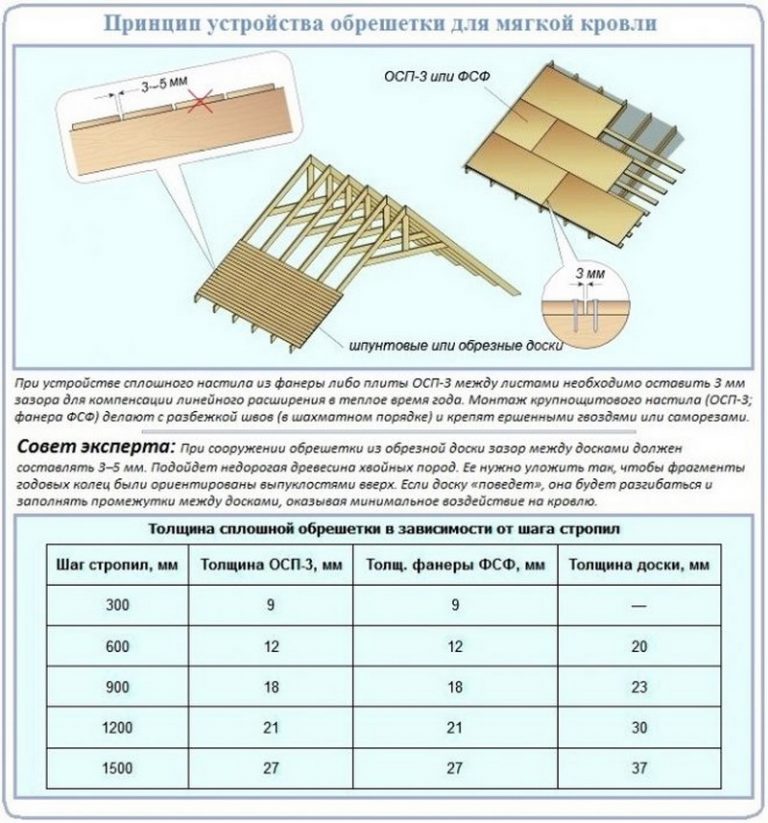
When stuffing the lathing step depends on what material was chosen for the roof. Most often there is a solid fixation, but since natural expansion is characteristic of wood, it is better to leave a gap of at least 5 cm.Oriented strand boards are attached with self-tapping screws or brushed nails, leaving a gap of 3 mm. If plywood is chosen as a cladding material, then it must be resistant to moisture and grooved. The optimum sheet thickness ranges from 10 to 20 cm. Each wooden element must be carefully dried before work, and then they are treated with a special antiseptic solution.
Pro tips
It is worth paying attention to some of the nuances and tips provided by professionals.
- In order for the water to be removed in the right direction, the gabled drip must be installed starting from the lower edge of the roof and the slope. Plumbs from the eaves and gable apron should converge together. To do this, they are fastened, observing the chess order and two-centimeter overlap, using studs. After that, a bitumen waterproofing mastic is applied to the line of joining with a spatula.
- Do not forget to remove the protective film from the plumb line. Roof mounting is carried out with the help of nails, observing an indent of 15 cm. In order for the elements to fit better, it is recommended to trim the stiffening ribs, and slats are closely inserted into these cuts.
- Processing the waterproofing carpet, it must be covered with ridge-eaves tiles. After that, the slats that cover the fragments and places of the joining line of the most part of the tile are already laid.
- Compliance with the order of nailing - through diagonally. Where the roof is adjacent, wooden strips of 5x5 cm are used. A lining material, fastened with bitumen and nails, is laid on top. The next layer is a metal strip nailed. Finally, the joint areas and various slots are treated with a sealing compound. Proper gutter construction should bring precipitation into the gutter.
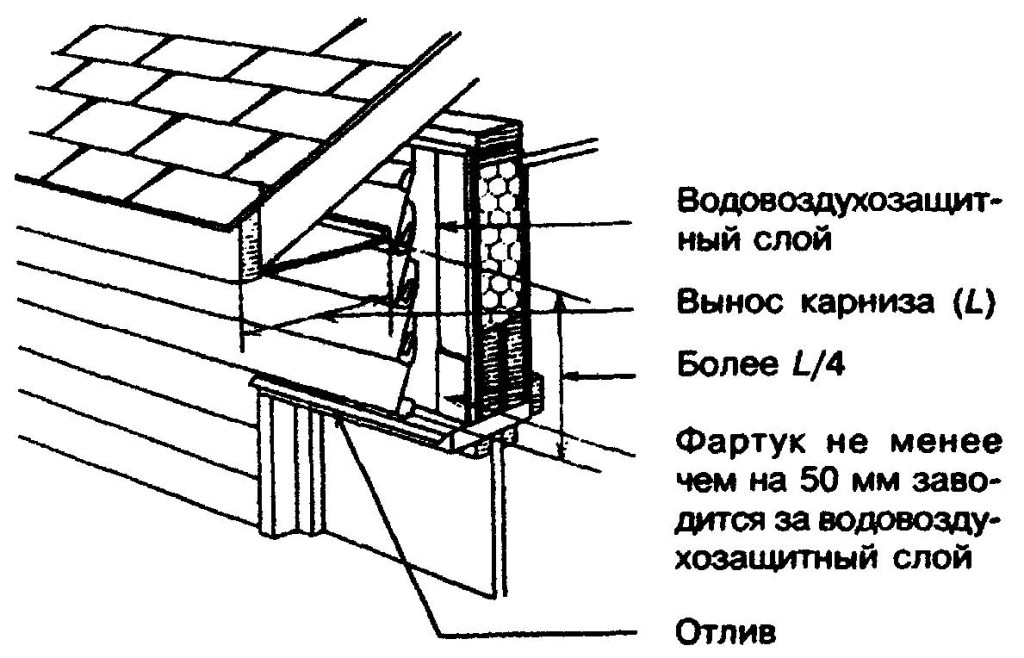
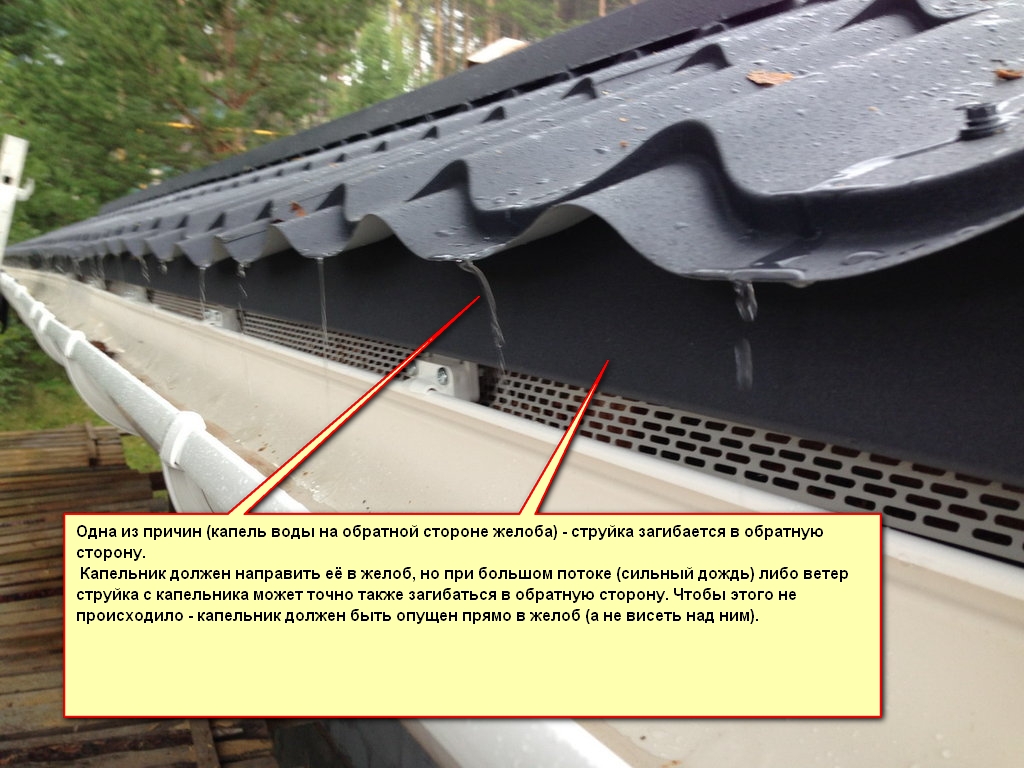
- It is important that the installation of the drip does not violate the adequate and advising circulation of air masses in the space under the roof. If you miss this moment, there is a high risk of an unpleasant situation, when accumulation of excess moisture does not come out, which will spoil the insulation and adversely affect all wooden elements. To prevent the formation of ice on the surface of the riding boards, the apron should be installed as close as possible to the gutter.
- Choosing a drip, you should pay attention to what material it is made of. The metal must be high quality, durable and resist the effects of corrosive changes. Once a year you should inspect the entire system of water flow and from time to time clean the plumb with funnels from various debris. Do it in preventive measures to prevent the formation of blockages and clogging of wastewater.
In fact, fix the drip bar on the roof is easy.
However, it should not be forgotten that some types of work should be completed by this time, namely:
- installation of a frontal board;
- filing overhangs;
- installation of drainage fasteners;
- assembly crates.
How to mount the dripstick yourself, see the next video.


