How to adjust the pressure switch of the pump station?
The pressure switch is one of the important parts of the pumping station. It is responsible for the operation of the pump at certain values of pressure. Periodically, the relay needs to be properly configured. To do this, you should know how it works, its principle of operation and technical characteristics.
Regardless of its small size, the relay significantly extends the service life of the pump, and also ensures the quality of the pumping station.
Special features
Buying a pumping station, many want to immediately get acquainted with its device. Of great importance is each of its elements. Immediately after the pump is turned off and on when a certain pressure in the hydraulic tank is reached, the pressure switch is responsible.
Pressure switch - an element that regulates the flow of water in the system. Due to the relay, the entire pumping system is turned on and off. It is the relay that regulates the water pressure.
By the principle of operation, the relays are divided into electronic and mechanical. Using electronic relays is easier in terms of operation, but the service life of mechanical ones is longer. Therefore, mechanical relays are in great demand.
The relays can be initially built into the pumping station, or they can be separate. Thus, according to the characteristics, you can easily choose a relay for the effective operation of the pumping system.
Water inevitably contains third-party particles, and they are the main cause of the failure of electronic relays. Therefore, it is better to use a special separate filter for water purification. The main advantage of using an electronic relay is that it does not allow the pumping station to idle. After turning off the water supply, the electronic device continues to work for some time. In addition, such relays are easier to configure and install.

Often, the pressure sensors immediately have factory settings. As a rule, they are set at 1.5-1.8 atmospheres for switching on, and at 2.5-3 atmospheres for switching off. The maximum allowable pressure for a relay is 5 atmospheres. However, not every system can withstand it. If the pressure is too high, it can cause leaks, wear of the pump membrane and other malfunctions.
The initial adjustment is not always suitable for certain conditions of the station, and then you have to adjust the relay yourself. Of course, for proper adjustment, it is best to get acquainted in detail with what this small device is and how it works.
Principle of the device
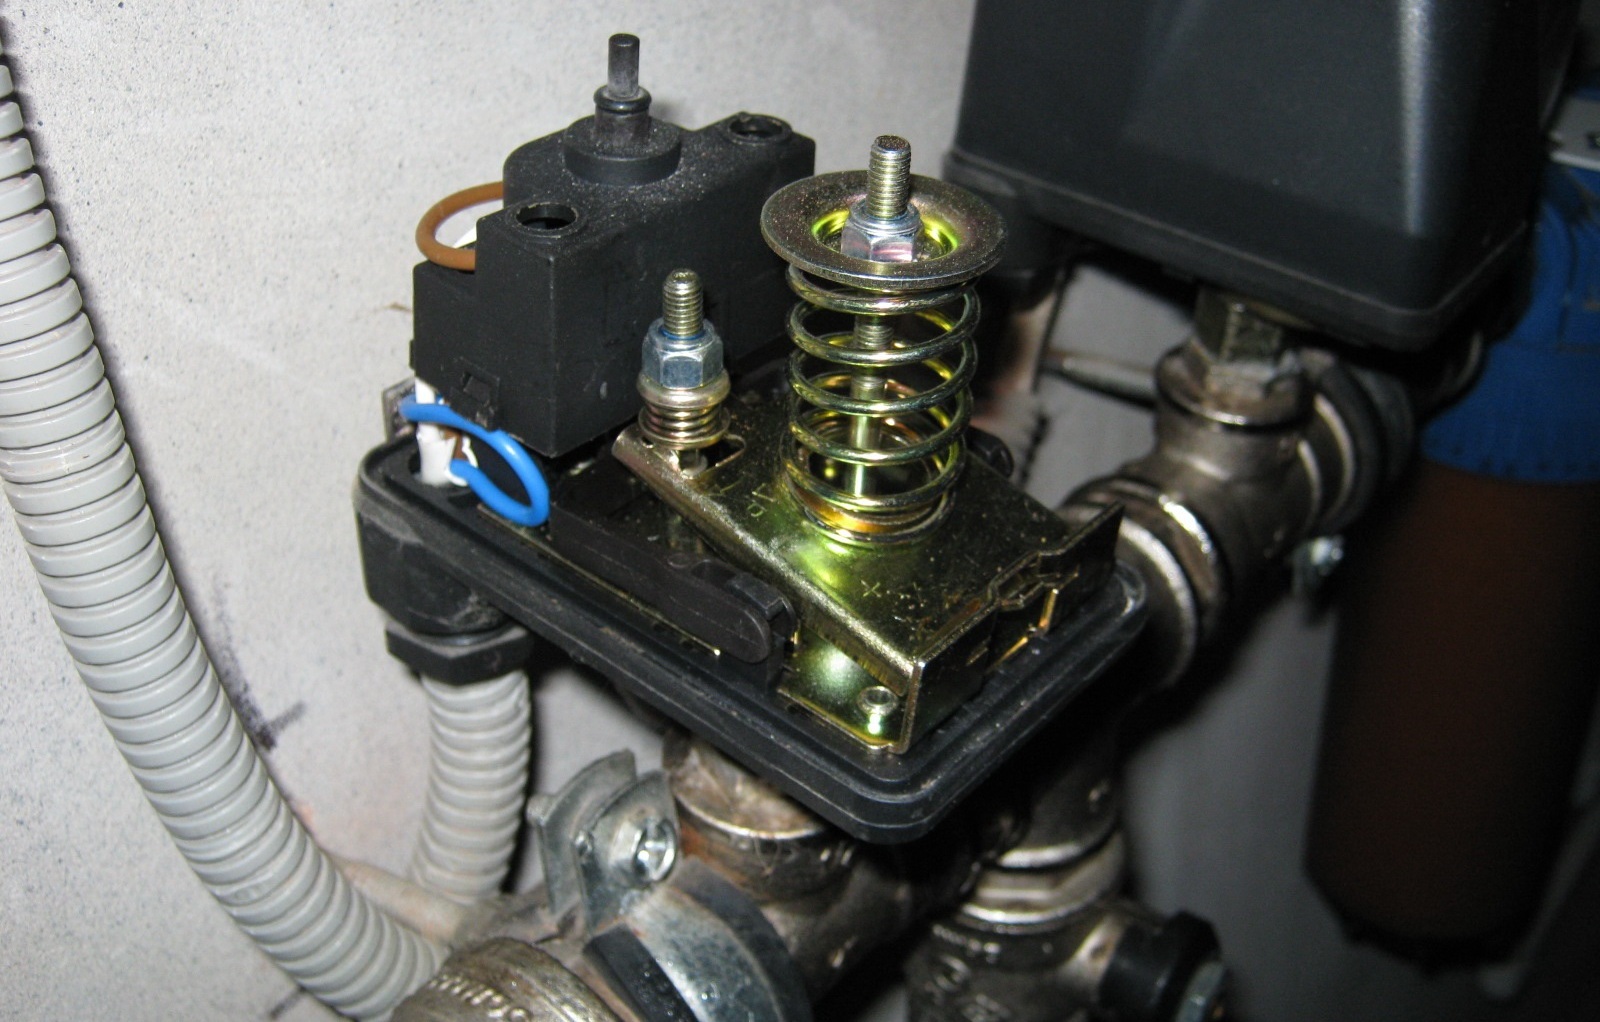
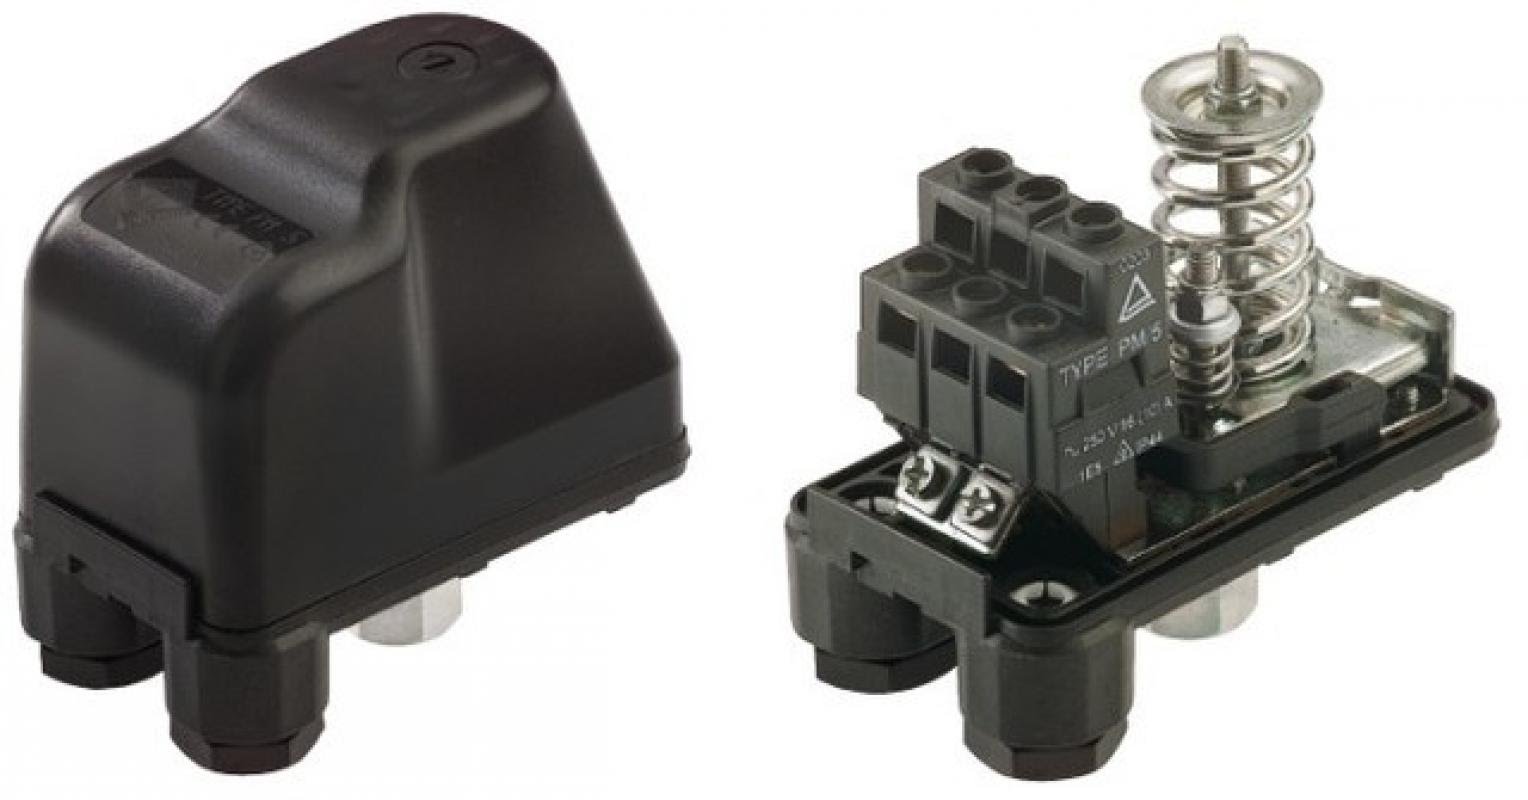
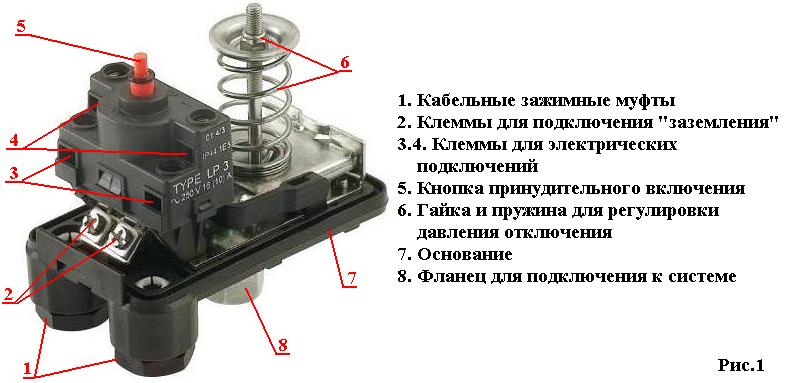
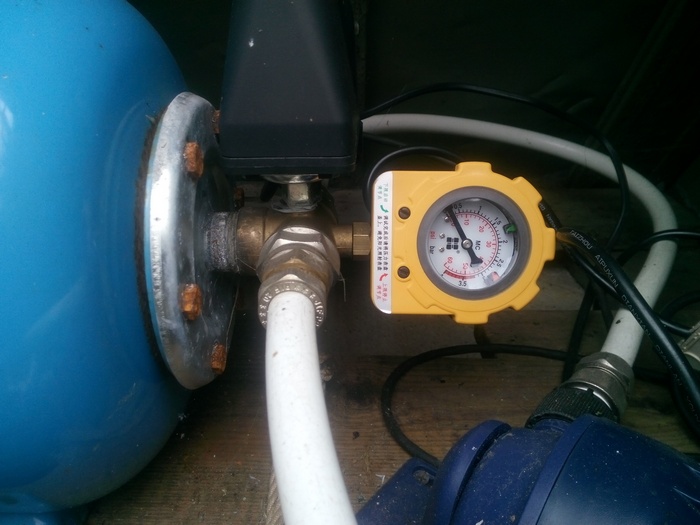
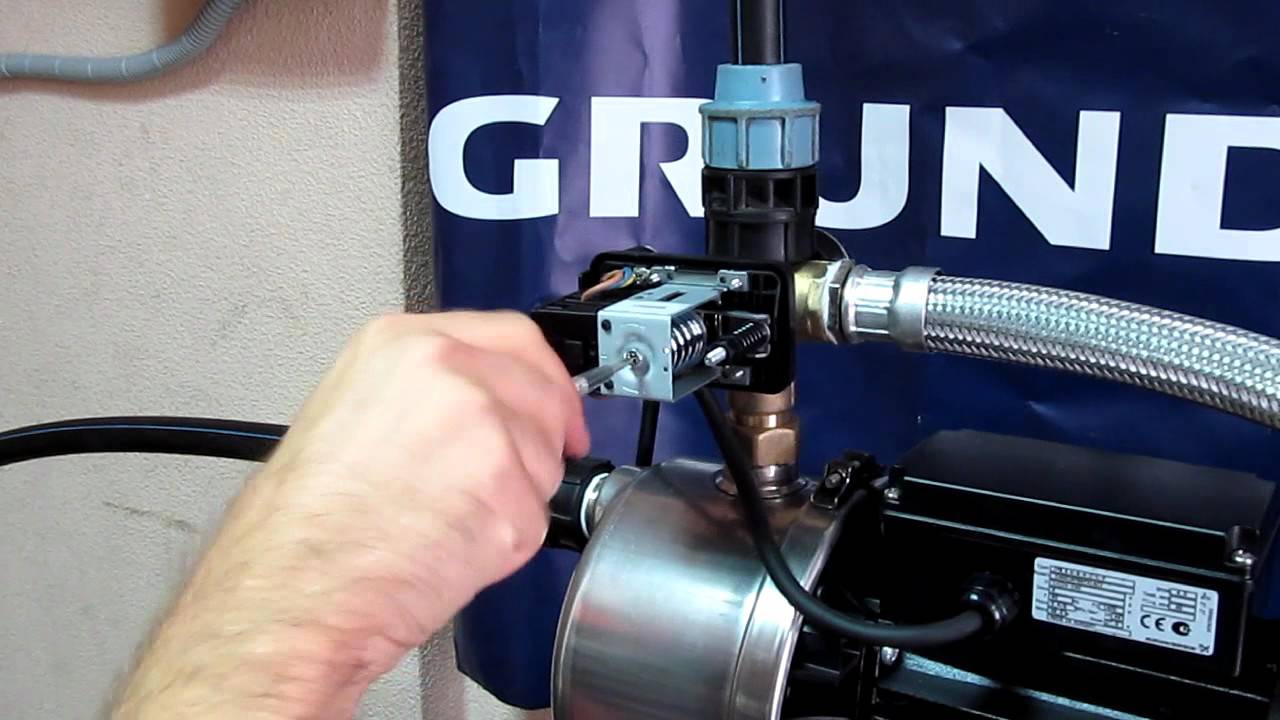
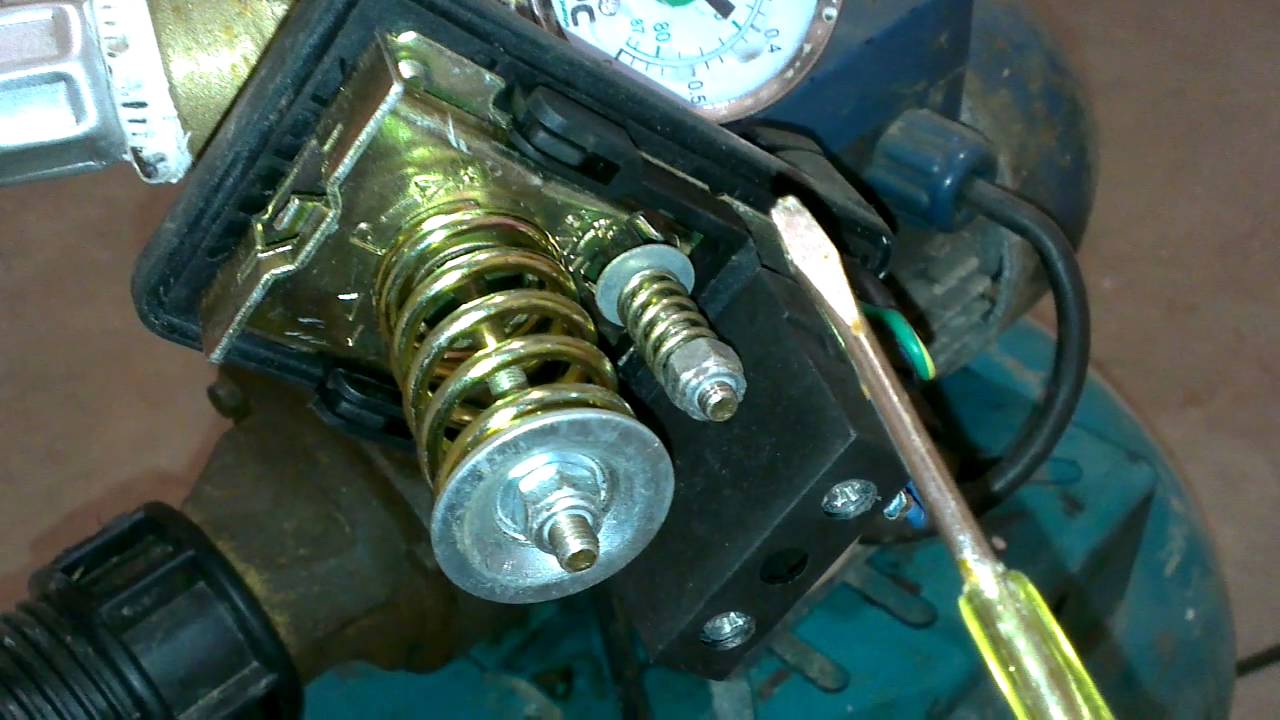
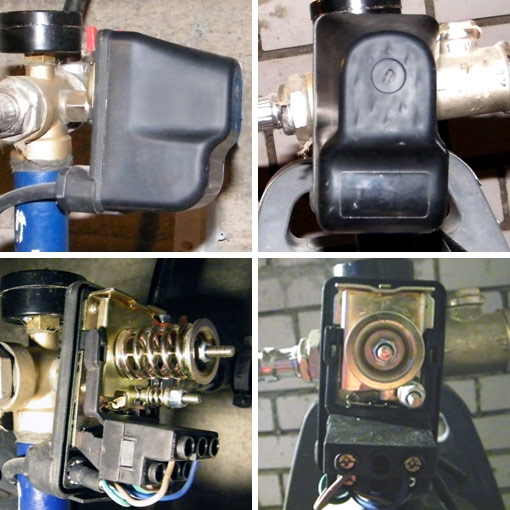
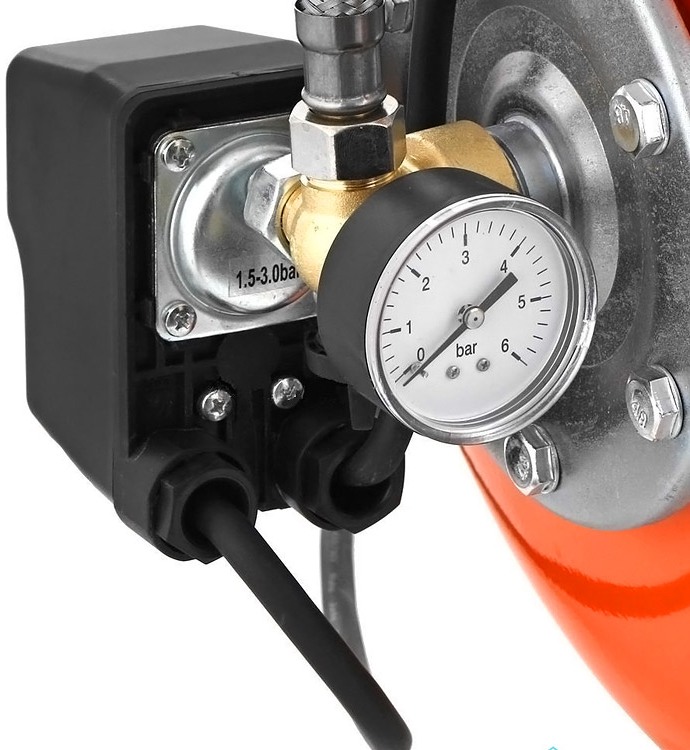
The most common mechanical pressure switch of a pumping station is a metal plate with a contact group on top, two spring-loaded regulators and connection terminals. A membrane cover is installed on the bottom of the metal plate. It covers directly the membrane and the piston attached to it. And also on the cover there is a threaded connection for installation on the adapter, which is located on the pumping equipment.All the above listed construction details are covered with a plastic cover.
On the working part of the regulator, this cover is fixed with screws.
If necessary, it can be removed using a wrench or a screwdriver.
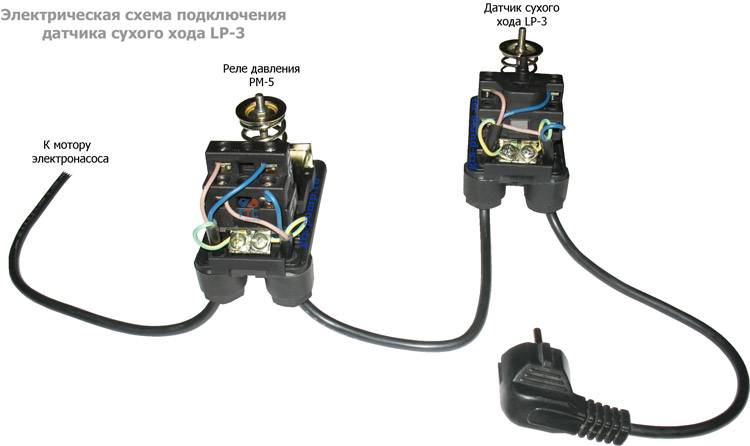
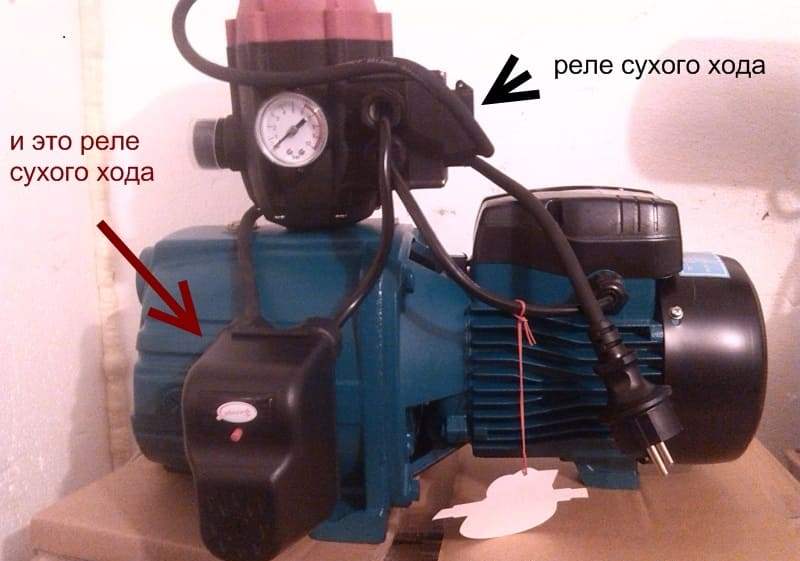
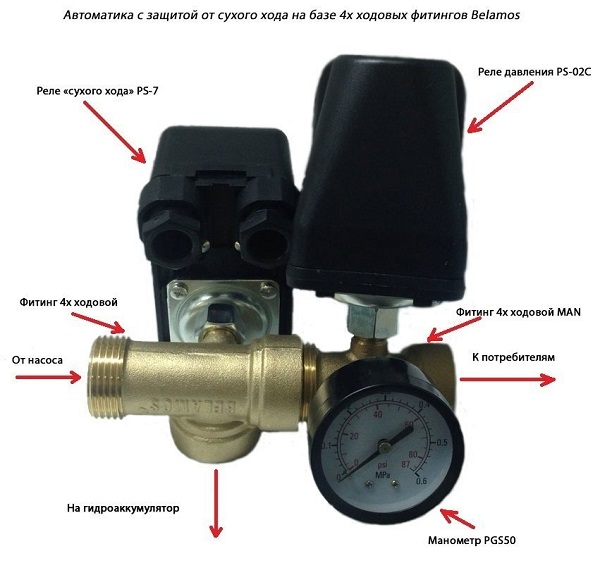
Relays can have a different configuration, shape, and even vary the location of some elements or wiring diagram. There are relays that have additional protective elements that keep the device running dry and help protect the motor from overheating.
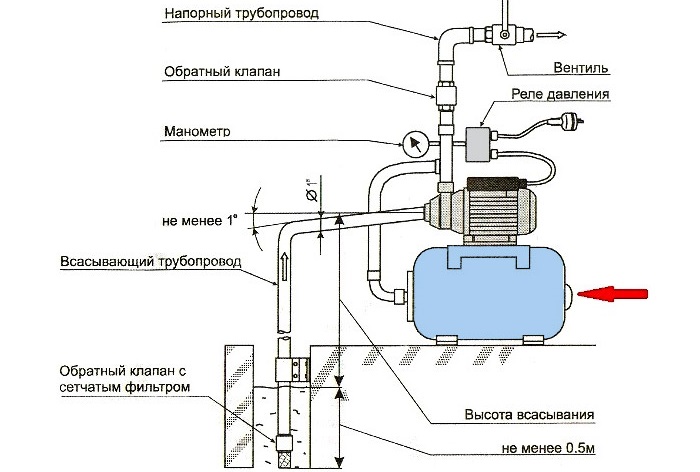
For the water supply of a private house, constructions of stations are used, in which the pressure regulator is the RM-5 or its foreign counterparts. This model of pressure switch inside has a movable plate and two springs on its opposite sides. The plate moves the water pressure in the system using a membrane. By rotating the clamping nut of one or another spring block, it is possible to change upwards or downwards the limits at which the relay operates. Springs, as it were, contribute to the pressure of the water displacing the plate.
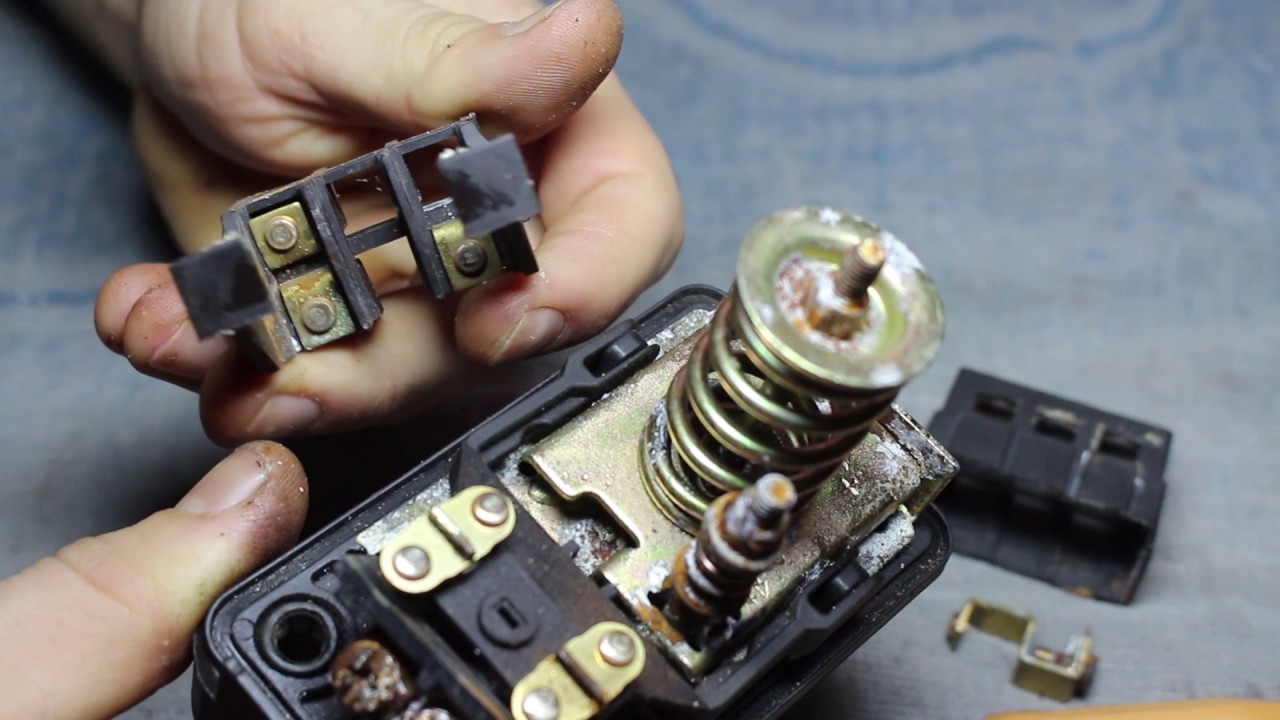
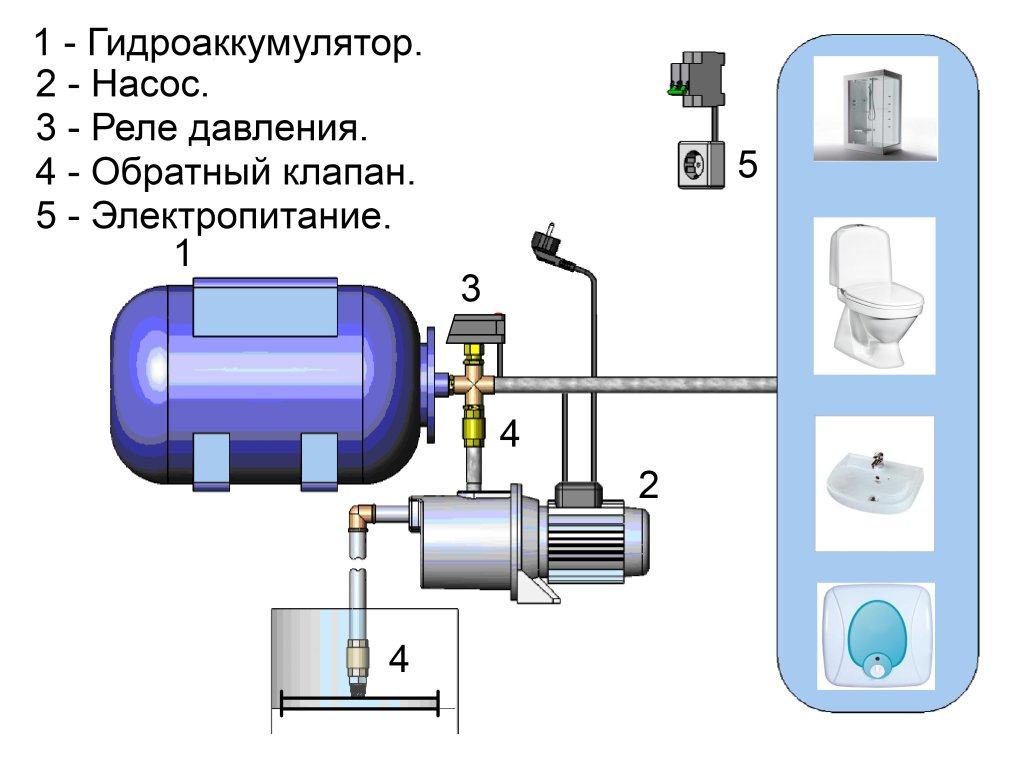
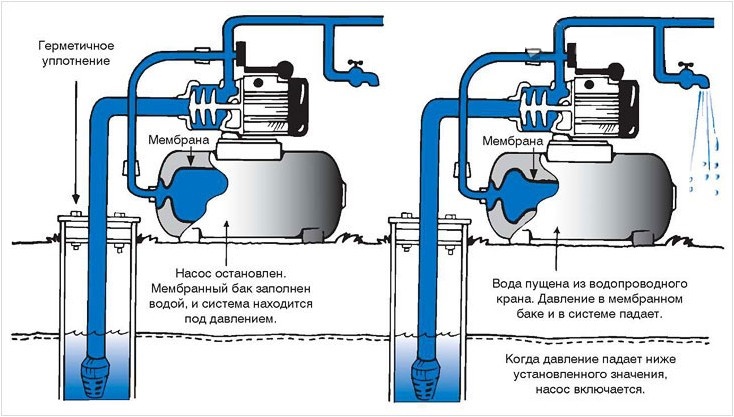
The mechanism is made so that when the plate is displaced, the opening or closing of several contact groups occurs. If we consider the scheme of work, it will be next. When turned on, the pump delivers water to the accumulator. Through the closed relay contacts, the motor is supplied with power. At the same time in the tank increases the pressure of water.
When the pressure reaches the value specified by the upper limit springs, the mechanism is activated, the contact opens, and the pump is turned off. The fluid from the pipeline does not flow back into the well due to a non-return valve. As the water is used, the pear becomes empty, the pressure decreases, and then the lower parameter spring is activated, which closes the contacts, including the pump. Then the cycle repeats.
During the operation of the entire pumping station, the operation of the pressure relay is as follows:
- a water tap opens and it comes from a filled hydraulic tank;
- in the system, the pressure starts to decrease, and the membrane presses on the piston;
- contacts are closed and the pump is turned on;
- water flows to the consumer, and when the valve closes, fill the hydraulic tank;
- when water is pumped into the hydraulic tank, pressure rises, it acts on the membrane, and this, in turn, on the piston, and the contacts open,
- pump stops working.
From the settings of the relay depends on how often the pump will turn on, and the water pressure, and the service life of the entire system. If the parameters are set incorrectly, the pump will not work correctly.
Training
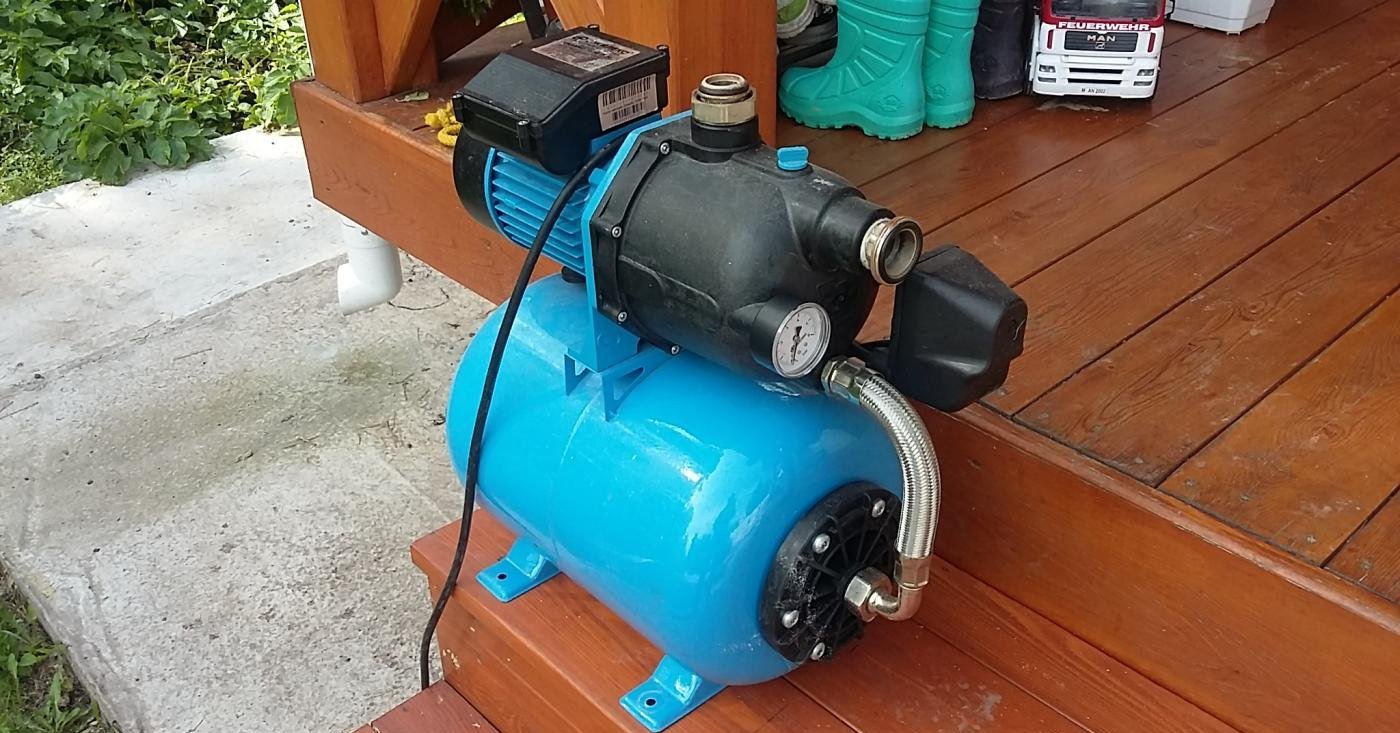
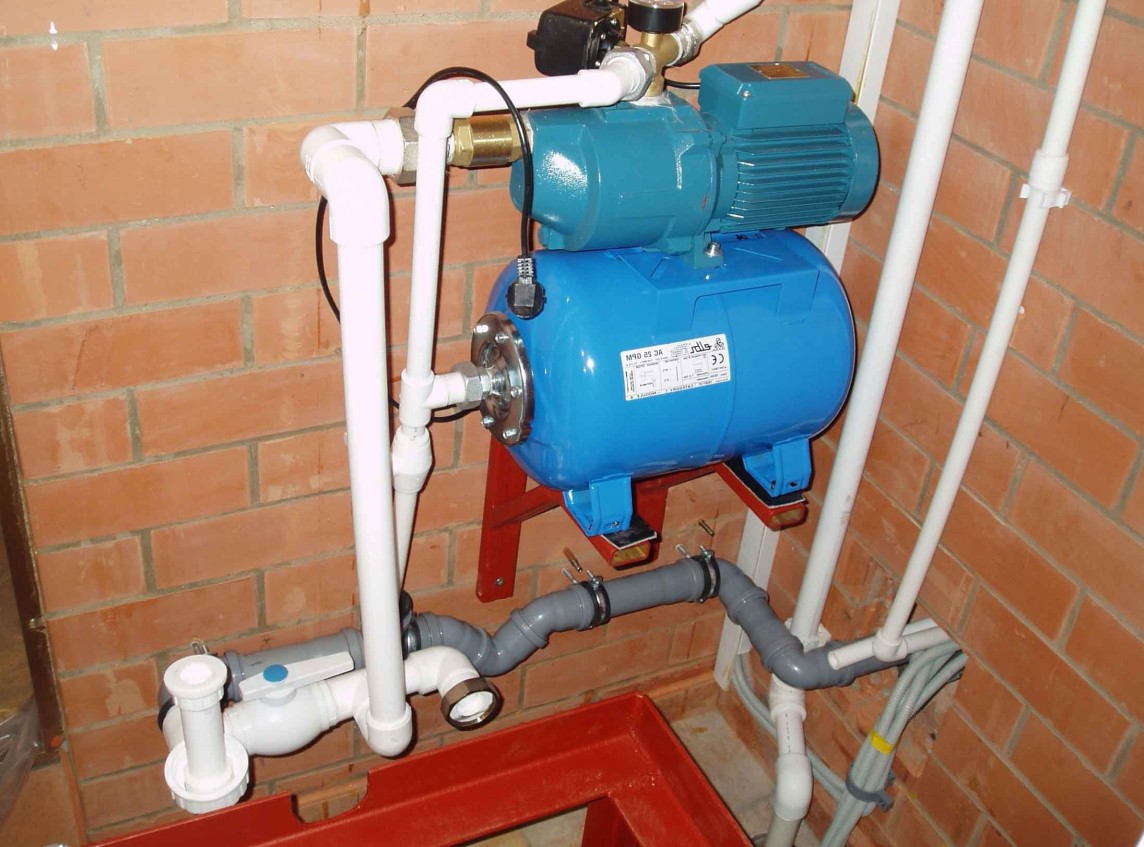
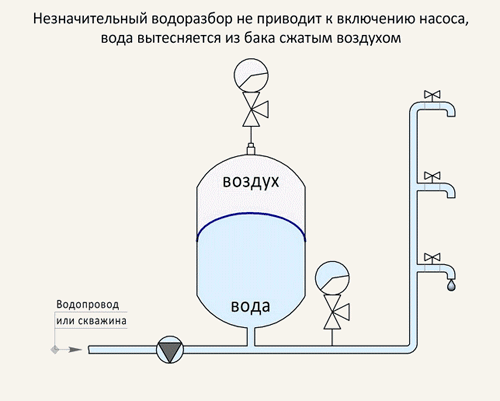
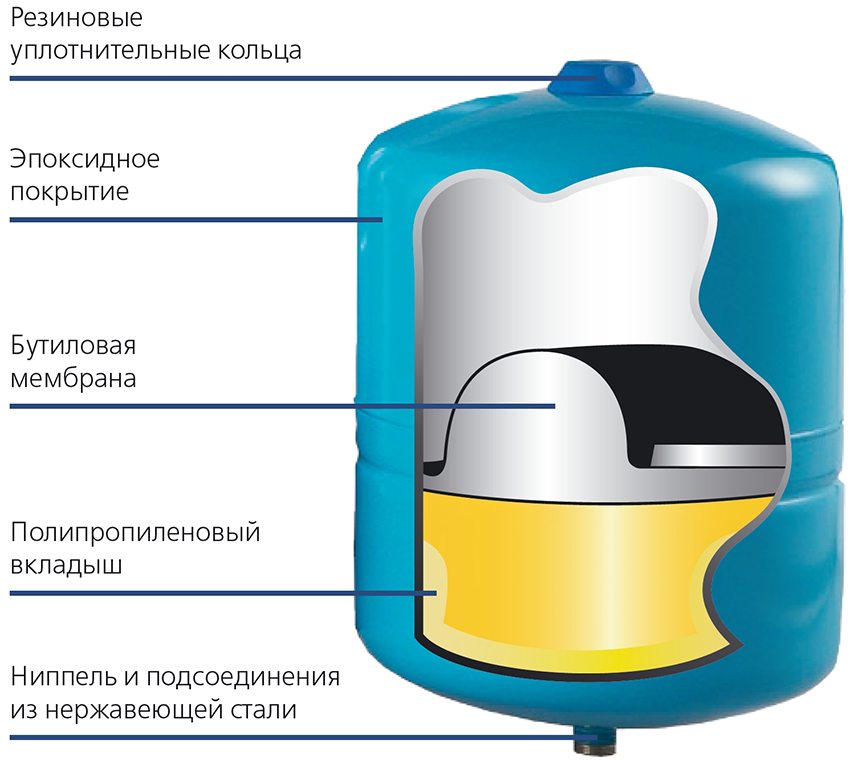
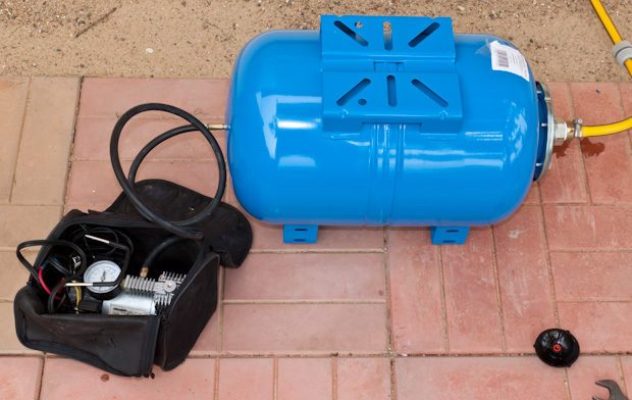
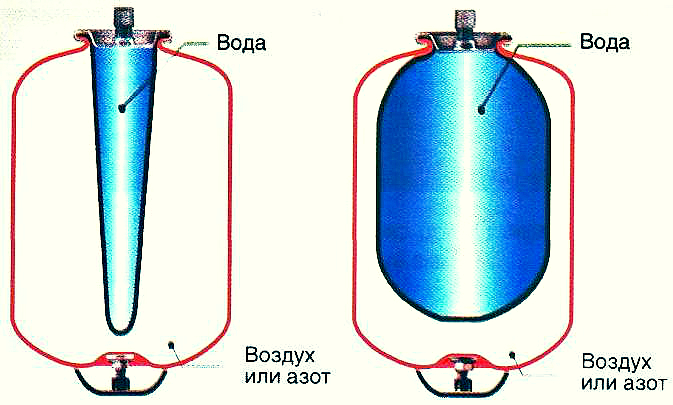
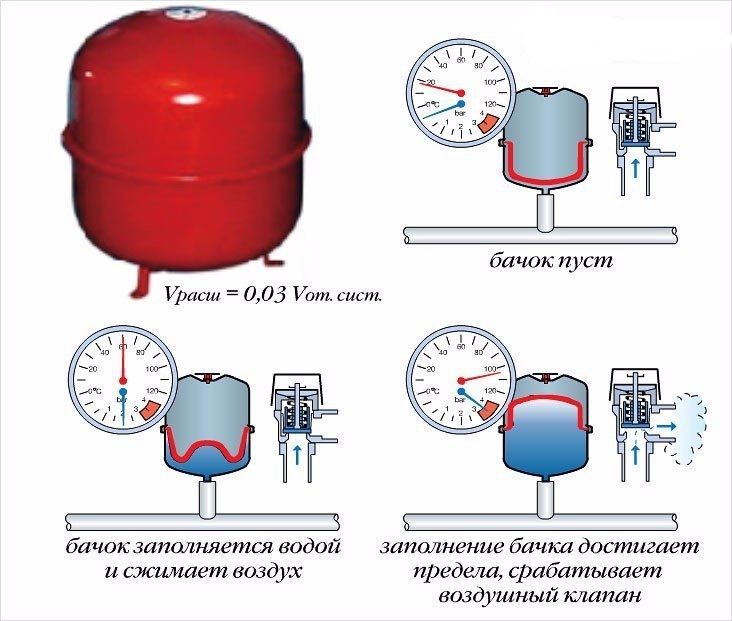
The relay should be adjusted only after checking the air pressure in the accumulator. For this, it is better to understand how this hydroaccumulator (hydraulic tank) works. It is a hermetic composite container. The main working part of the tank is a rubber pear into which water is drawn. The other part is the metal case of the hydroaccumulator. The space between the shell and the pear is filled with pressurized air.
The pear in which water accumulates is connected to the water supply system. Due to the air in the hydraulic tank, the pear with water is compressed, which allows to maintain the pressure in the system at a certain level. Thus, when the tap with water is opened, it moves through the pipeline under pressure, and the pump does not turn on.
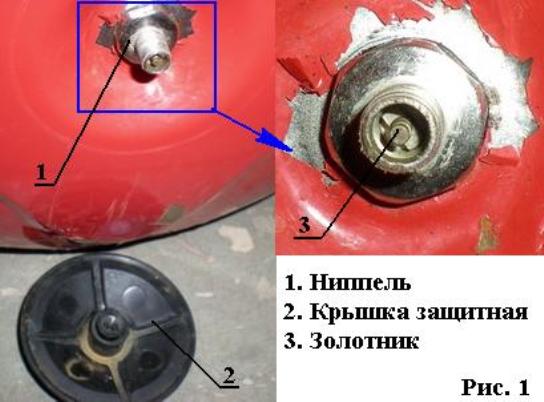
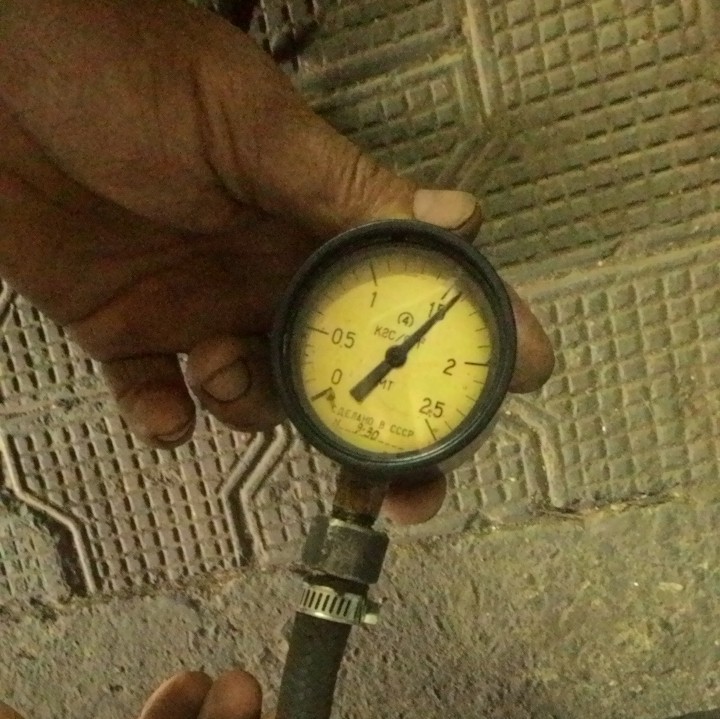
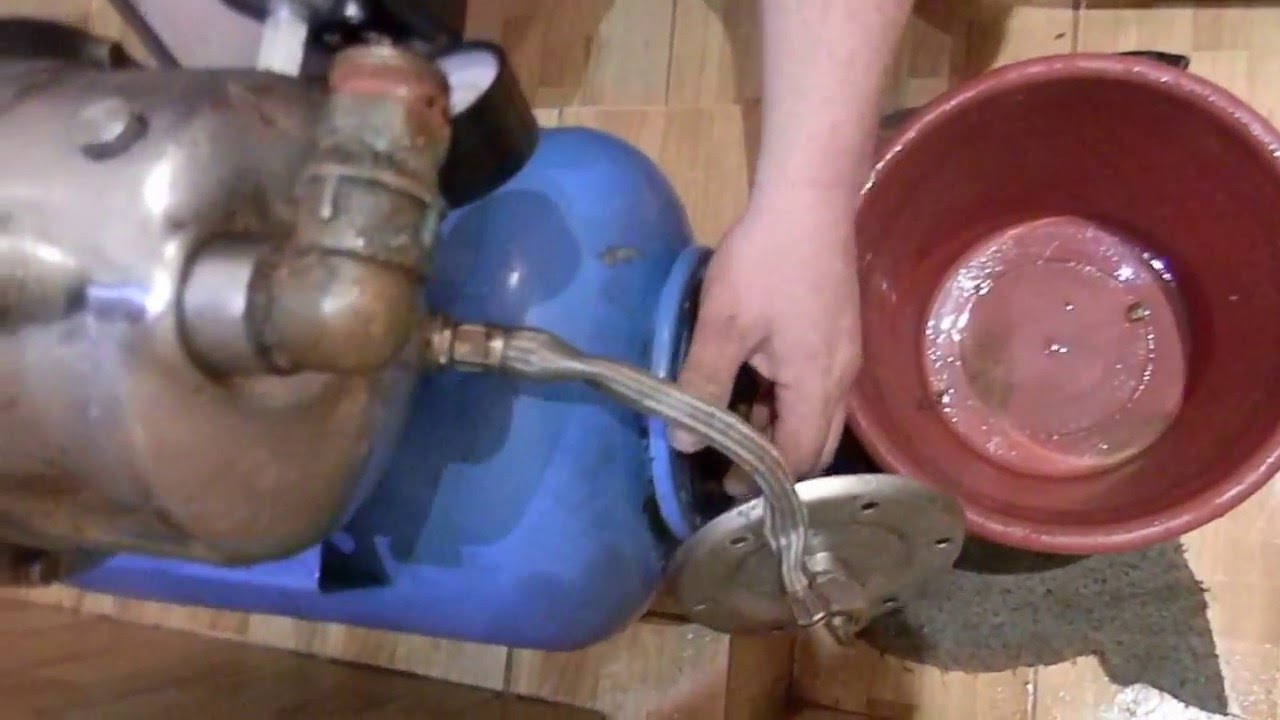
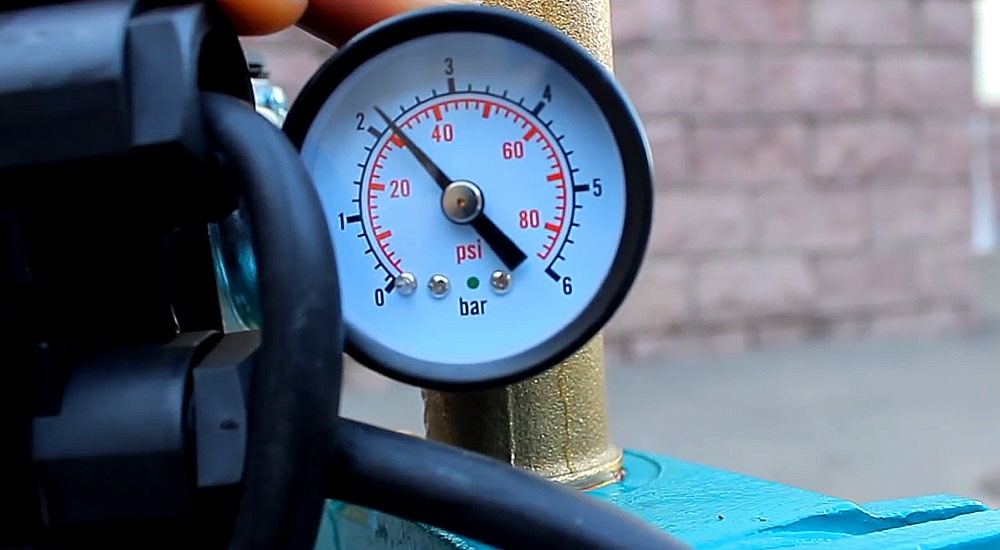
Before checking the air pressure in the hydraulic tank, the pumping station should be disconnected from the network, and all the water should be drained from the reservoir tank.Next, open the side cover on the tank, find the nipple and measure the pressure with a bicycle or automobile pump with a pressure gauge. Well, if its value is about 1.5 atmosphere.
In that case, if the result obtained has a smaller value, then the pressure is raised to the desired one using the same pump. It is worth recalling that in the tank the air must always be under pressure.
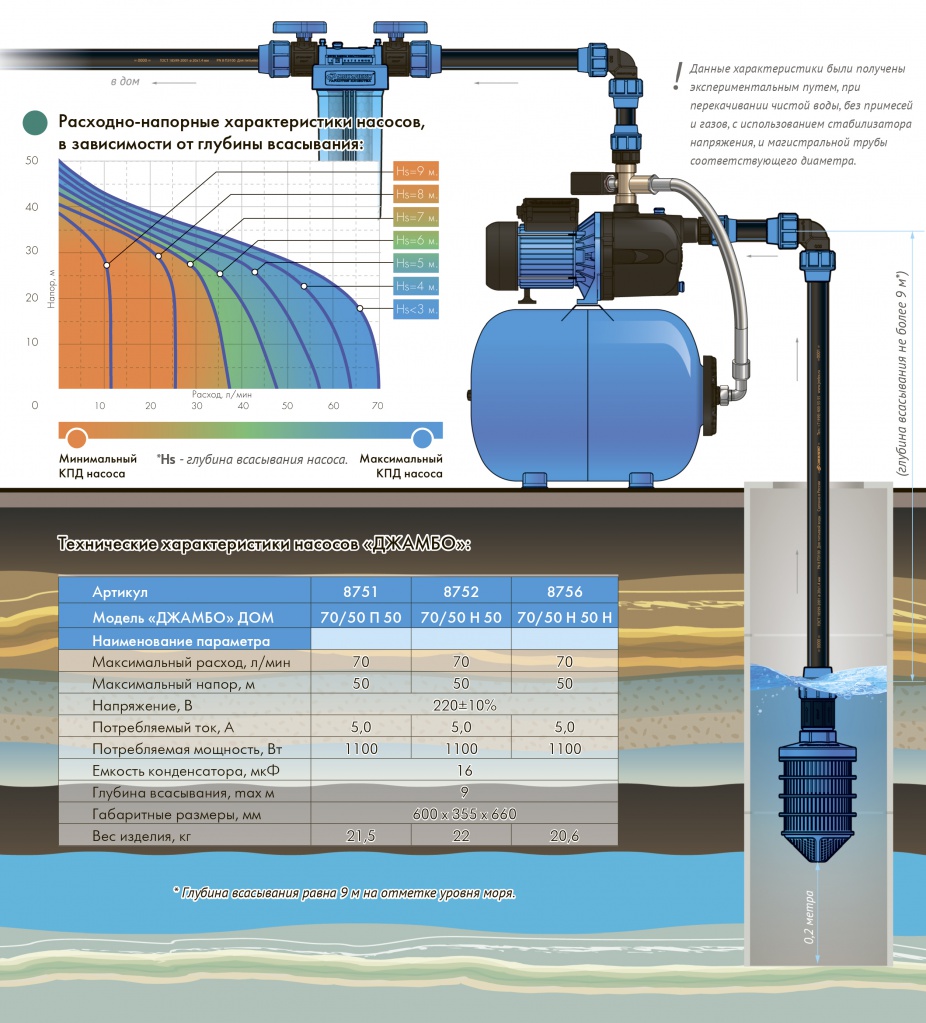
For a hydraulic tank with a volume of 20-25 liters, it is better to set the pressure in the range of 1.4-1.7 atmospheres, with a volume of 50-100 liters - 1.7-1.9 atmospheres.
It is important to periodically check the air pressure in the hydraulic tank when using a pumping station. (about once a month or at least three months), and if there is a need, then pump it up. These manipulations will allow the hydroaccumulator membrane to work longer. But it also does not follow that the hydraulic tank is too empty without water for too long, as this can lead to shattering of the walls.
After adjusting the pressure in the accumulator, it happens that the pumping station stops working in normal mode. This means that the pressure switch must be adjusted directly.
How to set your own hands?
When starting the well pump and the station, setting up the relay is very important. And it should be done correctly.
Despite the fact that the pressure switch immediately comes with factory settings, the best option would be to check and adjust them further. Before you begin to regulate the relay, it is worth knowing what the values are recommended by the manufacturer to set the allowable pressure values. However, it must be borne in mind that the failure of the pumping station due to incorrect settings is a non-warranty case.
When making calculations of permissible pressures of pressure and shutdown of automation, the manufacturer takes into account possible features of operation. And this is done when developing parameters for work.
When selecting them, the following data is taken into account:
- required pressure in the highest section of the pipeline;
- height difference between the pump and the highest section of the water extraction;
- possible pressure drop during water transfer.
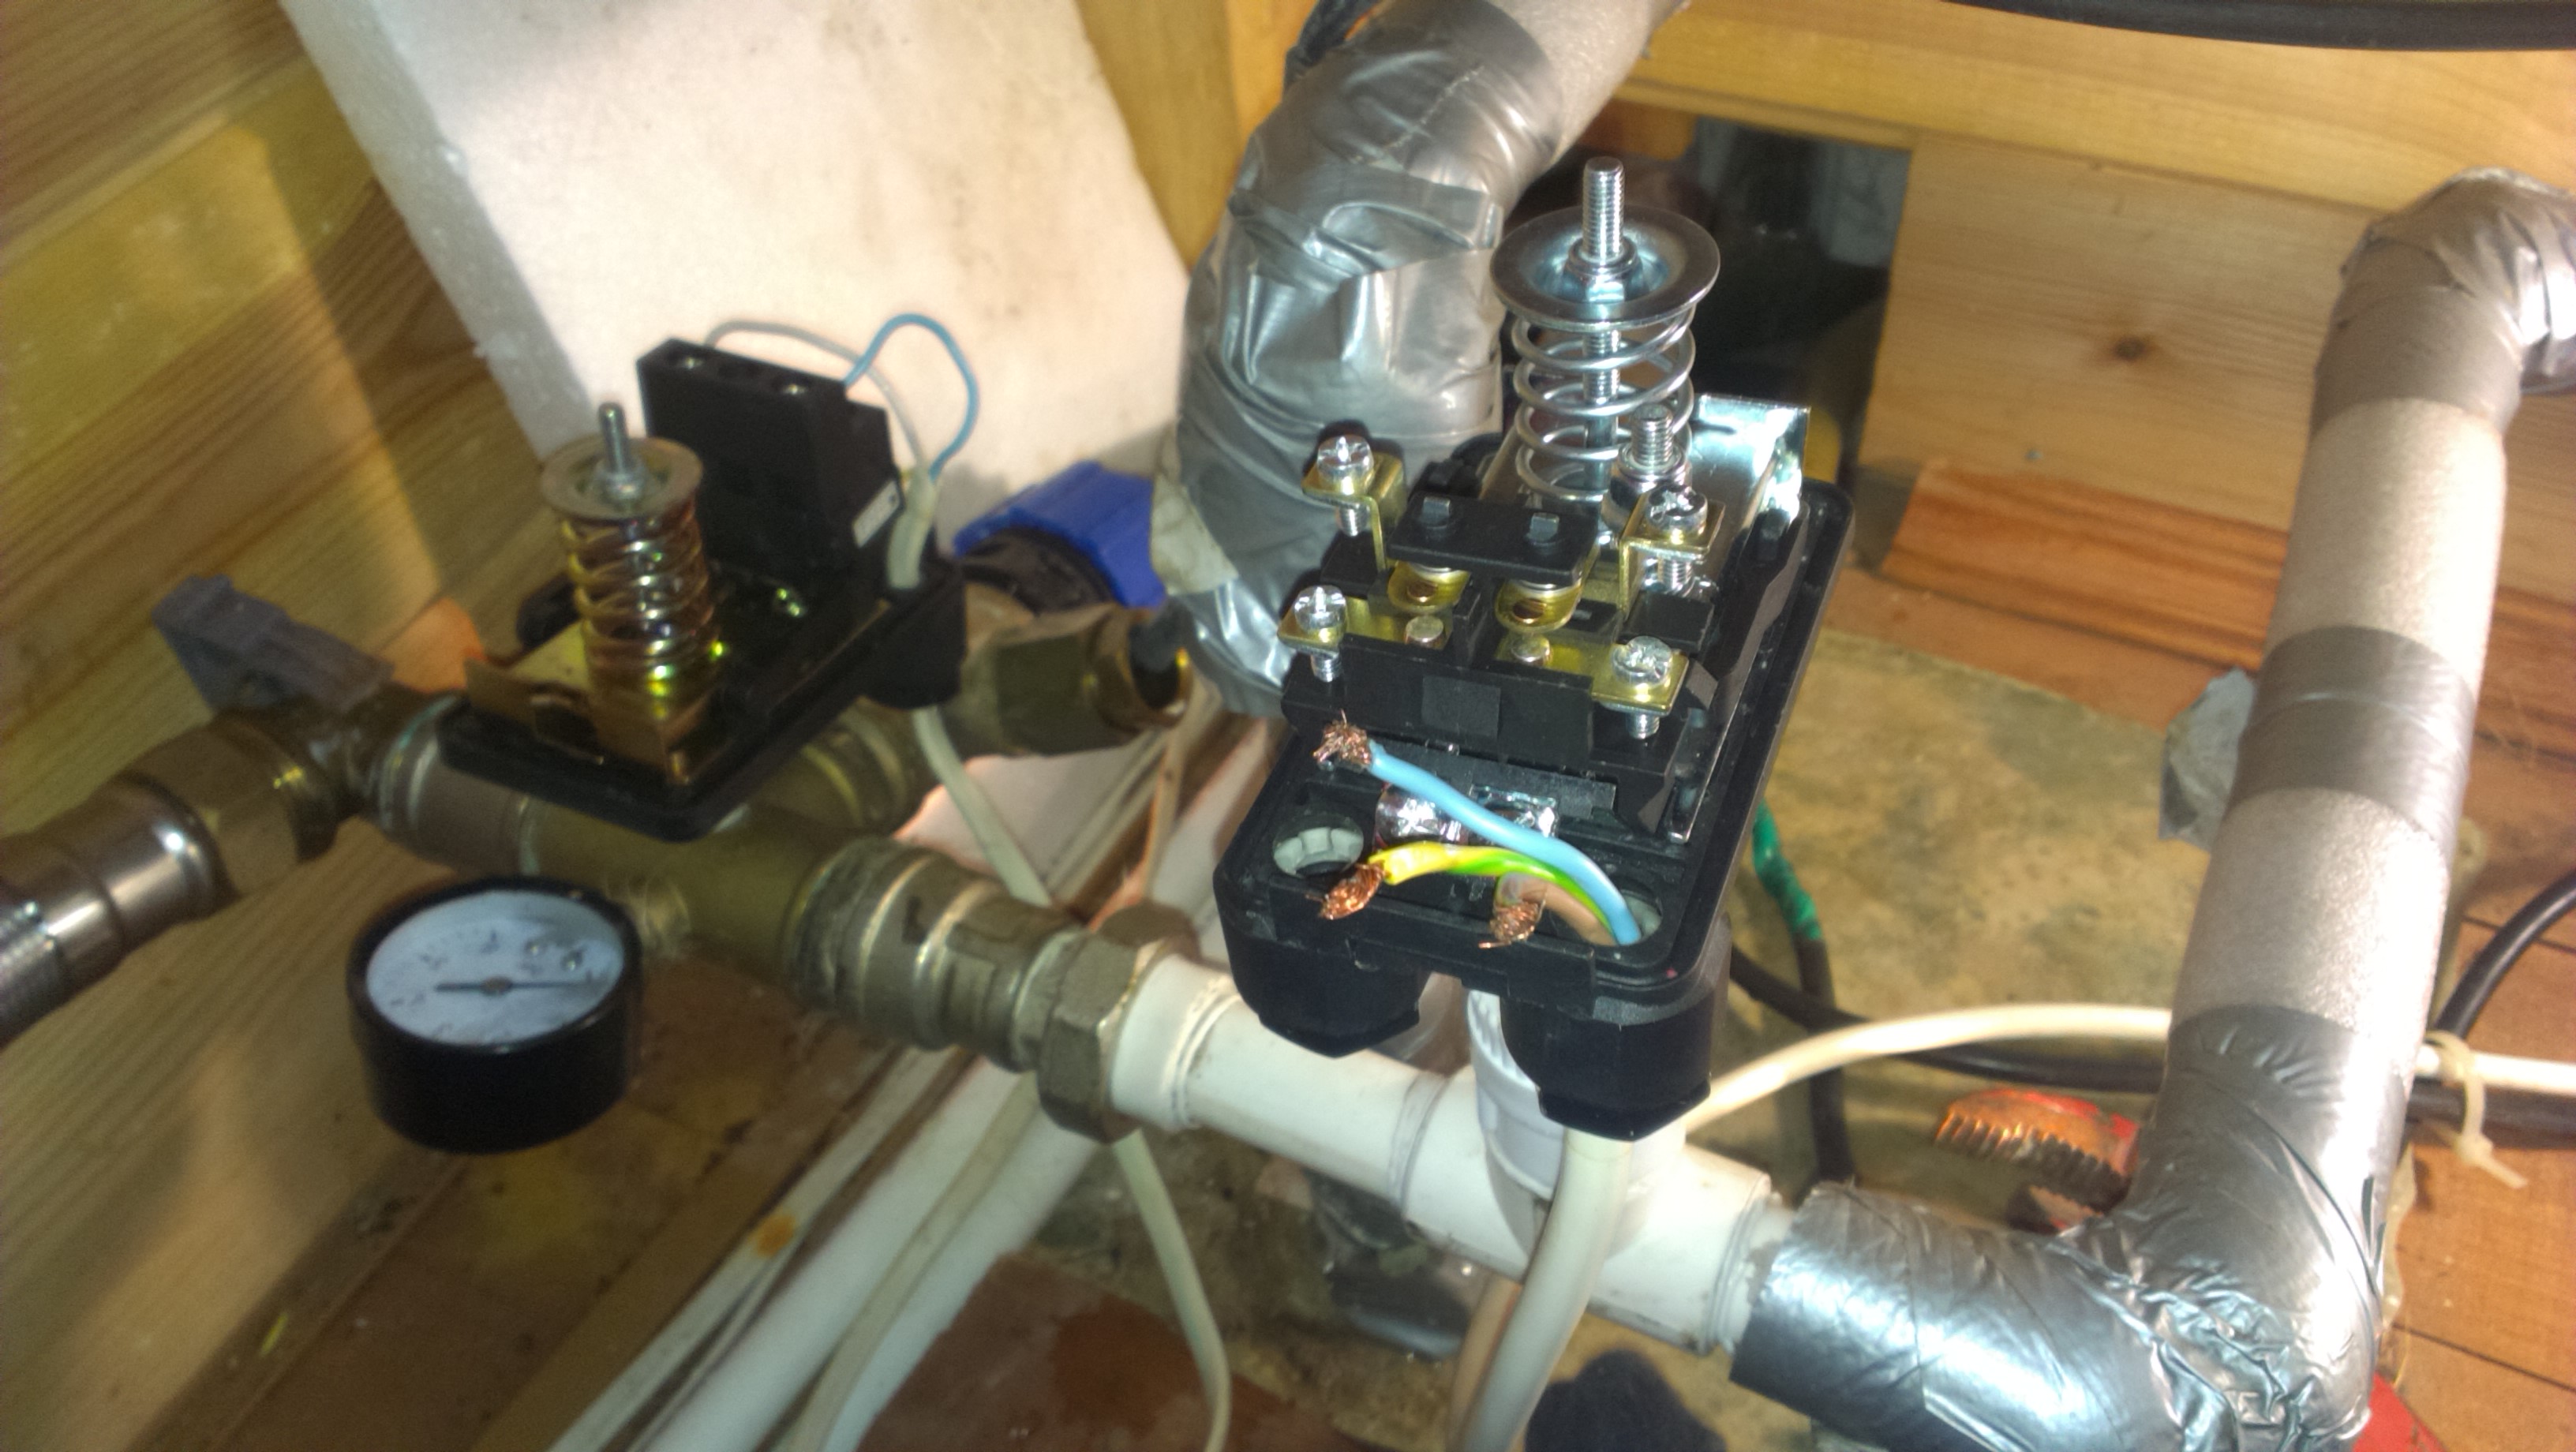
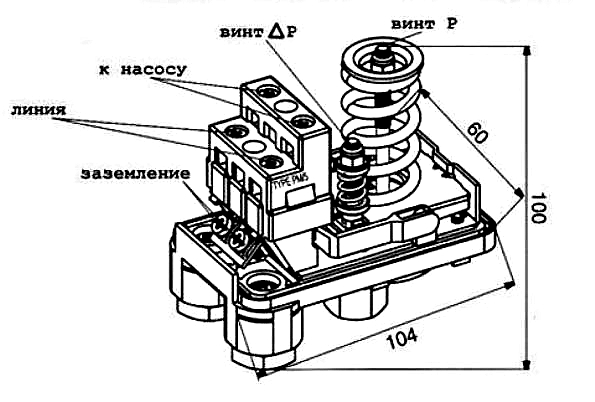
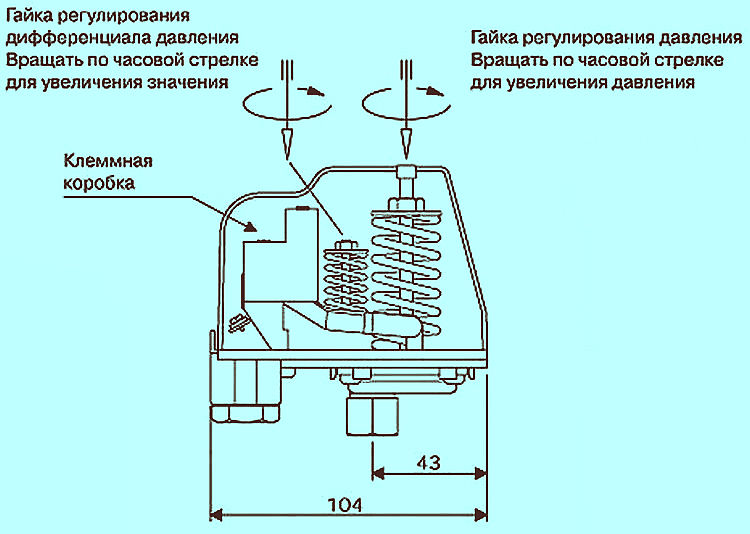
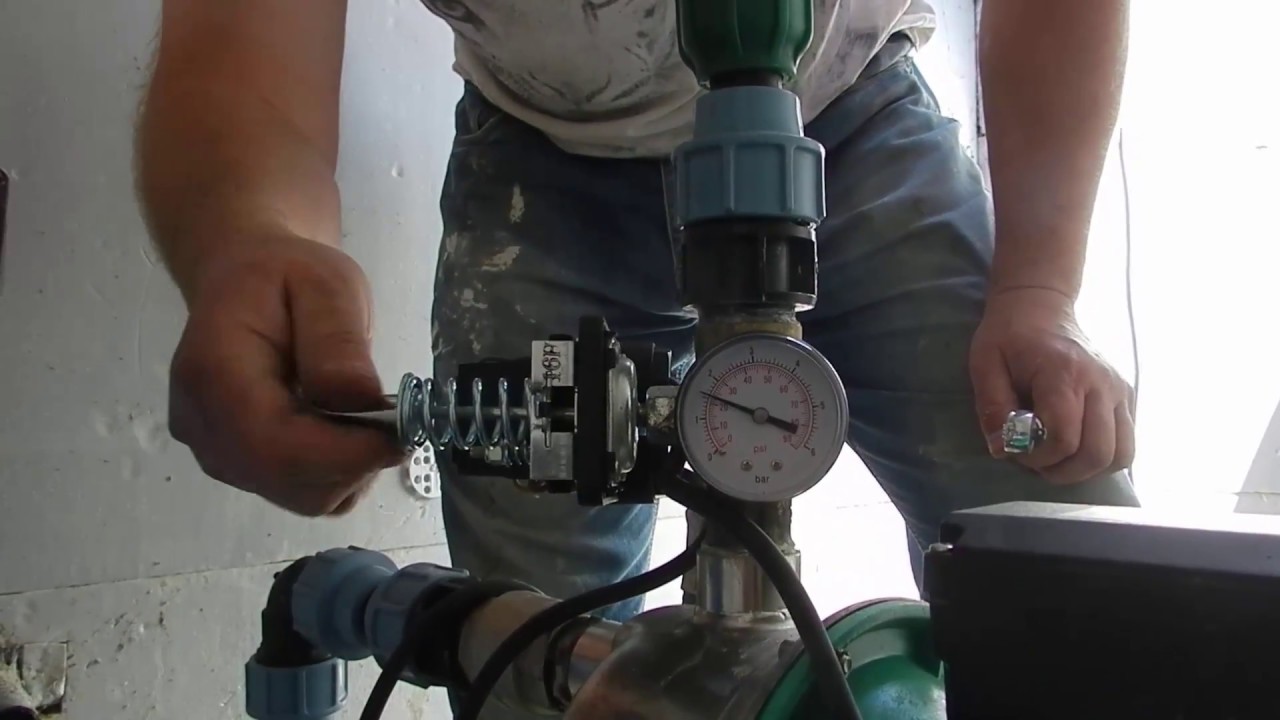
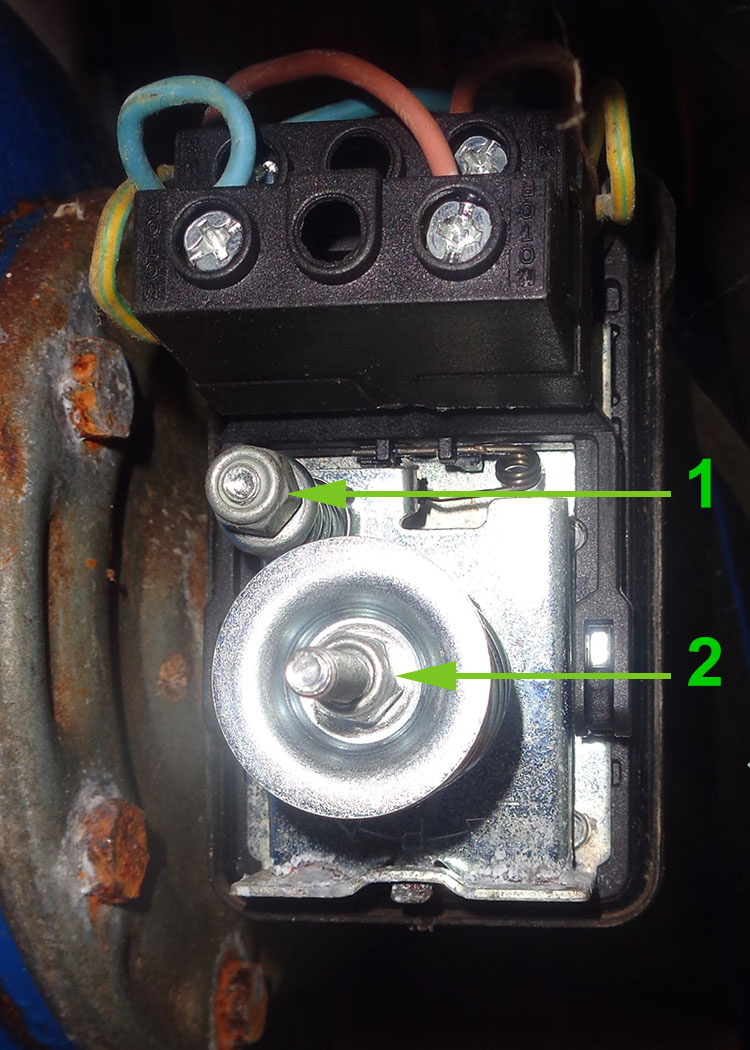
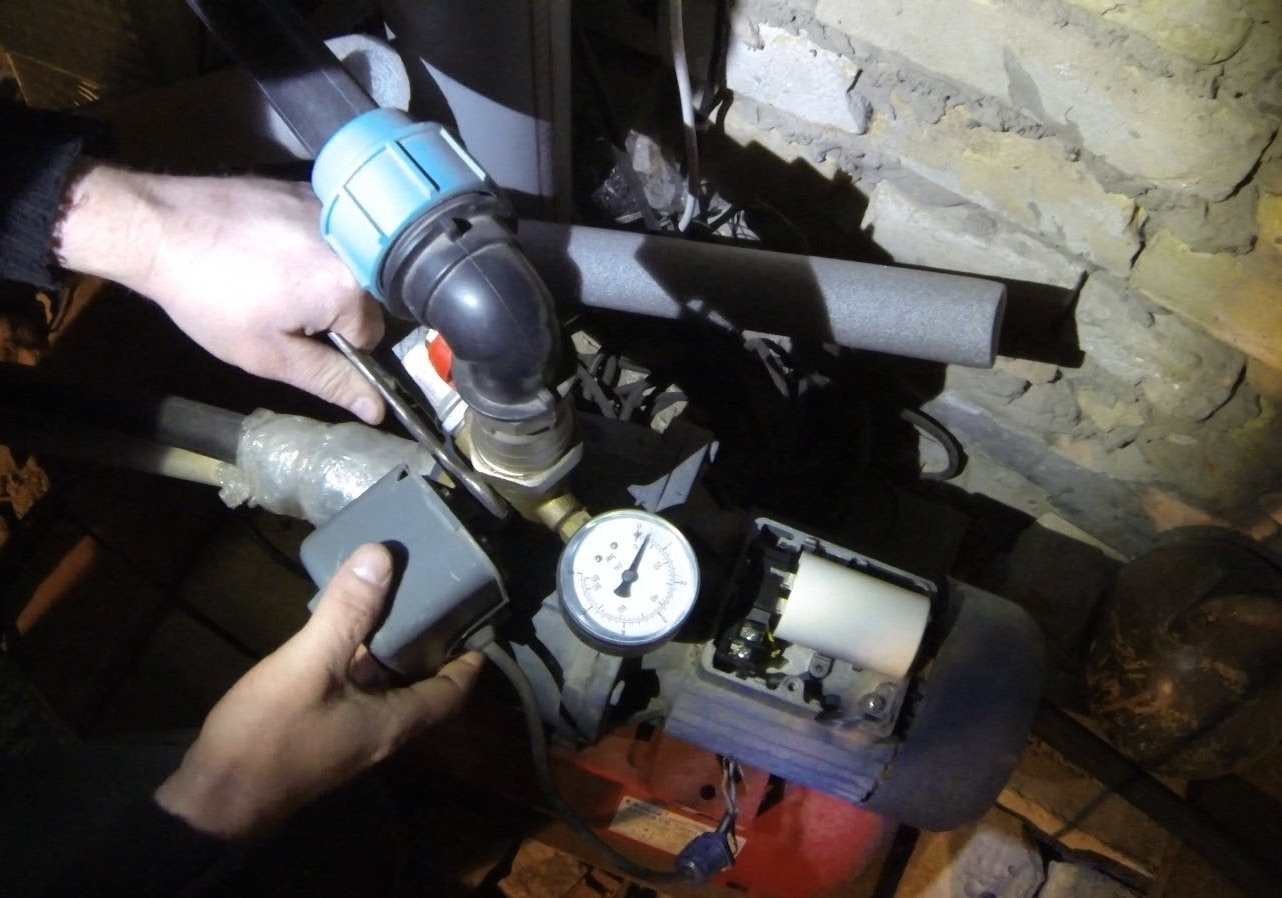
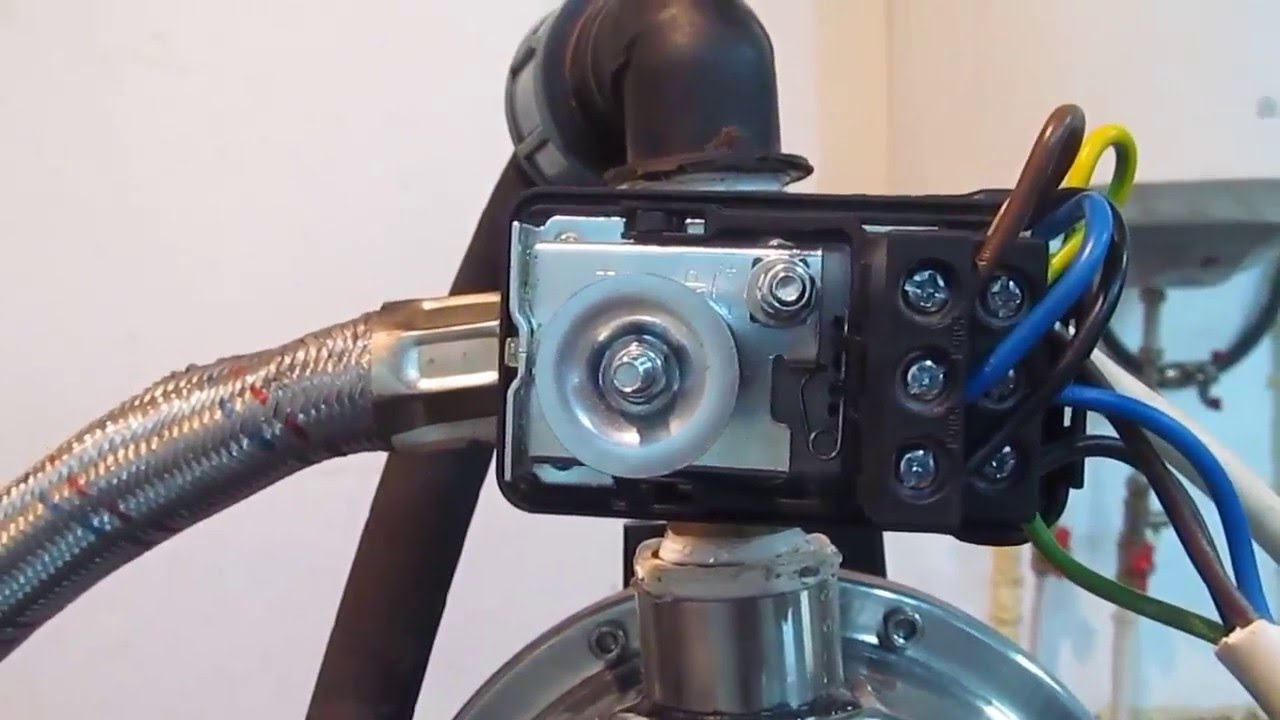
Before adjusting, you need to prepare the tools in the form of a set of screwdrivers and wrenches. Usually, the cover of the relay is made in black color so that it does not merge with the entire accumulator.Under the cover are two springs, which act as a regulator. Each spring has a nut.
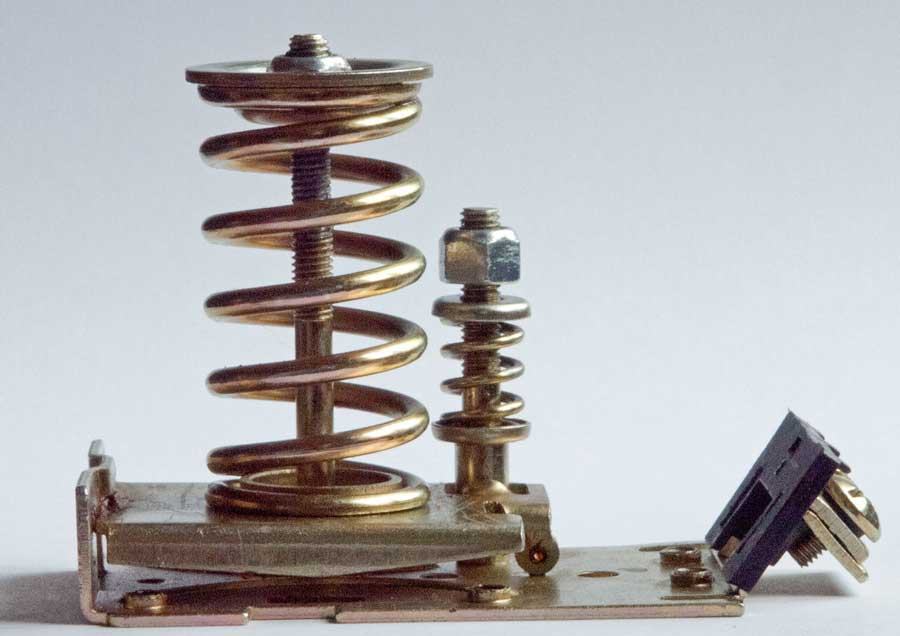
It should be noted that the size of the upper spring is larger, and the nut on it regulates the pressure for shutdown. It is also sometimes denoted by the letter "P". A small nut on the bottom spring allows you to adjust the pressure difference. The designation of a small nut is in the form of "ΔP" (delta P).
It is worth remembering that the accuracy of the settings made is best checked by a pressure gauge that is built into the system. To ensure more accurate settings, it is important to verify the values obtained with those indicated in the passport of the pumping station. Take care not to exceed the maximum values.
To raise the pressure at which the station will turn off, the nut “P” is tightened clockwise, and to decrease it - counterclockwise. Often next to the nut bear the designation in the form of "+" and "-". Rotation of the nut must be carried out slowly, less turnover at a time. It is useful to remember that with a larger value of "P" there will be more water in the pear, which means that the pump will turn on less frequently.
Before proceeding directly to setting up the relay, you should at least understand a little how the pumping station as a whole works. The hydroaccumulator contains a rubber bulb and air.The pump pumps water from the well to the pear. It is filled with water, air is compressed, and pressure is created on the walls.
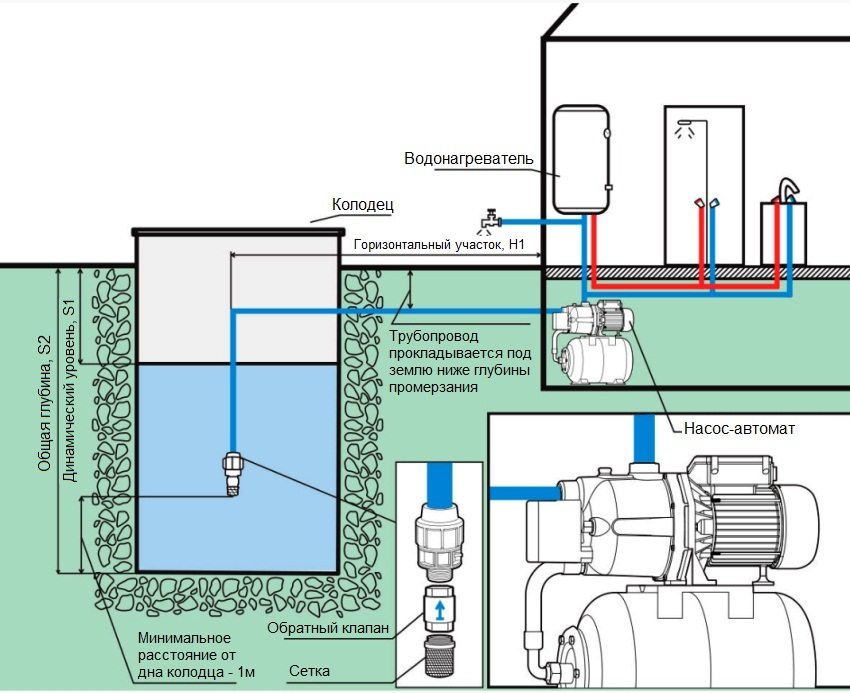
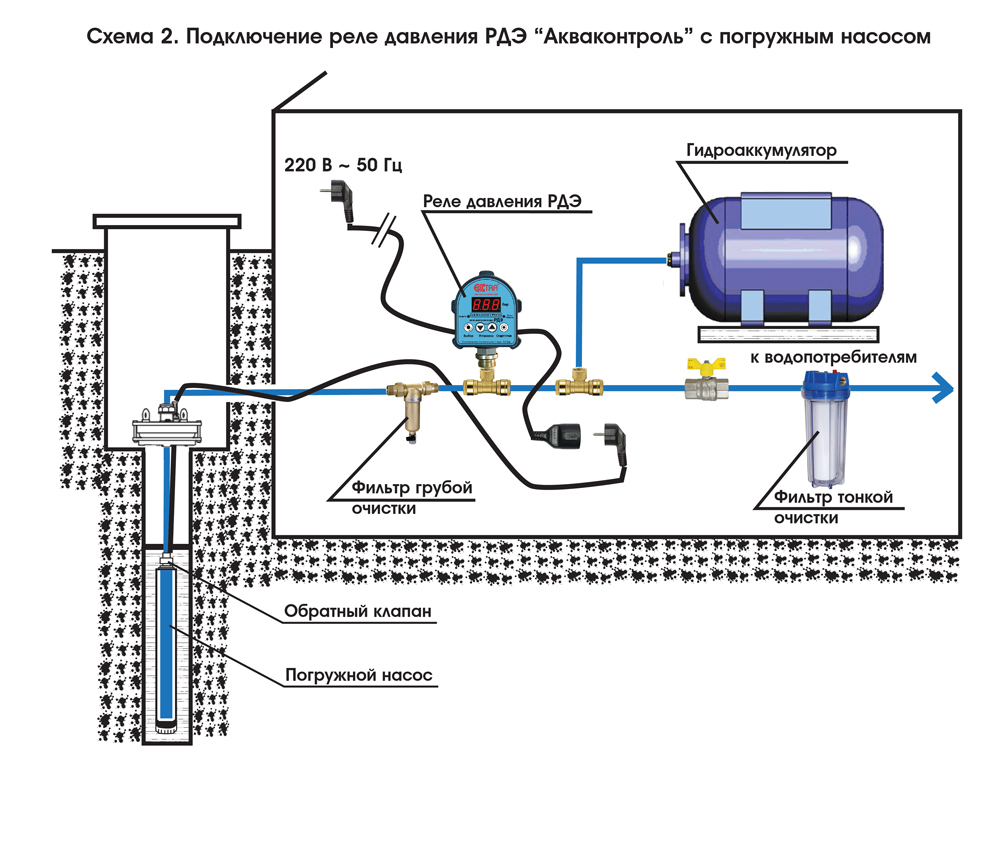
Adjusting the pressure switch allows you to set the fill limit for the tank, that is, the moment when the pump should turn off. The system pressure is displayed on the gauge. It is worth noting that the water in the well will not come at the expense of the check valve.
When the faucet in the house opens, the water from the pear leaves with a pressure that is equal to the pressure applied. The water from the pear is consumed and the pressure decreases, and when it reaches the lower threshold, the pump will turn on.
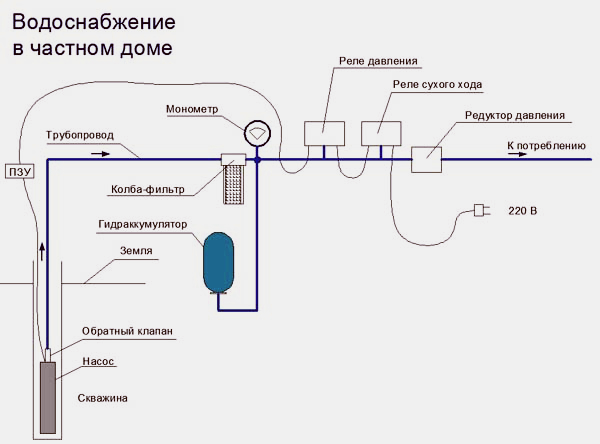
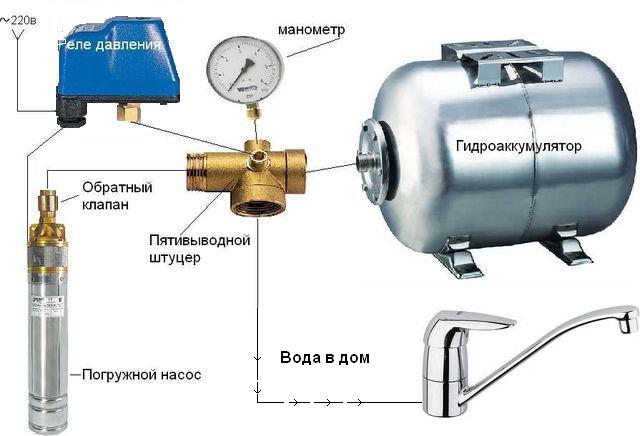
When assembling the pumping station, the pressure switch is connected between the outlet fitting of the hydraulic tank and the check valve on the pipeline. When assembling it is best to use a five-pointed fitting, which has a thread for the main parts, including a pressure gauge. It is very important to install a check valve and a fitting in the correct order. Otherwise it will be difficult to adjust the pressure switch.
It is worth noting that in addition to the relay, the “dry running” sensor as well as the frequency converter can also be part of the pumping station.
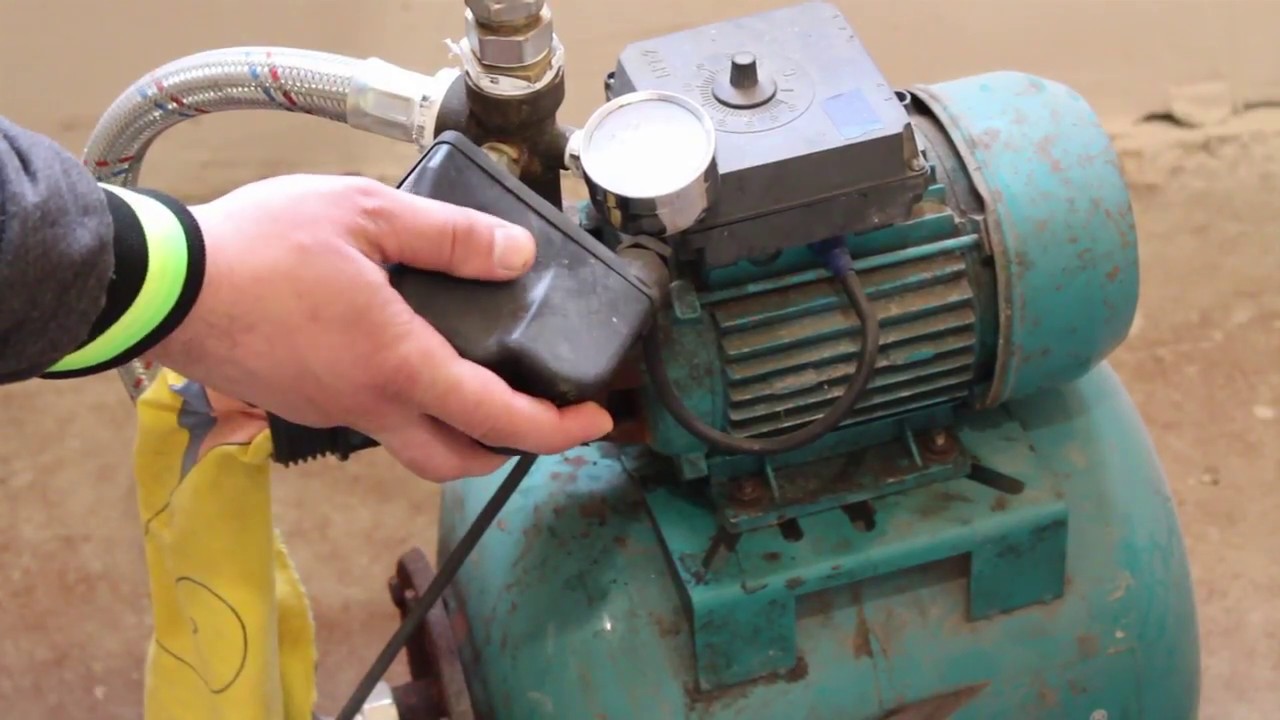
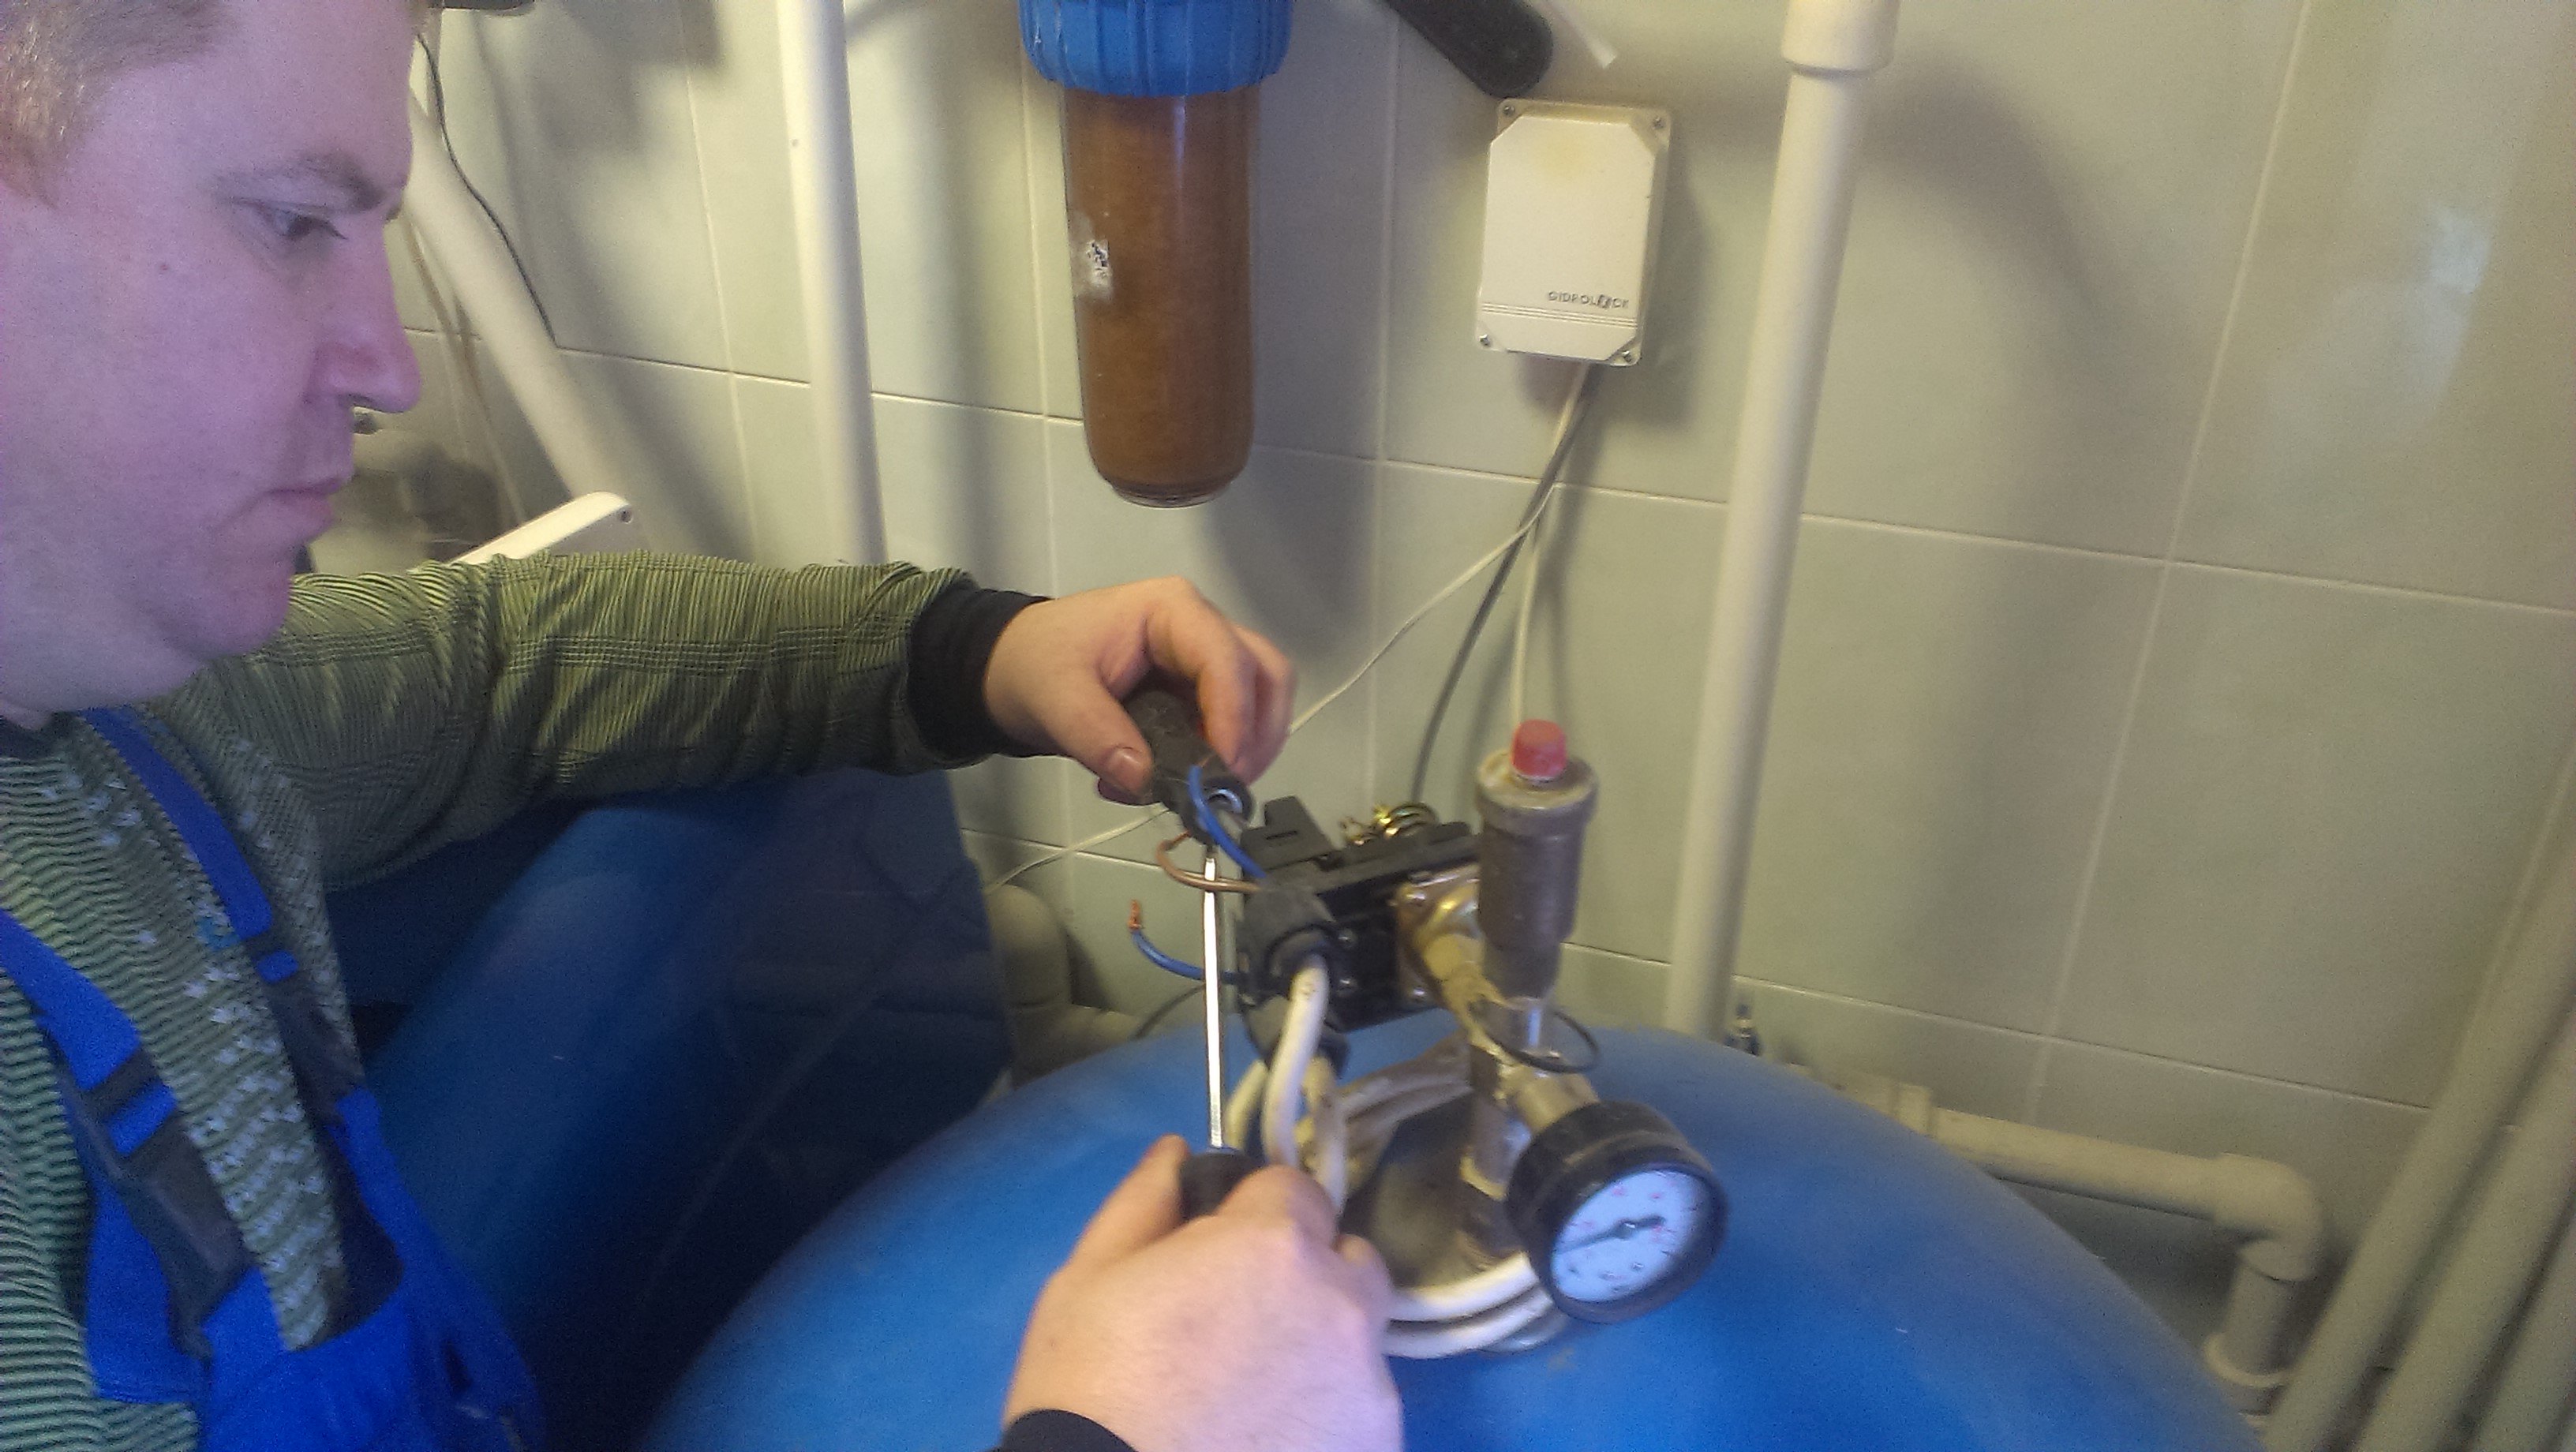
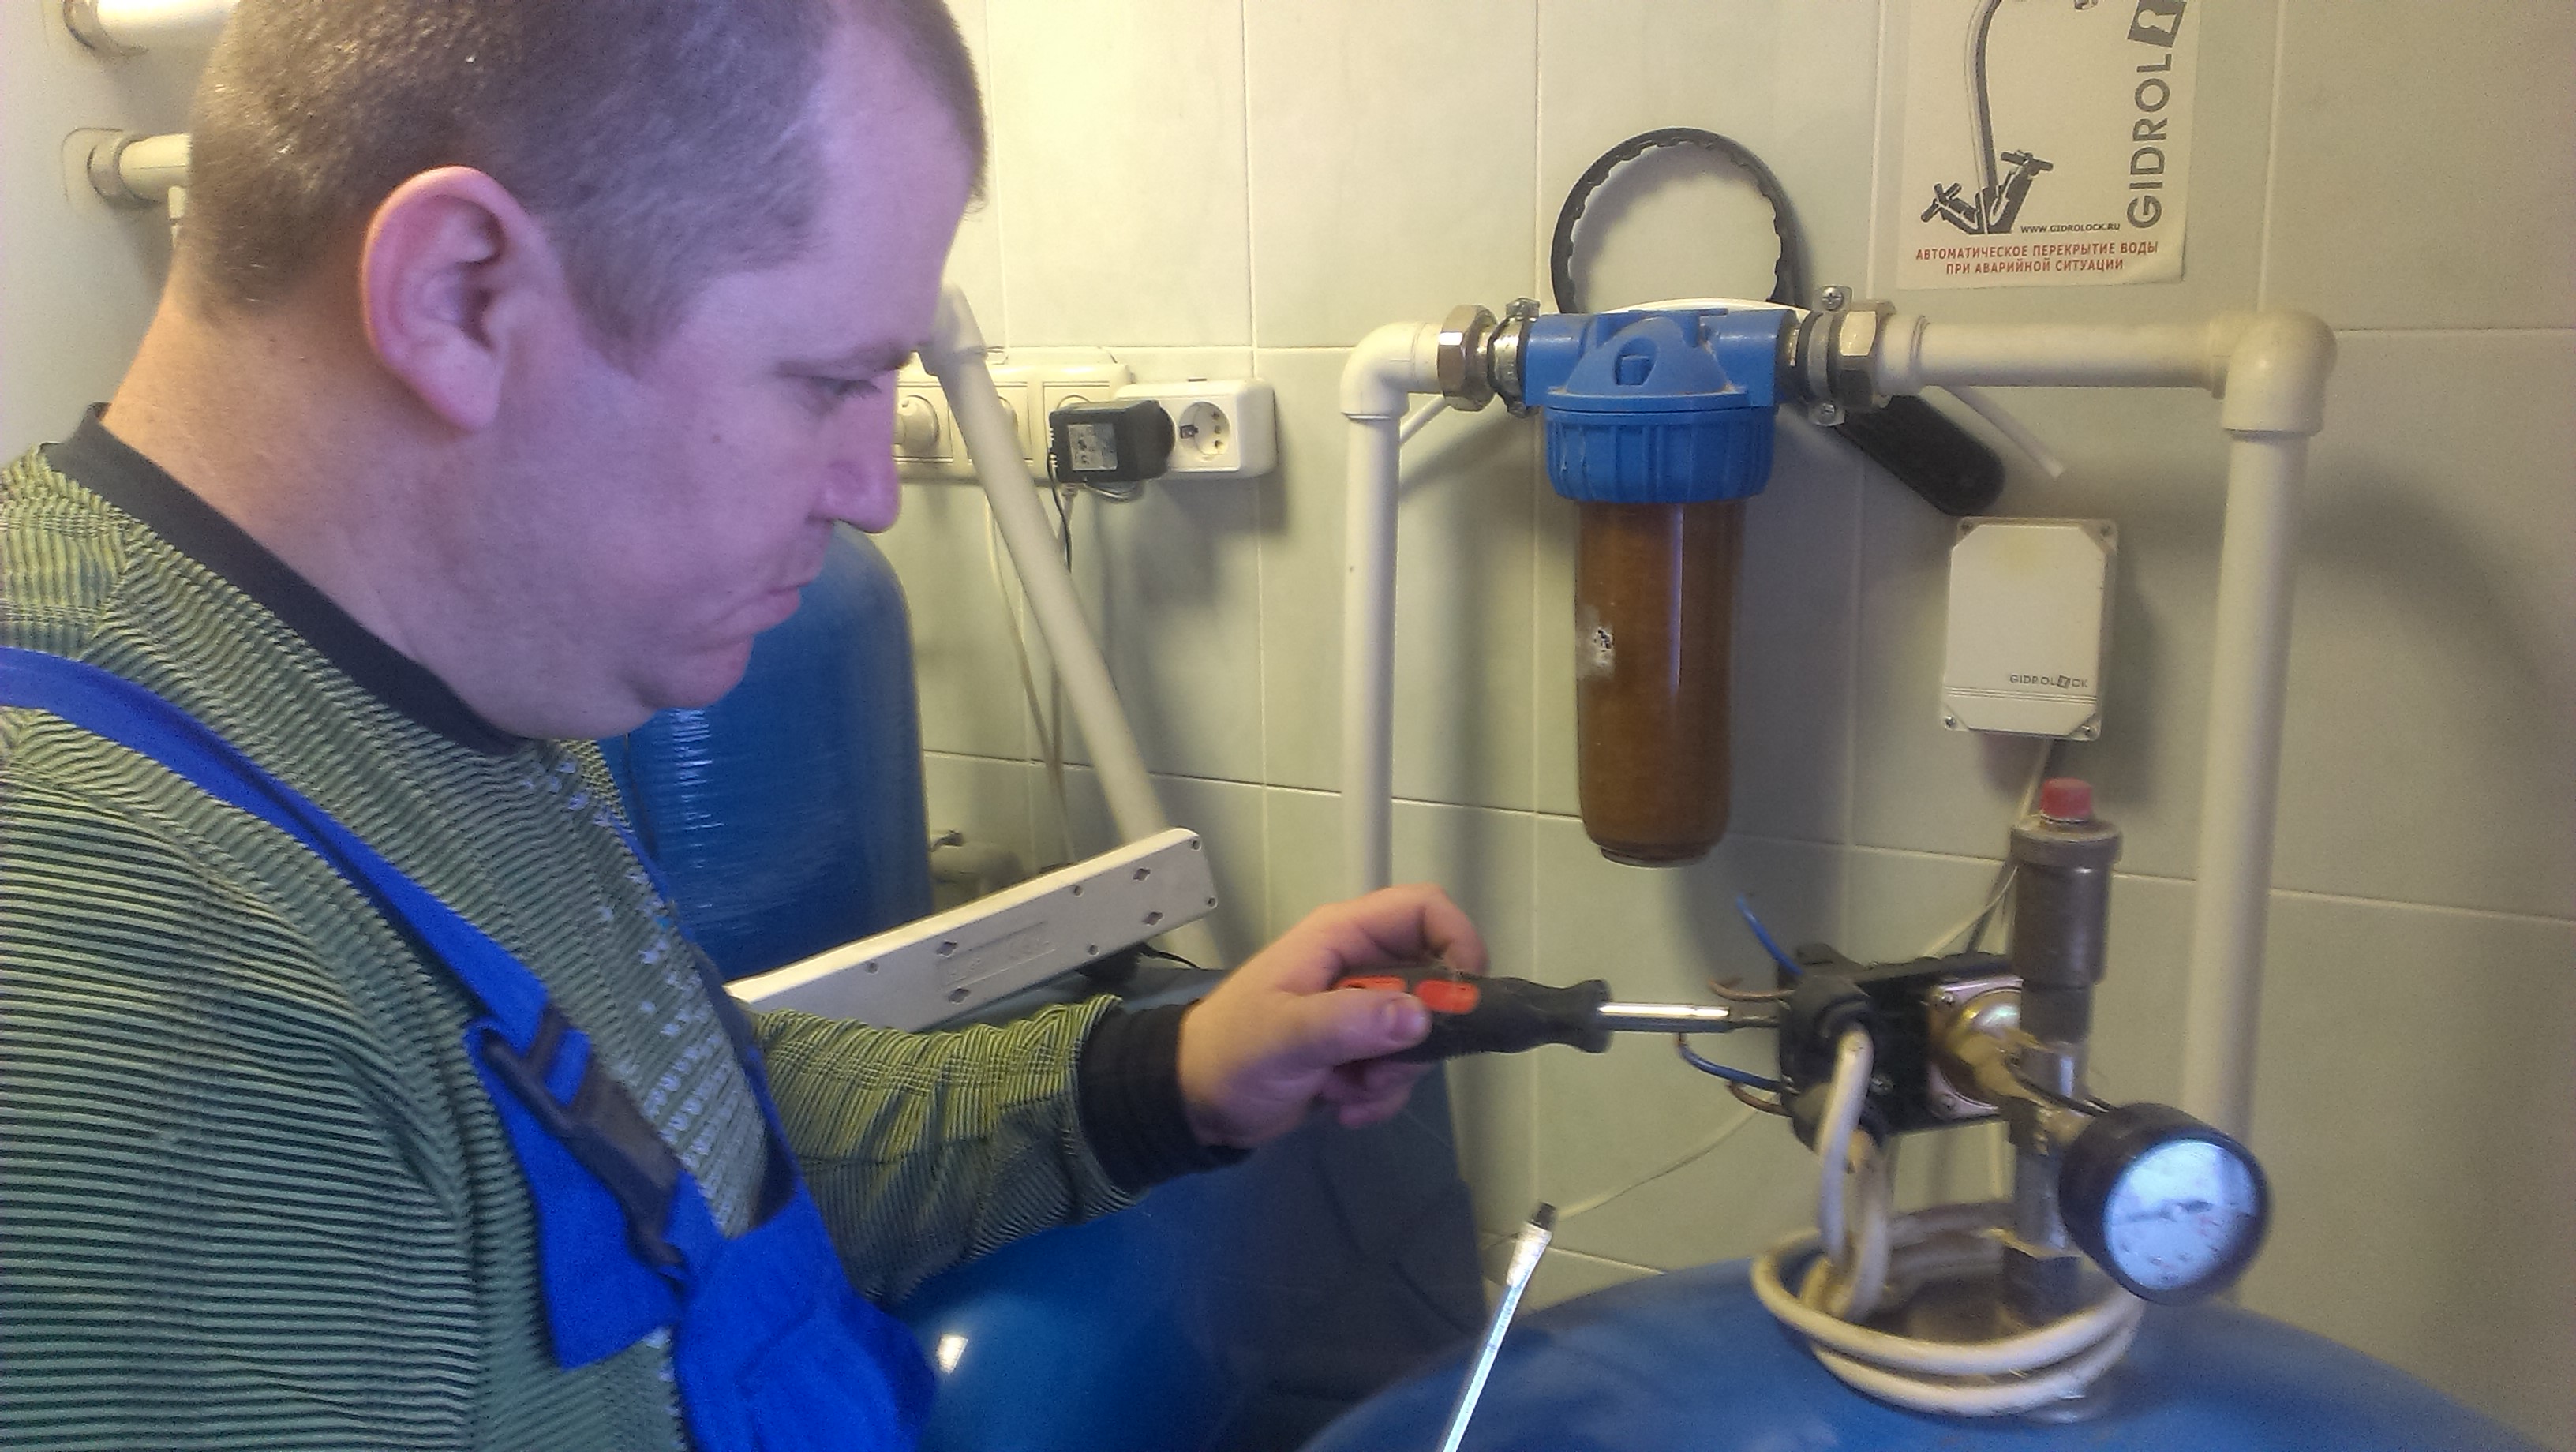
The air pressure in the hydraulic tank is checked and has the optimum value, all the filters in the system are new or replaced, which means that you can proceed to adjust the pressure switch. First you need to turn off the pump, then drain the water from the pipeline, opening the lowest tap whenever possible. After using a wrench or screwdriver, you must remove the plastic case from the relay. Turn on the pump and let the system fill with water.
After the relay has tripped and the pump has been switched off, record the value displayed on the pressure gauge. This value is the upper limit of pressure. Next, you need to partially open the valve located at the highest possible part of the system. In the case of a single-level water collection system, it is necessary to open the faucet that is most remote from the pump.

When the pressure drops to a certain reading, the pump will start. At this point, you need to fix the data with a pressure gauge. Get the value of the lower pressure. If we take it away from the upper pressure recorded earlier, we will get the value of the current pressure difference of the relay.
However, in addition to the pressure value, it is necessary to check whether sufficient water pressure is generated in the highest and most distant tap of the system. If it is weak, then it is necessary to increase the value of the lower pressure.Initially, the device is disconnected from the mains, and then tighten the nut, which is located on a larger spring. In case of strong pressure, the nut is loosened to loosen it.

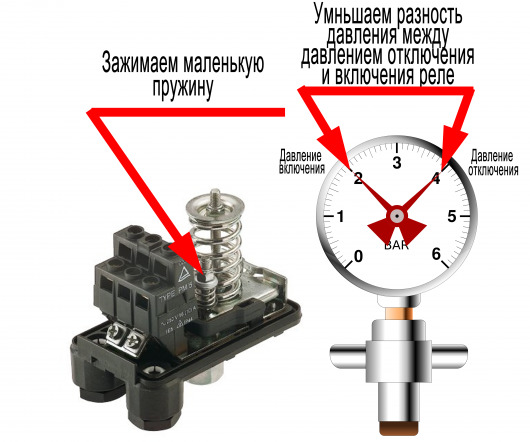
Now you can adjust the pressure difference of the relay found above. Usually the optimum value is 1.4 atmospheres. With a smaller water supply will be more uniform, but the pump will often turn on, which reduces the service life of the system.
If the pressure difference value of the relay is more than 1.4 atmospheres, the system will not work in such a strong wear mode, but the difference between the maximum and minimum pressure becomes quite noticeable. To adjust it, turn the nut on the smaller spring. To increase the differential pressure value, tighten the nut clockwise. If the spring is relaxed, the result will be the opposite.
With fully loosened springs, the setting of the relay is made in a slightly different way. First start up the pump station to produce pressure injection in the system. It is produced to the level until the water from the most distant from the pump tap will flow at an acceptable pressure. For example, at the moment the pressure gauge showed 1.5 atmospheres.This pressure is fixed by disconnecting the pump and pumping station from the power supply.
Then the plastic case is removed from the relay and the nut, which is located on the larger spring, is tightened until a characteristic click, which indicates that the contacts have triggered. Next, the relay housing is installed in place, and the pumping equipment is started. The pressure is injected 1.4 more atmosphere.
After that, the device is again disconnected from the power supply, remove the relay housing and tighten the nut of the smaller spring until it clicks. This is a click-open contact. We get a pressure switch configured to operate with an upper pressure of 2.9 atmospheres and a lower pressure of 1.5 atmospheres. After finishing the settings, return the plastic case of the relay to its place and connect the pumping station to the mains.
Setting the relay when the water is filled with a pear is not performed. This is due to the fact that the upper pressure of the relay is adjusted as the sum of the pressures of water and air. It turns out that if the hydroaccumulator is full, then it is impossible to say for sure how much water there is in the atmosphere, and how much air.

Tips
So that the water in your system always pleases you with your pressure, you should heed the advice on how to adjust the pressure switch.It is especially important to take into account some points that many do not even pay attention to.
Do not set the maximum pressure value (more than 5 atmospheres). And also it should not be the nuts that adjust pressure, tighten all the way. Otherwise, the relay, in general, will not work.
During the operation of the pumping station, you need to look for the presence and pressure of air in the hydraulic tank housing. Some problems can be identified by ear. For example, if there is a reduced air pressure in the reservoir of a hydroaccumulator, the pump will turn on too often. Moreover, the automation will turn it on almost immediately when opening the tap and turn it off when closing. In this case, when the tap is open, the gauge will reach the lower value.
In order for the membrane or the pear to work as long as possible, the air pressure should be set 10 percent lower than the switch-on pressure value when regulating the relay.
It should be noted that the check of the air pressure in the hydraulic tank is made only when the water is drained from the water supply system and the pump is disconnected from the power supply.
If the regulation of the upper value does not turn off the pump, and the pressure gauge shows some one and the same figure, then this indicates a low pump power.It is simply not enough to pump water within the established limits.
Repair the relay is possible, but it is not always appropriate. It is better to purchase a new serviceable relay, since it protects the pear from damage, and the pump from excessive overload. The relay needs constant maintenance, for example, you can lubricate internal parts that rub. This will reduce the resistance, and the relay will operate more accurately.
Achieving the optimum operation of the pumping station is important, and it largely depends on the correctly selected pressure in the hydraulic tank and the correct setting of the relay.
It is best to check the pressure with a car pump, which has a less graduated scale. This will provide more accurate measurements. Some models of pumping stations have plastic manometers, but they do not differ in reliability and accurate indicators. As for electronic pressure gauges, their readings often depend on the ambient temperature and battery level. That is why experts advise to stop the choice on a conventional mechanical pressure gauge in a metal case.
To learn how to properly configure the pressure switch pumping station, see the following video.


